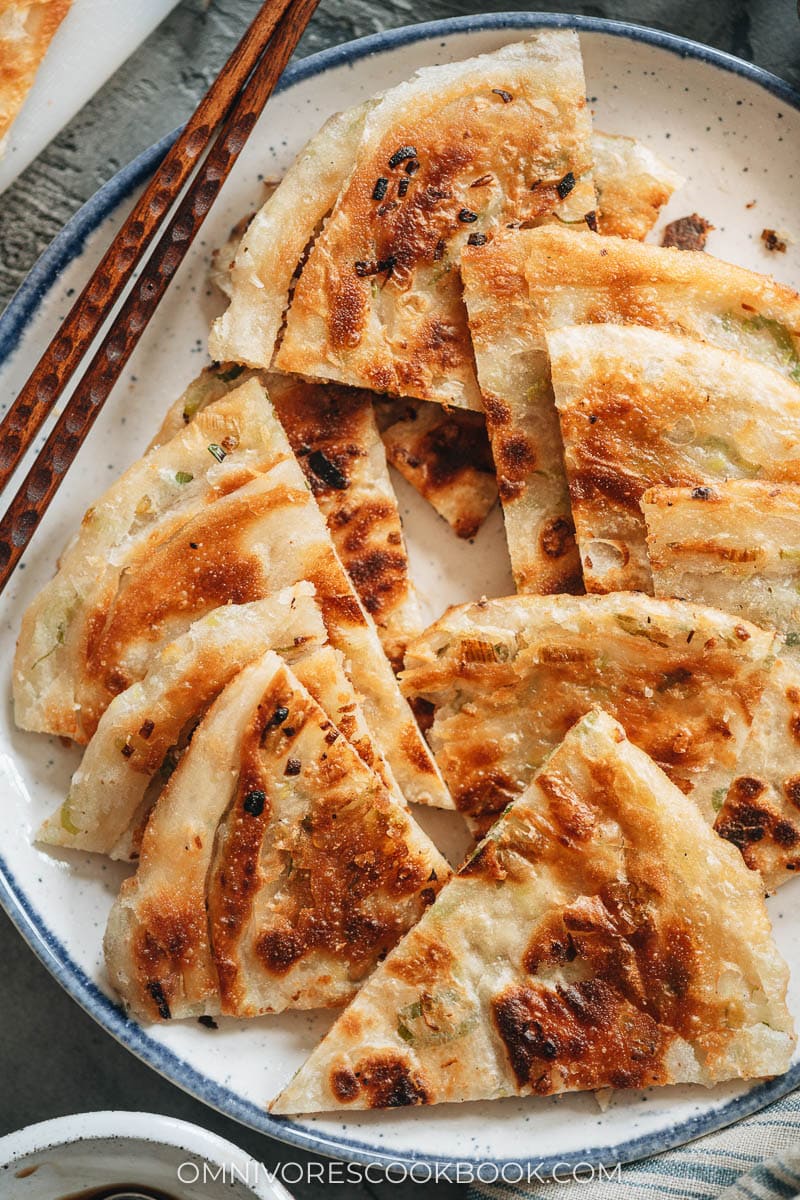
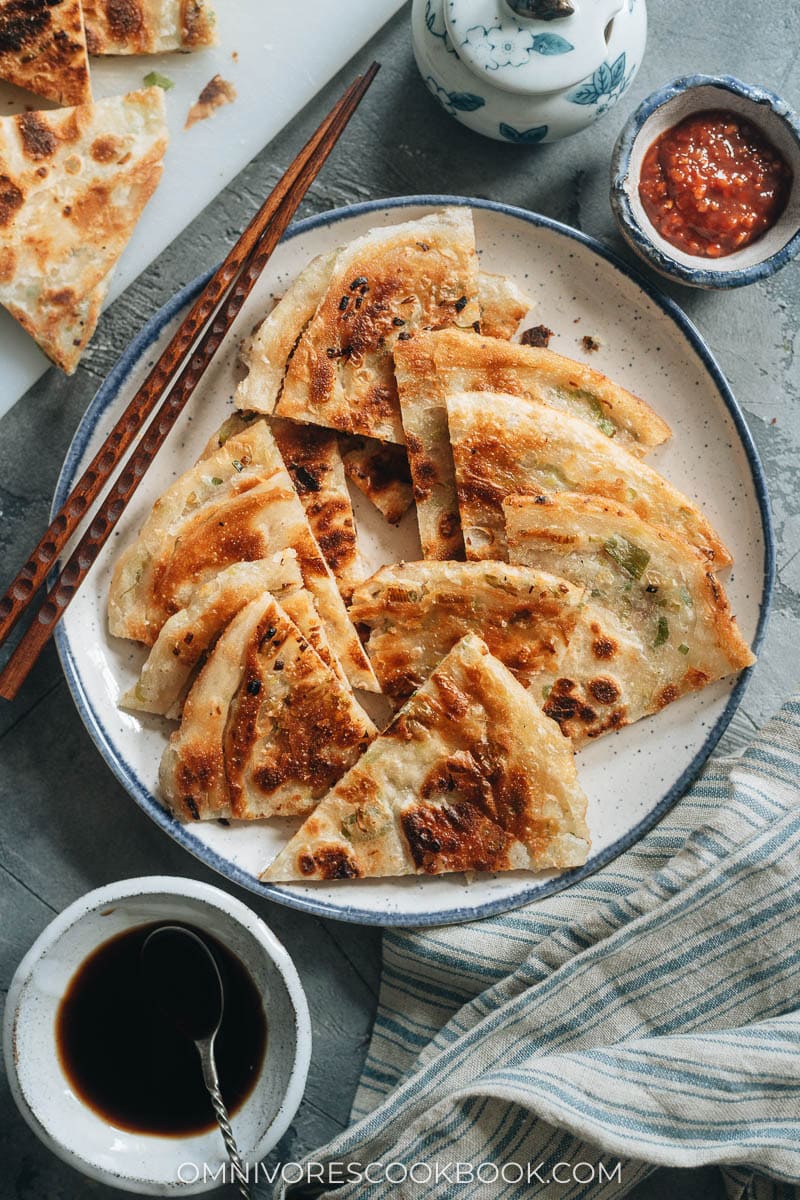
Chinese scallion pancakes are always such a hit at dim sum. You’ve likely seen them as an appetizer or side dish to go with all those stir-fry dishes that you love. But did you know you can make an even tastier version at home?
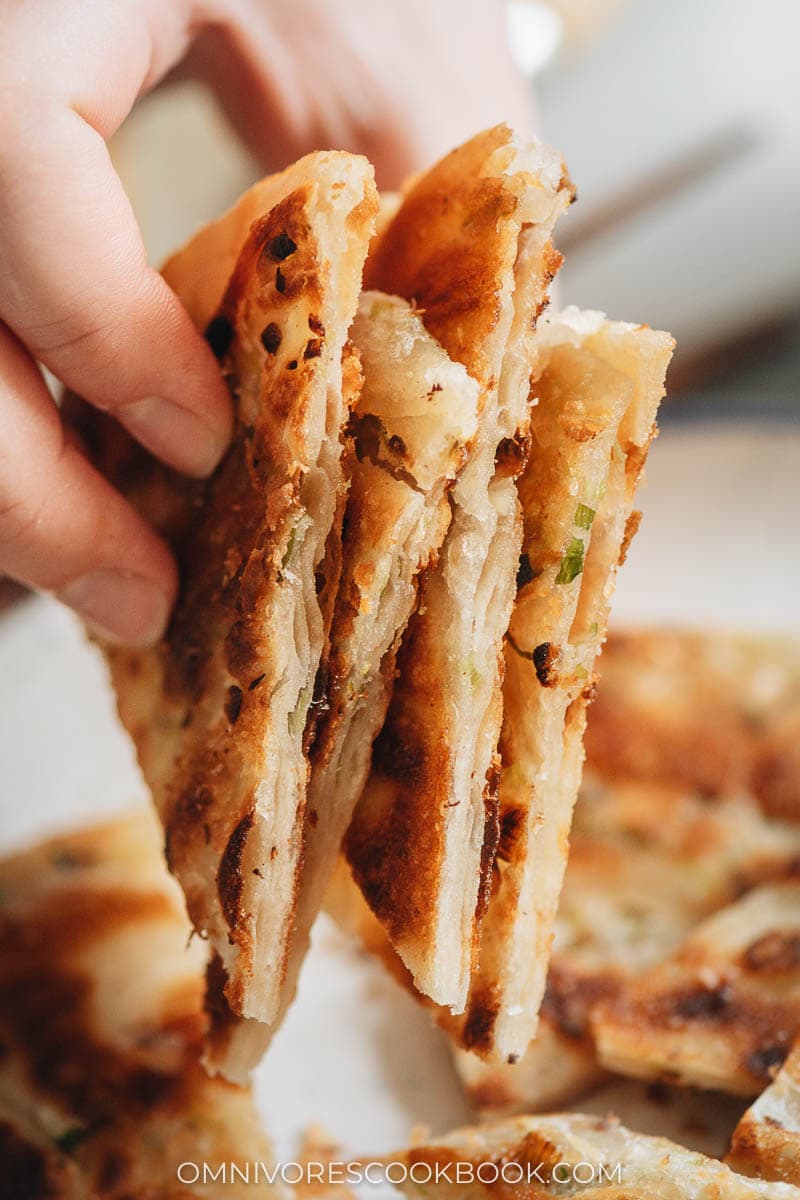
The secret to scallion pancakes is the crispy, flaky exterior that gives way to a slightly chewy interior of thin layers. When fresh-off-the-stove, it is extra crunchy and addictively fragrant. They are such a treat that you can enjoy them on their own, and they’re perfect for snacking much like my Guo Kui recipe. And your kids will adore them!
Once you’ve tried the homemade version, there’s no going back to takeout scallion pancakes.
Why this recipe
I shared a recipe a few years ago and since then I’ve been perfecting the method. Today I want to share an updated version that uses even simpler ingredients to yield a better result.
- A dough that’s easy to work with and takes minimal time to prepare and rest.
- Delightfully crispy and flaky texture with thin layers inside.
- Extra green onion stuffing, giving it a more aromatic flavor.
- Skipped the animal fat while maintaining the flavor and the texture of the dish.
After many tests, we found out the perfect flour-to-water ratio to create a dough that is elastic and not too soft. So you will be able to work in more layers and create a better texture.
My previous scallion pancake used chicken fat. It was super delicious but it did require an extra grocery run. Plus, I’ve received many requests for a vegan/vegetarian version. Using this recipe, you can simply use regular vegetable oil with more green onion to create a very delicious result.
Ingredients
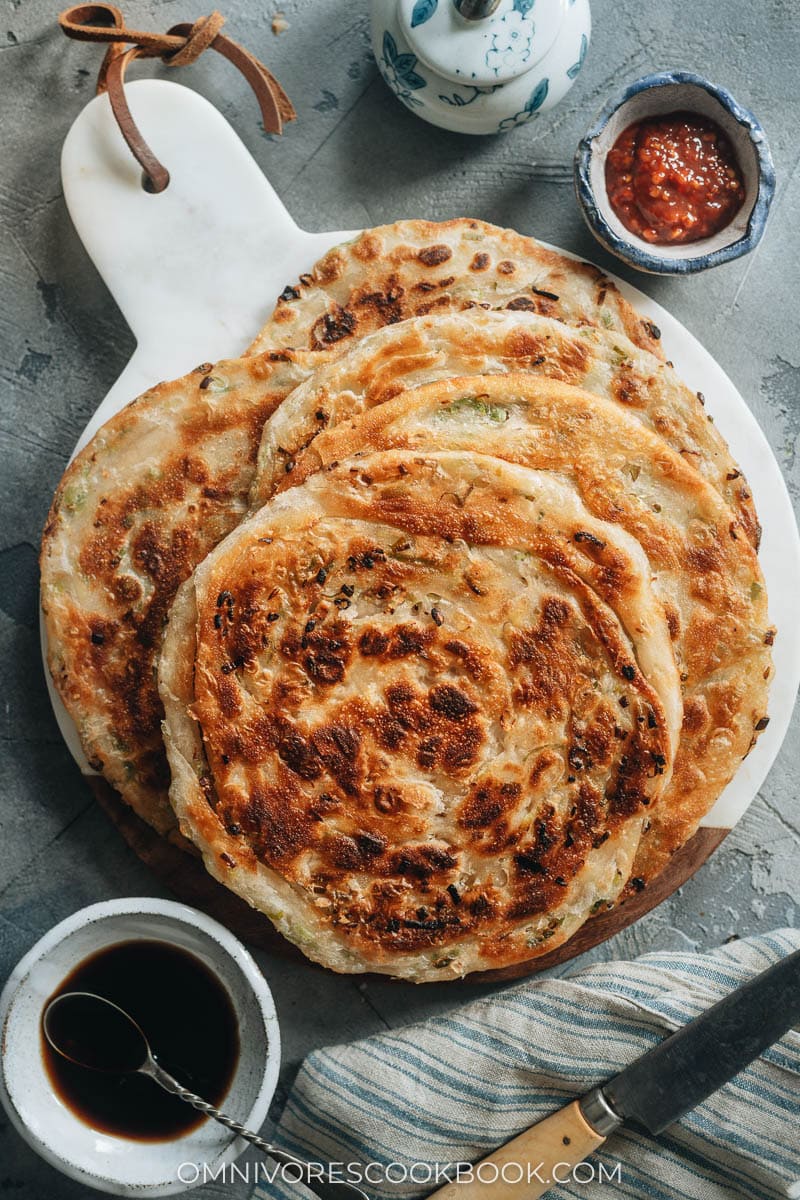
All you need are some basic pantry ingredients to make great scallion pancakes – all-purpose flour, water, salt, vegetable oil, and green onion.
To further boost the taste, you could add some ground Sichuan peppercorns to the filling, but it’s totally OK to skip them.
Extra green onion
How you cut the green onion can greatly affect the outcome of your scallion pancakes. Instead of thinly slicing it into round shapes, I prefer to:
- Halve the scallion lengthwise.
- Thin slice them into very small half-moon pieces.
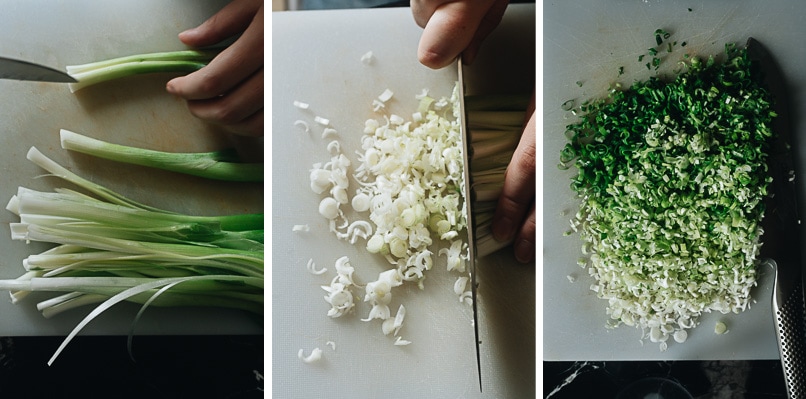
The smaller the green onion pieces, the easier it will become when you roll them up in the dough. This cutting method creates fewer air pockets and allows you to stuff more green onions.
What oil to use
Traditional Chinese scallion pancakes use lard, which makes it easy to work in the layers, and it adds a fragrant taste. I used to enjoy using chicken fat, because it creates an even more fragrant taste.
Over the years, I’ve tried to make my diet healthier, so I’ve tried using plant-based oil instead of animal fat. I found out that many oils work. My favorite is peanut oil, which adds a nutty taste to the pancakes. Olive oil and coconut oil work great too, if you enjoy their unique taste. If you use a neutral vegetable oil, you can blend in 1 tablespoon sesame oil to add fragrance.
Cooking process
Cooking scallion pancakes might look daunting at a glance. My detailed step-by-step photos will help walk you through how to prepare the dough and shape the pancakes like a pro.
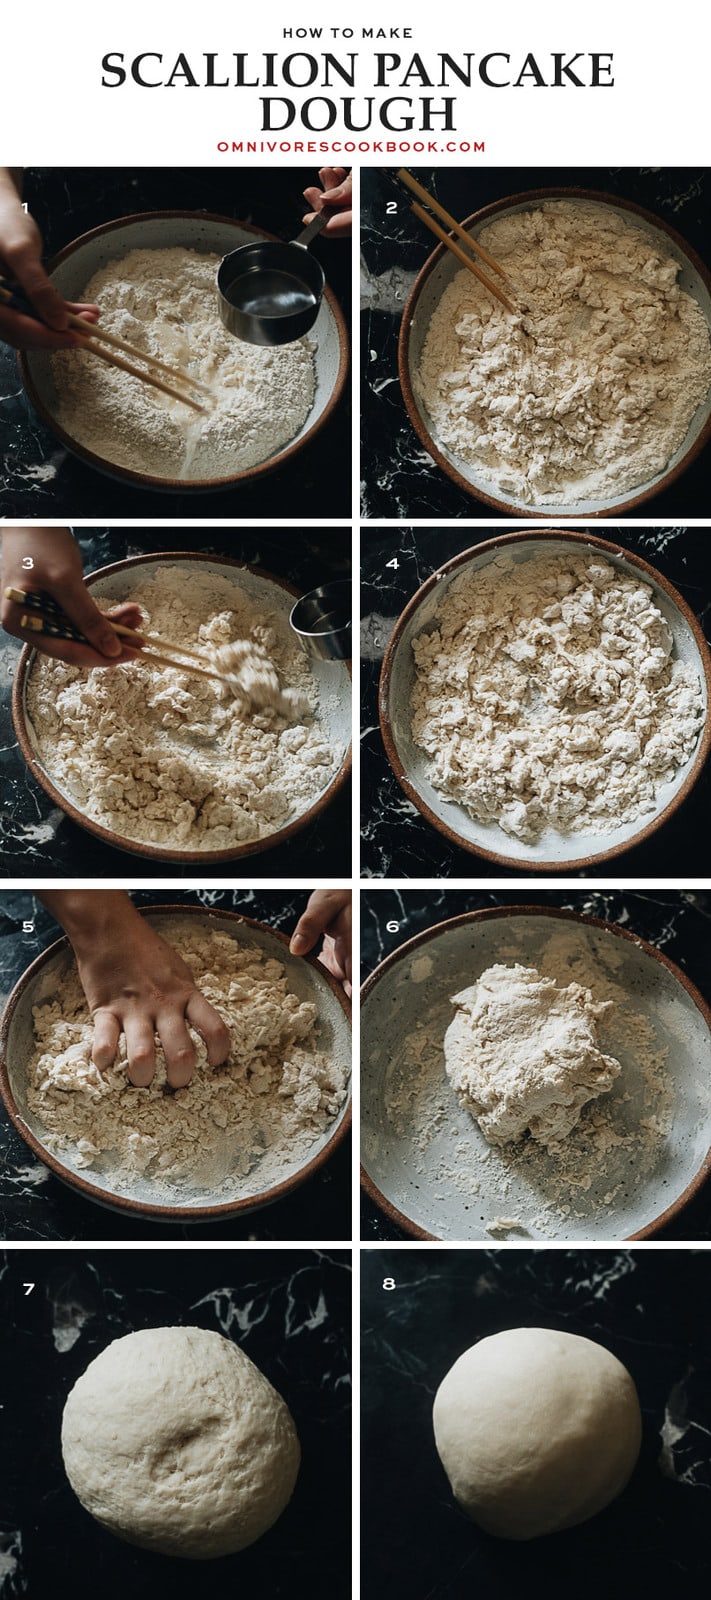
Part 1 – Prepare the dough
If you’re making a big batch of scallion pancakes, you can use a stand mixer to make the dough. But I found it easy enough to knead the dough by hand.
- Slowly add the hot water to the flour and mix it at the same time.
- Mix until the hot water is fully absorbed
- Slowly add the cold water and continue mixing
- Dough flakes should form once all the water is added
- Start to press everything together with your hand
- You can add a bit more water if there’s too much dry flour left. Or you can slightly add a bit more flour if the dough is very sticky. Once you’ve pressed all the dough flakes together, you should have little or no dry flour left.
- Knead about 5 mins until a tough dough is formed.
- Let rest for 20 mins, then knead for 1 minute to form a smooth dough.
Part 2 – prepare the filling
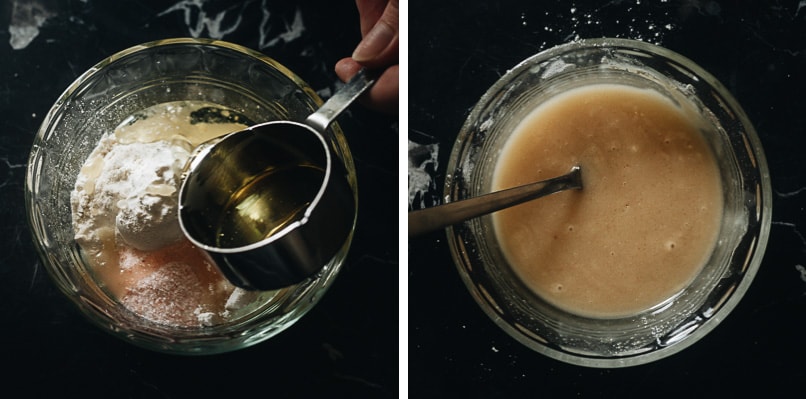
The best way to make the scallion pancake filling is to make an oil flour paste (not simply brushing oil onto the dough). This way you can work in layers easily without pressing out the oil as you roll out the pancakes.
To make the filling, simply mix the dry ingredients with the oil until it forms a smooth paste.
Part 3 – Forming the scallion pancakes
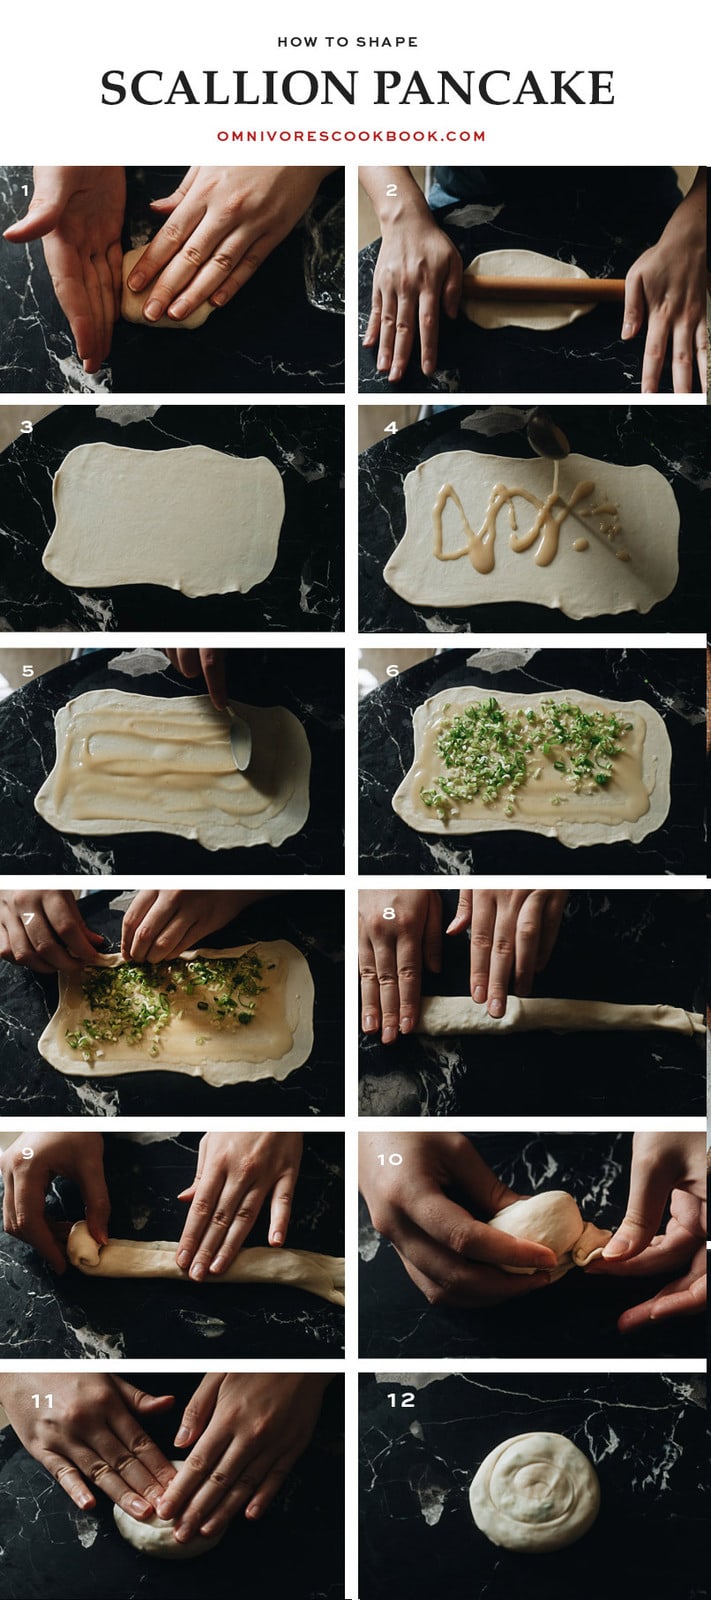
- Cut the dough into 6 pieces and work on the pieces one at a time. Use your hands to shape the dough into a rectangular shape.
- Roll the dough
- The dough should form a very thin rectangle.
- Add the flour oil paste
- Spread out the paste, leaving about 1” (2.5 cm) on both a long and a short end without the filling (your top and left)
- Add the green onion, concentrating most of it towards a long and short end with the filling
- Gently roll up the dough, as tightly as possible
- Press the air bubbles out of the dough strip
- Further roll up the long dough strip
- Tuck the end on the bottom
- Gently press the tall pancake
- Let it rest while you work on the rest of the pancakes
PS. I prefer to rest the formed pancakes for a few minutes before rolling them out, to let the gluten relax, so you can roll them out easily.
NOTE: the photos were shot on the opposite side of the table from where the pancakes were made. If the recipe description looks upside down or confusing, check the video at the bottom of the recipe so you can get a better idea.
Part 4 – Roll and cook the pancakes
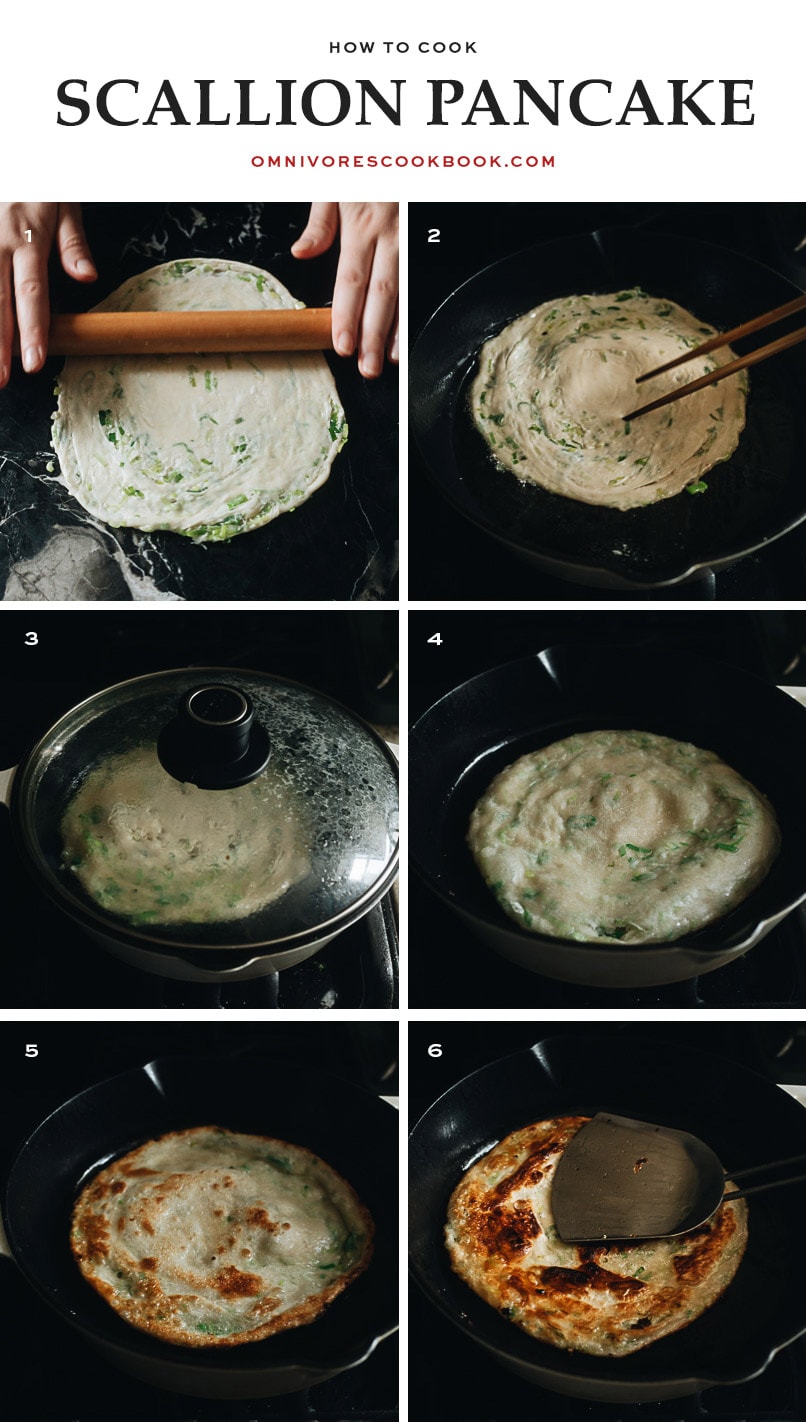
- Roll out the pancakes when you’re ready to cook
- Heat up a pan with a layer of oil on the bottom, add the pancake, and wiggle the pancake a few times so it won’t stick
- Let the pancake cook covered first
- Flip the pancake and cook covered again
- Then cook uncovered, until both sides of the pancake are browned
- You can use a spatula to press the pancake, to help with even browning
NOTE:
- You can either use a cast iron skillet or a nonstick pan. Either will work. If you use a cast iron pan, you will need a generous amount of oil to prevent the pancakes from sticking.
- It’s possible to use less oil to cook the pancakes. But for the best result – golden brown surface and extra crispy texture, you will need a thin layer of oil to cover the bottom of the pan (not just a few drops).
- It’s important to cook the pancakes covered at first, to cook through the interior.
How to store scallion pancakes
The best thing about these pancakes is that they can be stored raw or cooked.
If you’d like to get the best fresh result, freeze the scallion pancakes raw after you roll them out. Carefully stack them with a piece of parchment paper in between, then transfer everything to a large ziplock bag. Press out as much air as possible and seal the bag. Freeze the pancakes for up to 3 months.
To cook the frozen pancakes, simply let them thaw at room temperature for 8 minutes and cook them using the same method.
If you cook all the pancakes and have leftovers (very unlikely!!), you can put them in a bag and store them in the fridge for a few days. You can either reheat them in the microwave or on the stovetop. Note, if you reheat a cooked pancake, it will still be quite crispy but the texture will turn a bit chewier.
Afterthought
Chinese scallion pancakes do take a little time to prepare and the recipe might look ridiculously long. But compared to other classic Chinese dim sum, this one is actually easier to make. If you’re new to dim sum making but love bread, this is a great place to start.
These scallion pancakes taste so good that I would refrain from making them often, because I’ll just eat them all (lol). But these are my favorite and they taste so much better when you make them at home. Since you can make them ahead and freeze them for later, they are perfect when friends or family come by. If you’ve never had them before, you’re absolutely going to be in love at first bite!
Dishes to serve with
Complete your Chinese restaurant style dinner with these dishes below:
- Mapo Eggplant
- Salt and Pepper Pork Chops
- Chinese Egg Drop Soup
- Chicken Fried Rice
- Sweet and Sour Pork
- Chinese Chili Garlic Shrimp
Want to learn more about Chinese Cooking? Sign up my newsletter to receive the 5-Day Chinese Cooking Crash Course and recipe update!
Chinese Cooking Made Easy
Are you new to this website? This free email series is a great place to start. I’ll walk you through a few of my most popular recipes and show you how and why they work. You’ll quickly start to cook better Chinese food in your own kitchen.
Watch video
Chinese Scallion Pancakes (葱油饼)
Ingredients
Dough
- 2 cups all-purpose flour
- 1/2 teaspoon salt
- 1/2 cup boiling water
- 1/4 cup cool water
Filling
- 1/3 cup all-purpose flour
- 1/4 cup peanut oil (or your favorite oil like olive oil, melted coconut oil, melted butter, or melted chicken fat etc.)
- 3/4 teaspoon salt
- 8 green onions , split down the middle and chopped (yield 1 cup)
Cooking
- Vegetable oil for pan frying
Dipping Sauce (Optional)
- 1 1/2 tablespoon soy sauce
- 1 tablespoon Chinkiang vinegar (or rice vinegar)
- 1/4 teaspoon sugar
Instructions
Make the dough
- OPTION 1 – USING YOUR HANDS: Combine the flour and salt in a big bowl. Stir to mix well. Slowly drizzle in the hot water while mixing it with a pair of chopsticks (or a fork), until the water is fully absorbed. Slowly drizzle in the cool water, continuing to stir until many dough flakes form. Press the dough together, and try to combine the wet dough with the dry flour. Drizzle in a little extra water if there is any dry flour remaining. Knead until a firm ball is formed, about 5 minutes. Cover and let rest for 20 minutes.
- OPTION 2 – USING A MIXER: Combine the flour and salt in the mixer bowl with the dough hook attachment. Turn it to the mix setting and slowly drizzle in the hot water followed by the cool water. After a minute of mixing, drizzling in a little extra water if there is any dry flour remaining. Turn to setting 4 and knead until a ball of dough is formed, about 3 minutes. Cover and let rest for 20 minutes.
Make the filling
- While the dough is resting, combine the flour, oil, and salt in a small bowl. Mix until a smooth paste is formed.
- If making the dipping sauce, combine all the ingredients with 1 tablespoon of water in a small bowl and mix until the sugar is dissolved.
Form the scallion pancakes
- When the dough is done resting, knead for another minute until it is smooth. Cut the dough into 6 even pieces, about 76 grams per piece. Form the dough into balls using your hands.
- Work on one dough ball at a time, covering the rest with plastic wrap to prevent drying out. Roll each dough ball into a thin rectangle with a rolling pin, aiming for around 6×10” (15×25 cm). Lift and turn the dough regularly as you roll it to prevent sticking. Spoon about 1 tablespoon of the filling onto the dough and spread it evenly with the back of a spoon, leaving about 1” (2.5 cm) on top and the left end without the filling. Sprinkle 2 heaping tablespoons of green onions onto the paste, concentrating most of it towards one side of the length and one side of the width, creating a loose L shape (see the blog post above for the step-by-step pictures).
- Begin rolling the dough from the longer side of the dough where the green onions are concentrated, until you have one long tube. Lightly flatten the tube using your hand. Pinch the side with more green onion to seal it. Take the sealed side and gently pull and roll it towards the unsealed side, using your hand to smooth out the dough to push any large air bubbles out. Tuck the loose end under the rolled bun. Gently press down on the round disk with your hand to seal the pancake.
- Set the formed pancake aside and cover it with plastic wrap. Repeat steps 4 and 5 until each pancake is ready.
Roll out the pancake
- Roll each prepared pancake into a circle, about 7-8” (17-20 cm) wide. Flip and move it as you do to prevent sticking. Don’t worry if air bubbles burst through or some green onions fall out.
- If you plan to store the pancakes and cook them later, place each pancake onto a piece of parchment paper and stack them. Transfer the pancakes to a large ziplock bag, squeeze out as much air as possible, and seal the bag. You can freeze the pancakes for up to 3 months.
Cook the pancakes
- Heat a 9” (23 cm) cast iron pan (or a nonstick skillet) over medium-high heat and add enough oil to fully coat the bottom. Once the oil is hot, add a pancake. Use a pair of chopsticks (or a spatula) to swirl the pancake around to spread the oil and prevent sticking, for a few seconds. Cover the pan and turn the heat down to medium. Let the pancake cook, covered, for 1 minute. Remove the lid and flip the pancake, cover, and cook for another minute. Remove the lid. Use a spatula to press the pancake, to ensure even browning. Continue to cook, flipping regularly, until both sides are crisp and browned, about 3 minutes. Turn to medium-low heat if the pan gets too hot. Transfer the pancake to a cooling rack or a cutting board to cool. Repeat to cook all the pancakes you plan to serve.
- Once the pancakes are slightly cooled enough to handle, cut into 6 pieces and transfer to a serving platter. Serve hot with the dipping sauce as an appetizer.
Cook frozen pancakes
- Let the frozen pancakes thaw for 10 minutes then proceed from step 8.
Store and reheat cooked pancakes
- Place the leftover pancakes in a ziplock bag by stacking them together. Store in the fridge up to 3 days. To reheat, add a pancake to a pan and heat over medium heat, cook, flip occasionally until the pancakes turn warm throughout.
Nutrition

Did you make this recipe?
I’d love to hear how it turned out for you! Please take a moment to leave a 5-star rating ⭐️ and share your thoughts in the comments further down the page. It really helps others discover the recipe too.
If you give this recipe a try, let us know! Leave a comment, rate it (once you’ve tried it), and take a picture and tag it @omnivorescookbook on Instagram! I’d love to see what you come up with.
Other classic dim sum recipes
- Pineapple Buns (Bolo Bao)
- Chinese Steamed Custard Buns (nai wong bao, 奶黄包)
- Char Siu (Chinese BBQ Pork, 叉烧肉)
- Char Siu Bao (Steamed BBQ Pork Buns) 叉烧包
- Chinese Chive Pockets (韭菜盒子, Chinese Chive Dumplings)
- Chinese Turnip Cake (Lo Bak Go, 萝卜糕)
Lilja Walter is a part of the Omnivore’s Cookbook team and worked closely with Maggie to develop and test this recipe.

Holly
Very nice recipe, it makes a lovely flaky pancake. I used finely diced perennial leeks and chicken fat for my filling. I had a bit of trouble rolling out the coiled pancake without the filling bursting out, but that was probably because I added quite a bit of leek filling.
Sara
I have just made this recipe to accompany my orange tofu dinner, and I must say, this has to be one of the most delicious things I have ever eaten. Dramatic, maybe, but from the very first bite, I was sold. It is a lot of work to prepare, I will not lie, but the result is absolutely worth it. The dough is great to work with, the kitchen smells of delicious scallions and the saltiness and crunchiness of it is a delight. I will absolutely do these regularly. Thank you for sharing this amazing recipe!
圓圓
I loved loved love this and am already looking forward to making it again and refining my technique! THANK YOU for sharing such detailed instructions, the pictures in particular really helped! I will say the time estimates were pretty off for me… it took me about 70 minutes with almost no downtime to prep the six pancakes, freezing 5 and cooking 1. I think this will get faster with practice, but I don’t think I’ll ever get it down to 10 minutes prep。 ;-)
Jen and Linda
My daughter and I made your recipe. We love it. We we’re glad for your video. We live in Florida and no one makes them.
Lauren
These were excellent and not too hard for a beginner! I noticed my pancakes were very crispy and looked almost deep fried on the edges- does this mean they were rolled out too thin?
Maggie Zhu
Not at all depending on how you like the texture. I love the crispy edges and there’s nothing wrong to have a bit of dough that’s extra crispy. But if you prefer the chewier texture, you can roll them out a bit thicker the next time 🙂
Suse
Hello, the written instructions say to use 50g of all purpose flour for the filling, but in your video it says 95g. How much should it be? Thanks!
Suse
Oh nevermind, I saw someone asked the same question above and you answered it already.
Sorry!
Jennifer
YUM! your videos and images are beautiful. thank you!!!
Holly Hon
Great instructions! Have you ever tried making a gluten free version? I love scallion pancakes but I developed gluten sensitivities the last 15 years or so and have not been able to enjoy scallion pancake the same. I tried different gluten free flour and recipes but none of them quite taste like the real thing particularly with the texture. Can you develop a gluten free version ? 😊
Jess
THE BEST RECIPE EVER! So tasty and flaky. My family said it tasted just like the ones from a restaurant/shop. Really appreciate there is a video which is super easy to follow.
I’ve tried other recipes which are highly rated but nothing is as good as this one.
I saw the comment from a lady who gave it a bad review for taste and I disagree with her, she clearly has never tried the original pancake before.
Definitely will be making this again, thank you Maggie!
Libby
I made them last night when a friend came over (yay for vaccine and having friends over again!). They turned out great! The dough was super easy to work with and I could roll out without sticking (not like pie dough!). I used 1/4 whole wheat flour. Served them with pan seared green beans in a soy sauce/garlic/ginger marinade. So satisfying!
Quinn
These require a bit of effort, but they are so worth it. My wife (born and raised in Beijing) claims these are the best she has ever had. Definitely not good for the waistline, but oh WOW were they good. No need to worry about leftovers and reheating because if you leave them on a plate in the kitchen I guarantee that by morning they will all be gone. Actually, I saved a few triangles to fry with eggs for my son’s breakfast the next day. Wow, these are really, really good.
Thanks Maggie!
Priz
I love these, but my dough is hard to roll so they end up very thick and not so good :(, any recommendations ?
Peppy
I tasted my first scallion pancake at ChunBo restaurant in Newton, NJ eons ago. Over the course of few decades I could not fine recipes nor restaurants that could emulate the flavor. Your recipe finally did! It was so flavorful, the texture perfect, the crispiness divine and the layers wonderful to behold. I can’t believe how easy it is to make. I thank you very much for sharing this fantastic recipe. I did not make any adjustment to the pancake recipe but I did add mirin, chopped ginger, and scallion to the sauce. Yum yum yum…
Gayle
Hi Maggi… I love this recipe. However, I am confused about the APF in the filling. When I measured by cup, ie 1/4 cup + 2bsp, it came up to 38g and not 95g as stated in your recipe. Is there a typo in the recipe? Or cup measurement in America is not the same as in Asia? (I live in Jakarta). Also I find that chilling the dough does improve its elasticity and makes dough handling easier. Love the one cup of chopped green onions inside the filling. Bold and flavorful!
Maggie Zhu
Hi Gayle, thanks for leaving a good review and I’m glad to hear you like the pancakes.
And yes I did made a mistake! Thanks so much for catching it. The 1/4 cup + 2 TSB is 50 g when I measured it. Definitely not the 95 g. I just updated the recipe.
Emma
I loved this recipe! I’ve made it a few times now and I love it every time I fry them up.
Ashley
I’ve never had Chinese scallion pancakes before. These tasted great. I’m always a little hesitant when it comes to making doughs, but these turned out beautifully.
Jennifer
I just made these last night, and everyone loved them! I froze the rest, followed the instructions for thawing/cooking, and they turned out perfectly again. This recipe took some time (mostly rolling out the dough), but was worth it.
Jennifer in Colorado
Turned out perfectly, instructions were very clear. Thank you for another great recipe!
Ann
Thanks for all your wonderful recipes! I tried this one and the flavors were great however the consistency of my dough and oil mix were dryer / thicker than what appears in the video. I used the gram measurements and AP flour. Are your cup to grams conversion as written? I’m a bit confused since now when I look back at it it seems like 1 cup of AP flour normally converts to 120grams? Thanks.
Maggie Zhu
Really sorry about this! I just realized that I converted the grams incorrectly and I just updated it.
Tyas
Been making my way through the recipes in this blog and just found another winner. So good!