 | Learn how to make authentic Chinese char siu bao just like a dim sum restaurant. The buns have very soft, fine, and fluffy bread with a juicy tender pork filling. My recipe includes detailed step-by-step photos and a video to help you achieve the best result in your own kitchen.")
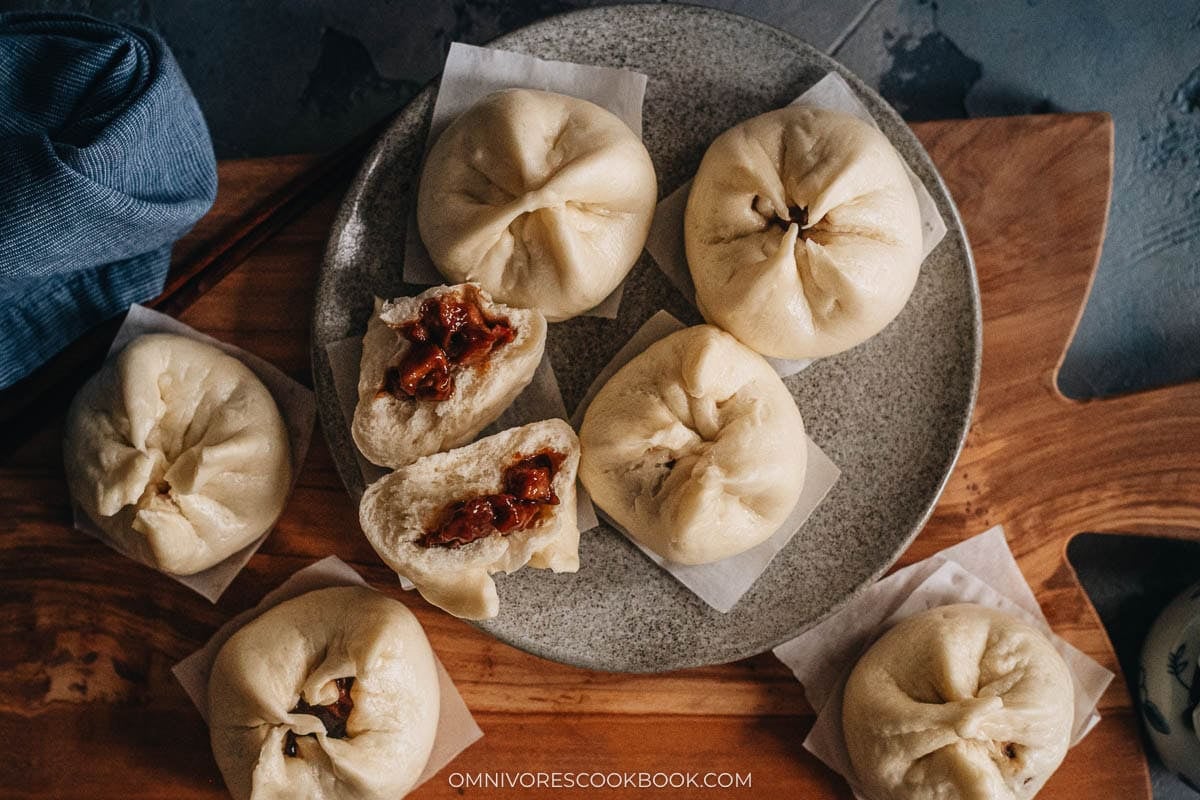
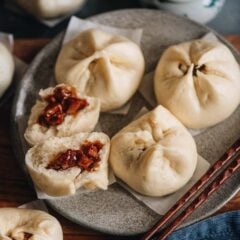
Char siu bao, or 叉烧包, is the one dish that defines dim sum for most people. The bun itself is impossibly soft, almost cloud like, with a smooth surface and a natural crack on top that reveals the sticky, glazed pork filling inside. In Cantonese dim sum houses, they arrive in bamboo steamers stacked 3 high, and they never last more than a minute on the table.
I started making these at home because the restaurant versions near me always used fatty pork that left the filling greasy. I wanted that same saucy, sweet glaze and cloud like dough, but with leaner meat that let the sauce really shine. After testing different flours and wrapping techniques, I finally nailed a version that my colleagues fight over whenever I bring them to a work lunch.
The process has 3 main parts: a simple yeast dough made with low gluten flour, a thick char siu filling cooked on the stovetop, and a specific folding technique that makes the buns crack open during steaming. I use a stand mixer to handle the dough so most of the work is hands off. The buns freeze well, so one batch covers weeknight dinners and last minute entertaining for weeks. I highly recommend making this recipe following my step by step directions and tips below or simply watch my easy to make Char Siu Bao video.
 | Learn how to make authentic Chinese char siu bao just like a dim sum restaurant. The buns have very soft, fine, and fluffy bread with a juicy tender pork filling. My recipe includes detailed step-by-step photos and a video to help you achieve the best result in your own kitchen.")
Ingredients
There are only 3 parts to this recipe: the dough, the filling, and the sauce that brings the filling together. Most of the filling ingredients come straight from my pantry.
Dough: I use warm water, yeast, sugar, low gluten flour (or cake flour), baking powder, and shortening. The low gluten flour is what gives the buns the ultra fine and smooth texture you get at dim sum restaurants.
Filling sauce: I cook chicken stock, hoisin sauce, oyster sauce, Shaoxing wine, sugar, garlic, and five spice powder together, then thicken it with a cornstarch slurry.
Char siu pork: I use leftover homemade char siu, chopped into small chunks. Store bought BBQ pork from a Cantonese restaurant or even deli roast pork works too.
My Technique Explanation
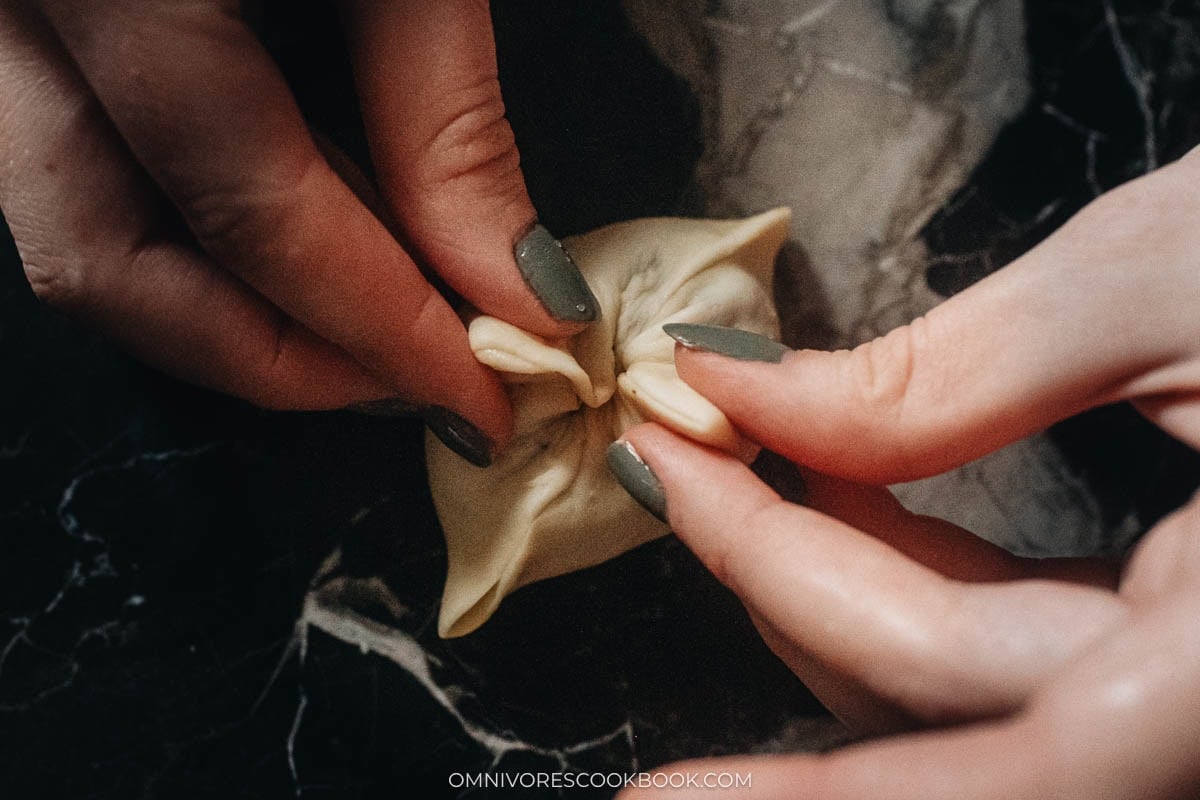
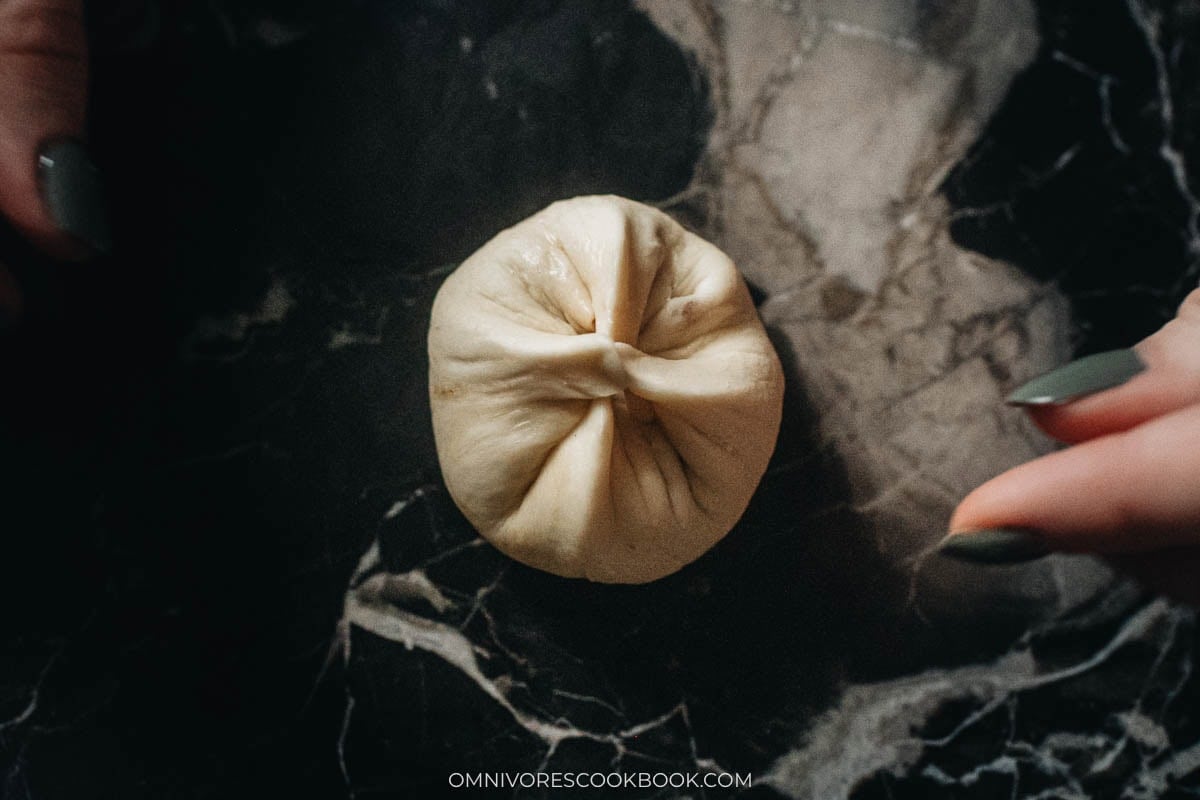
The wrapping technique is what separates homemade char siu bao from regular steamed buns. I use a 2 step fold that creates a cross pattern on top of each bun.
First, I pinch 2 opposite sides of the dough together, then fold in the remaining 2 sides and press the edges to form a square with a cross on top. Then I gather the 4 pointed corners and press them together loosely, not too tight. That loose seal is what allows the dough to crack open during steaming, giving the buns their signature look.
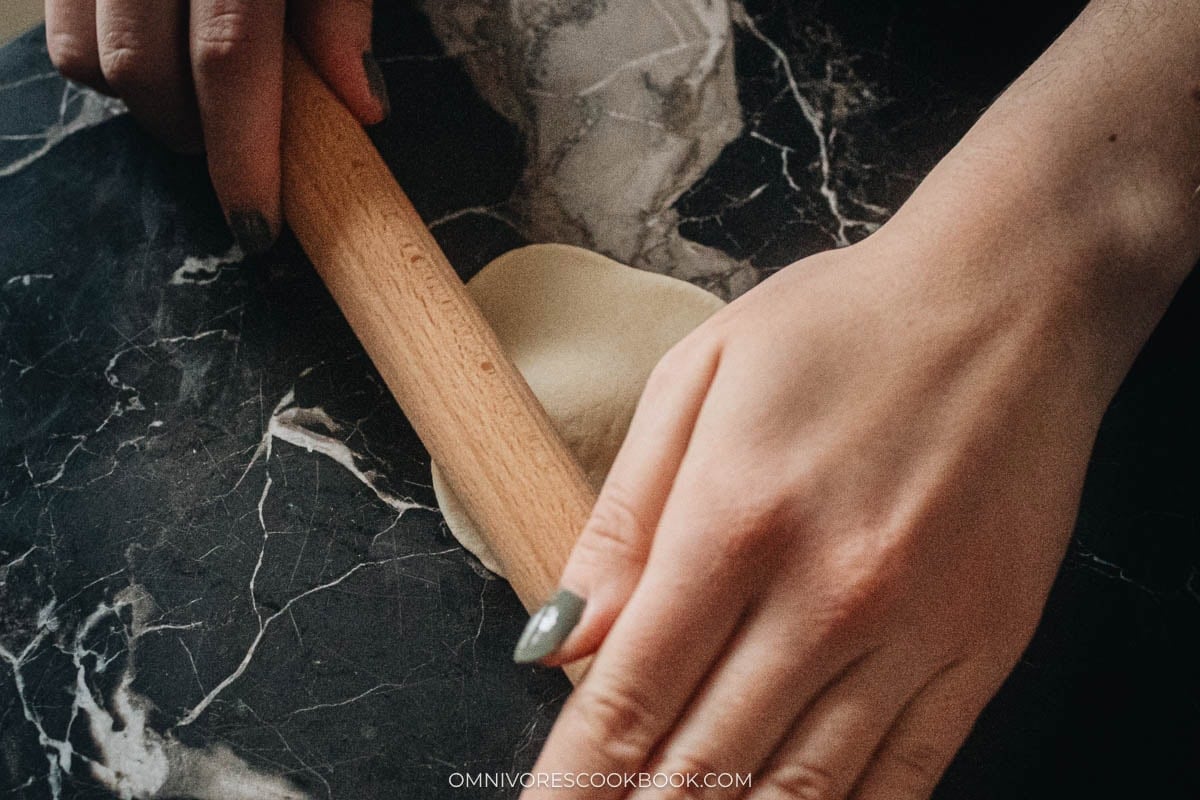
I also roll the dough thicker in the center and thinner at the edges. This matters because the folding process adds extra layers of dough on top, so starting thicker in the middle gives an even thickness in the finished bun.
How to Make
1. Activate the yeast: Warm the water to 100 to 110°F (38°C). Add the sugar and yeast, stir, and let it sit for 5 minutes until bubbly.
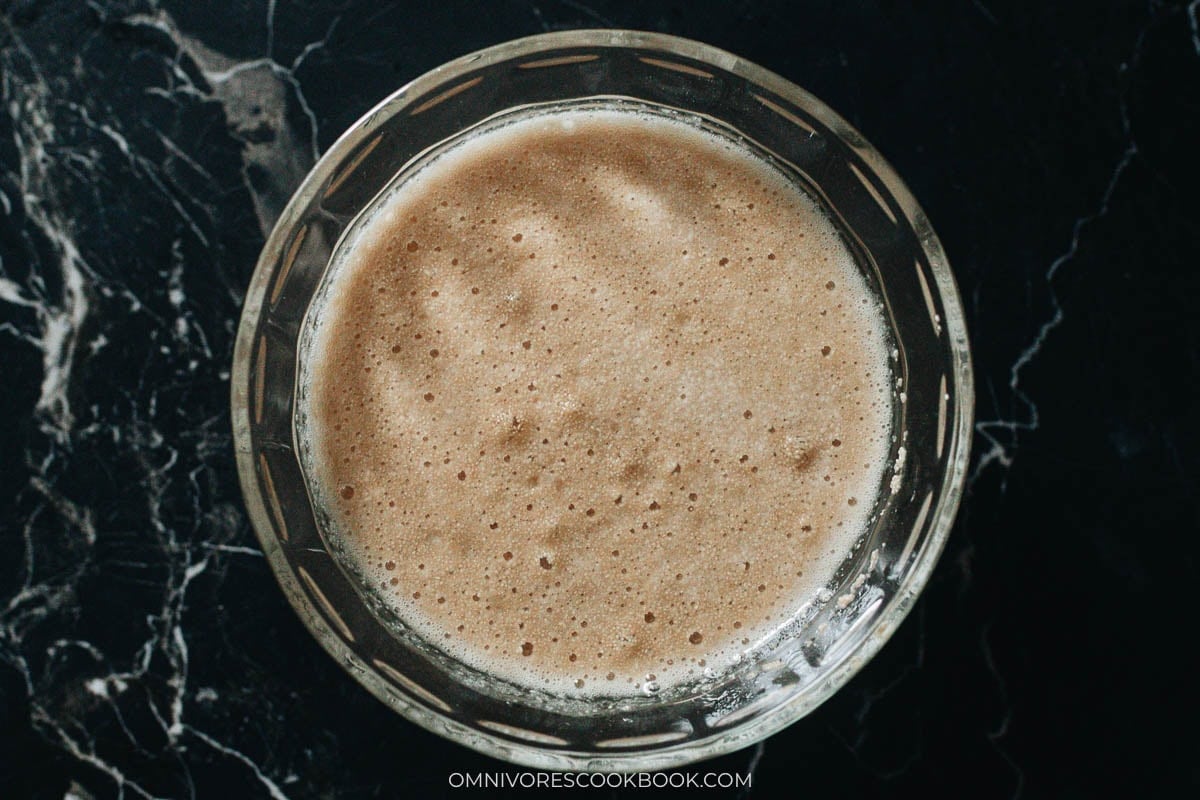
2. Knead the dough: Add the flour and baking powder to the mixer bowl. Pour in the yeast mixture and stir with a spatula until the liquid is just absorbed. Attach the dough hook and knead on medium speed for 10 minutes until smooth. Add the shortening and knead for another 5 minutes. The dough should be soft and lift cleanly from the bowl.

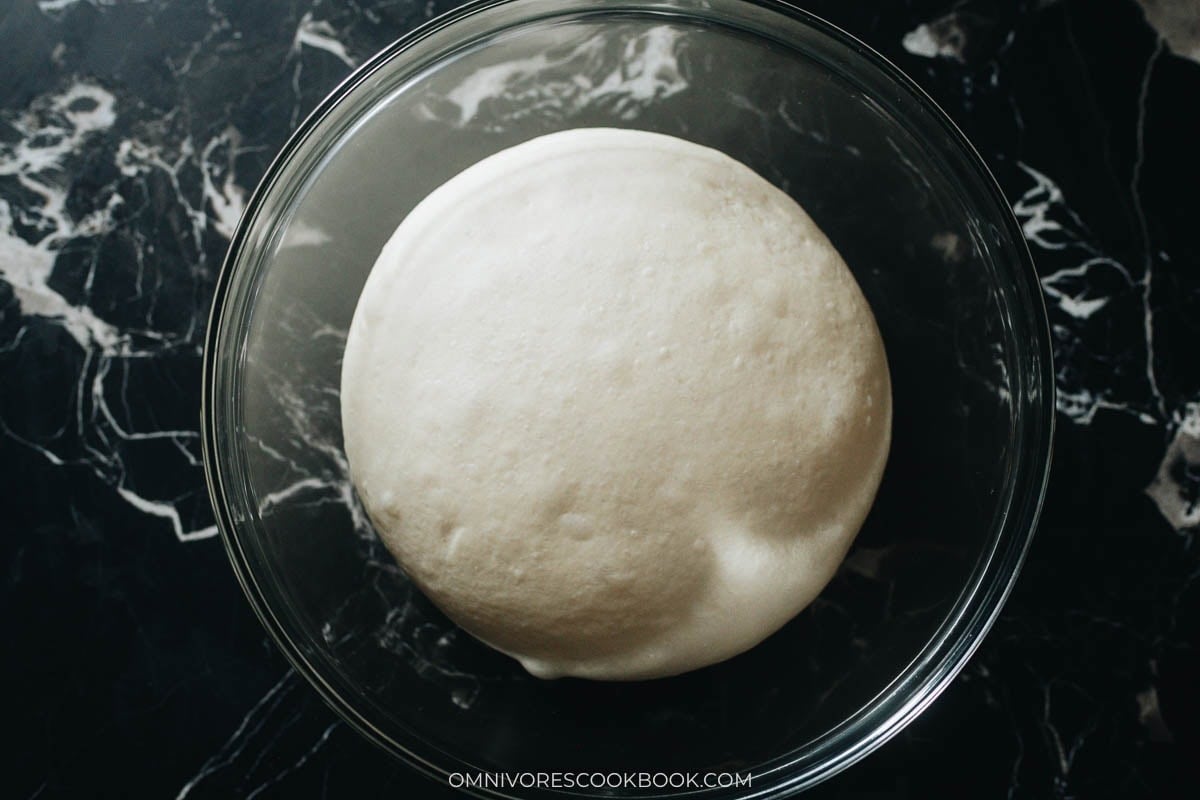
3. First rise: Transfer the dough to a lightly greased bowl, cover with plastic wrap, and let it rise in a warm spot until tripled in size, about 2 hours.
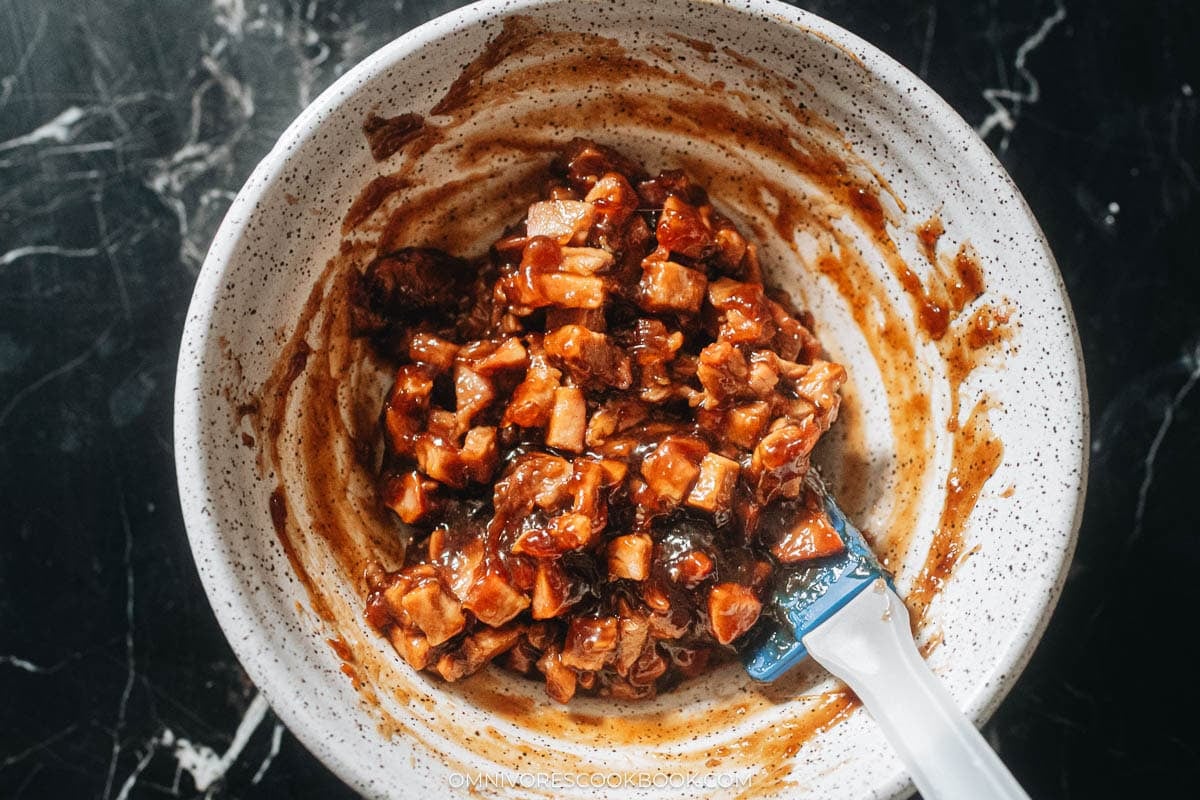
4. Make the filling: Combine the chicken stock, hoisin sauce, oyster sauce, Shaoxing wine, sugar, garlic, and five spice powder in a saucepan. Bring to a boil, then simmer for 1 minute. Remove from heat and let cool for 3 to 5 minutes. Mix the cornstarch with 1 tablespoon of water, stir into the cooled sauce, then return to medium low heat and stir constantly until thickened. Toss the sauce with the chopped char siu pork.
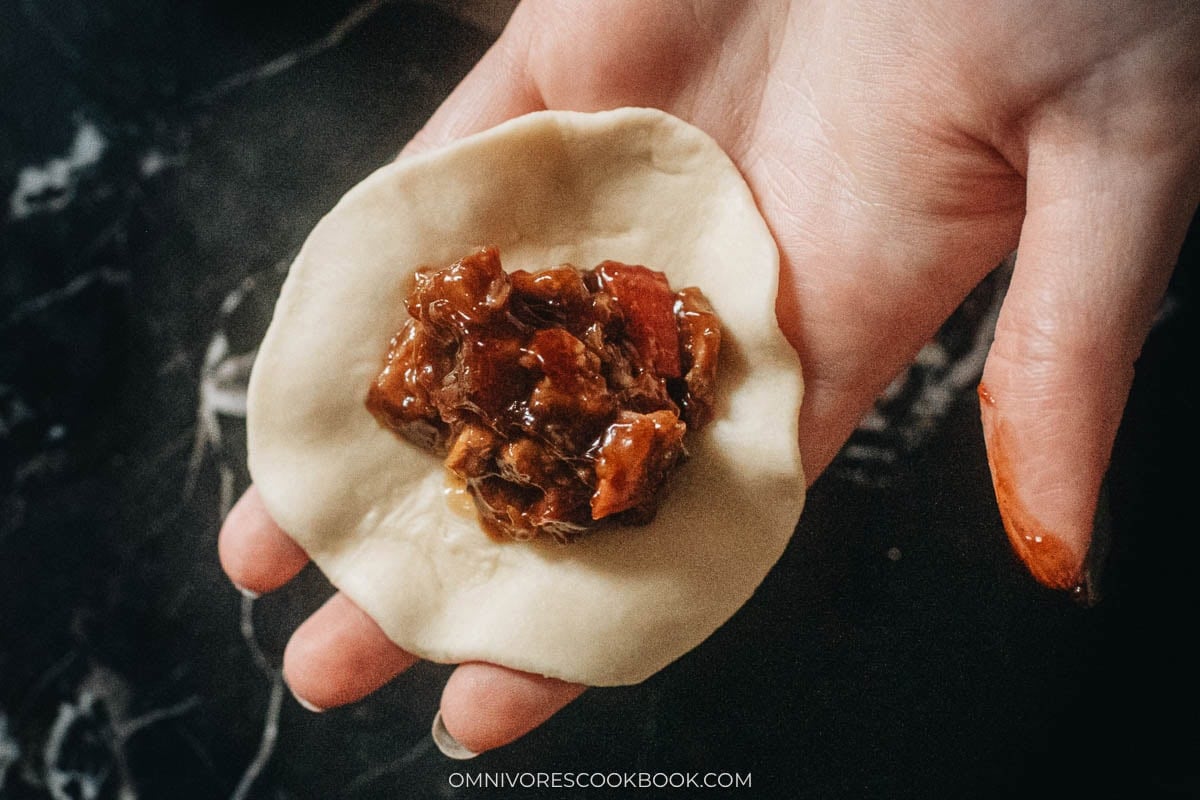
5. Shape the wrappers: Punch the air out of the risen dough. Divide into 16 even pieces (about 27 g each). Roll each piece into a disk that is thick in the center and thin at the edges, about 2.5 to 3 inches wide. Keep unused dough covered to prevent drying.
6. Fill: Place a heaping tablespoon of filling in the center of each wrapper.
7. Start wrapping: Pinch 2 opposite sides together.
8. Fold: Then fold in the other 2 sides to form a square with a cross on top.
9. Finish wrapping: Gather the 4 corners and press them loosely together. Place each bun pleated side down on a parchment square.
10. Second rise: Cover the wrapped buns loosely and let them rest for 20 to 30 minutes before steaming.
11. Steam: Bring water to a boil in your steamer. Place the buns on the rack with at least 2 inches of space between them. Cover and steam for 10 minutes. Remove from heat, uncover carefully, and let the buns cool for 5 minutes before serving.
Cooking Tips To Consider
Use low gluten flour for the best texture: It gives the buns a smoother surface and finer crumb than cake flour. I find it at Asian grocery stores labeled 低筋面粉. Cake flour works as a substitute but the surface will be slightly less even.
Let the sauce cool before adding the cornstarch slurry: If the sauce is too hot, the cornstarch cooks on contact and forms lumps instead of thickening evenly. I wait 3 to 5 minutes after removing from heat before stirring in the slurry.
Work in small batches: I wrap and steam 3 to 4 buns at a time rather than all 16 at once. This way the first batch has time to rest while I shape the rest, and I do not end up with dried out dough sitting uncovered.
Do not seal the buns too tightly: The loose fold is what makes the buns crack open during steaming. If I pinch the corners too firmly, the top stays sealed and I lose that signature split.
Steam over medium high heat, not full blast: Too much heat causes the buns to collapse when I open the lid. A steady medium high keeps the steam consistent and gives the buns a smooth, even rise.
How to Serve
I bring these to work lunches more than any other recipe I make. I pack 2 or 3 in a container and reheat them in the office microwave for about 30 seconds, and people always ask what smells so good. At home I eat them as a snack between meals or as an appetizer before a bigger spread. They go fast, so I usually double the filling and freeze half the batch unsteamed.
For a dim sum night at home, I prepare a bamboo steamer with these alongside Chinese egg rolls and scallion pancakes. I also like pairing them with wonton soup for a more filling meal. I let my parents grab buns straight from the steamer because they are best when the dough is still warm and the filling is still sticky. So good!
Frequently Ask Questions
What is the difference between low gluten flour and cake flour?
Low gluten flour, or di jin mian fen (低筋面粉), is a blend of wheat flour and wheat starch that produces a very smooth, fine textured dough. I tested both side by side and the low gluten flour gives a slightly smoother surface and more even crumb. Cake flour produces a whiter bun but the surface can be a little uneven.
Can I use regular roast pork instead of char siu?
Yes, I have done this when I did not have leftover char siu on hand. The filling sauce in this recipe is flavorful enough to carry regular deli roast pork. I chop it the same size and toss it with the sauce. I mean, the taste is not identical but it is still really good.
How do I store and reheat leftover char siu bao?
I refrigerate leftover buns in a sealed container for up to 3 days, or freeze them for up to a month. To reheat from the fridge, I microwave for 30 seconds or re steam for 3 minutes. For frozen buns, I thaw them completely in the fridge first, then reheat the same way.
Want to Save This Recipe?
Enter your email below & we’ll send it to your inbox. Plus get great new recipes from us every week!
Watch video
Char Siu Bao (Steamed BBQ Pork Buns)
Ingredients
Dough
- 125 g (1/2 cup) warm water
- 7 g (2 teaspoons) active dry yeast
- 60 g (4 tablespoons) sugar
- 250 g (1 2/3 cup) low-gluten flour (or cake flour)
- 7 g (2 teaspoons) baking powder
- 7 g (1 1/2 teaspoons) shortening
Filling
- 1/4 cup low-sodium chicken stock
- 2 tablespoons hoisin sauce
- 2 tablespoons oyster sauce
- 2 tablespoons Shaoxing wine (or dry sherry)
- 1 tablespoon sugar
- 1 clove garlic , grated
- 1/8 teaspoon five spice powder
- 1 1/2 tablespoon cornstarch
- 1 1/2 cups Char Siu (Chinese BBQ pork) , chopped (*Footnote 1)
Instructions
Prepare the dough
- Add the water into a small bowl and warm to approximately 100-110°F (38°C), about 30 seconds in the microwave. The water should be warm, just a bit above body temperature. Add the sugar and active dry yeast, stir to mix well. Let sit for 5 minutes so the yeast will activate.
- While the yeast activates, add the cake flour and baking powder into your mixer bowl.
- Once the yeast is activated, you should see bubbles on the surface of the mixture. Pour it into the mixer bowl. Mix it with a spatula a few times, until the liquid is just absorbed by the dry ingredients.
- Install the dough hook on your mixer. Start at low speed, then gradually increase to speed setting to 6 out of 10. Knead for 10 minutes, until the dough is very smooth. Stop the mixer halfway through and scrape the dough from the sides of the bowl.
- Add the shortening. Knead on level 6 for another 5 minutes. The dough should be soft, smooth, and easily lifted from the bowl without sticking to your hands.
- Lightly grease a large bowl with butter or oil spray. Transfer the dough into the bowl. Cover the bowl with plastic wrap and let it rest in a warm part of your room, until the size triples, about 2 hours.
Prepare the char siu filling
- Combine the stock, hoisin sauce, oyster sauce, Shaoxing wine, sugar, garlic, and five spice powder in a small saucepan. Cook over medium heat until boiling. Turn to medium-low heat and let simmer for 1 minute. Stir occasionally until everything is mixed. Once done, remove the pan from the stove and let the sauce cool for 3 to 5 minutes.
- While cooling the sauce, add the cornstarch and 1 tablespoon of water into a small bowl. Stir to mix until the cornstarch is fully dissolved. Pour the cornstarch into the sauce. Stir to mix well. Turn the heat back on, to medium-low. Bring the sauce to a gentle simmer and stir constantly, until thickened. You should be able to draw lines on the bottom of the pan easily.
- Transfer the sauce into a medium-sized bowl. Add the char siu meat. Stir to mix well.
Assemble and cook
- Cut some parchment paper into 3” (7 cm) squares to hold the buns. You’ll need 16 squares.
- Punch the air out of the dough. Transfer it onto a lightly oiled working surface. Knead a few times to make the dough into a round ball. Divide the dough into 16 even pieces by cutting it into 2 even strips, then further cutting each strip into 8 small pieces. Each piece of dough should weigh 27 grams. Use your hands to roll and shape the dough pieces into dough balls.
- Wrap the buns one at a time. Flatten a dough ball using your palm. Use a rolling pin to roll the dough ball into a round disc that is thick in the middle and thin on the edges, about 2.5 to 3” (6 to 7 cm) in diameter. Carefully remove it from the surface and place it onto your palm.
- Place about a heaping tablespoon of the char siu mixture onto the center of the wrapper. Wrap the bun by pinching two ends of the dough together, then pinching the other two ends together. Press the dough edges together so it forms a square bun with a cross on top. Pinch the two opposite edges together, then repeat with the remaining two edges. Now the bun will be round. Check my blog post above to see the step-by-step wrapping pictures.
- Once done, place the char siu bun onto one of the cut parchment squares, pleated-side-down, then place it on a plate. Loosely cover it with plastic wrap to prevent drying out. Repeat the process to wrap the rest of the buns.
- Set a stopwatch (or timer) after wrapping the first bun, to keep track of the resting time. You need to rest the buns for 20 to 30 minutes before steaming them.
Steaming
- Depending on the size of your steamer, you might need to steam the buns in batches. What I usually do is prepare the steamer after wrapping half of the buns, so some of them are ready to be cooked as I work on the rest.
- To prepare the steamer, add about 3” (7 cm) of water to the pot and heat it over medium-high heat until the water starts to boil. Place the rested buns onto the steamer rack, leaving at least 2” (5 cm) between them, because the buns will expand a lot as they cook.
- Cover and steam for 10 minutes. Once done, remove the steamer rack and place it onto a trivet. Uncover the steamer rack carefully. Let the steam out and then transfer the buns onto a serving plate. Let the buns cool for 5 minutes before eating.
- Cook the rest of the buns using the same method.
Serve and store
- The char siu buns taste best when they are hot or warm. If you made them in advance, you can warm them up in the microwave or in a steamer.
- Once the buns have cooled completely, place them in a sealed container in the fridge for up to 3 days.
- You can store the cooked buns in the freezer for up to a month. To cook the frozen buns, thaw them completely in the fridge. Then heat them up in the microwave or in a steamer until heated through.
Notes
- You can use the leftover pork from my Char Siu (Chinese BBQ pork) recipe, or you can purchase char siu pork from a Cantonese restaurant. If neither works for you, try using some not-so-heavily-seasoned roasted pork from your grocery store deli. This recipe makes a very flavorful BBQ sauce so you can still make very good pork buns with regular roast pork.
Nutrition

Did you make this recipe?
I’d love to hear how it turned out for you! Please take a moment to leave a 5-star rating ⭐️ and share your thoughts in the comments further down the page. It really helps others discover the recipe too.
The recipe is updated by May 28, 2020 with a slightly adjusted filling formula. The original recipe creates extra filling you can use, and I’ve got some feedback saying the buns are too salty. We’ve retested the recipe and updated the filling with a more balanced sauce, and it will be just enough for 16 buns.
Lilja Walter was a part of the Omnivore’s Cookbook team and worked closely with Maggie to develop and test this recipe.
jean tordella
Came out very dry and not enough sauce. Why is your filling so dark??
Maggie
Hi Jean, I’m sorry to hear your buns didn’t turn out as you hoped. One reason I can think of is you reduced the sauce a bit too long and it congealed too much? My previous filling recipe used a bit more sauces (when I shot the photos) but I’ve received some comments on the filling being too salty. So I’ve retested and updated the recipe later using more stock and less sauce but didn’t update the photos.
Steven L
hi Maggie, first of all, congratulations on your exhaustive, inspiring site
i have looked all over the net and cannot find any answer at all. we all know what a char shui bao, and most of are familiar with dai bao, but then there is third bun, which remains a mystery online; i know how to say it cantonese (more or less), but this might not anglicize well. it sounds like sang gnui bao (raw meat bun, though thouroughly cooked) than sam gnui bao (three meat bun). it’s even bigger than the dai bao; a layered affair of chicken and pork, much like the a dim sum beef ball, but packed tighter, with julienned water chestnuts—and huge. i hope you can help me with this
thank you. and Merry Christmas!
Cari
Hi Maggie! Thanks for this recipe my buns turned out so soft and yummy! However, I have a question. I can’t seem to get my Kitchenaid to successfully knead the dough. My dough was not able to wrap around the dough hook and it seemed drier than the one in your video. Not sure if I did something wrong? I followed the measurements in the recipe and used a scale as well.
Katie
I see chicken stock listed as an ingredient for the filling, but it is not mentioned anywhere in the instructions. Do I put it in the filling or omit it? Thank you!
Maggie
Hi Katie, you will add the stock while making the sauce with other sauce ingredients.
I just updated the recipe so now it reflected it in the instructions. Thanks for letting me know!
Rosalie
Hi Maggie, so grateful for all the detailed recipes! I’ve successfully made dumplings in my life primarily because of your site and my belly and my boyfriend thank you. Question about this recipe. I will probably have to make my own cake flour at home but am confused about the amount of cornstarch to use. Is it 250gm Total in flour I need? I always measure by weight and thought 120gm is one cup but the recipe says 250gm is 1.66cups. Please let me know if there’s something I’m missing. Thanks again for everything.
Maggie
Hi Rosalie, the 250g is the total cake flour you need. If you can measure by the weight, please ignore the cup measurement. It’s not very accurate and the number varies a lot depending on how you measure it. The 1 cup (120 g) is probably the sifted flour. If you use slightly packed flour, the weight will increase a lot. Anyhow, you should use the weight in this recipe. Happy cooking and hope your buns turn out great!
Rosalie
Oh that makes sense… Great, let’s do this thing! Thanks so much Maggie!
Terumi
Hello,
I can’t seem to find the gluten free version of the bun dough recipe. Would you please let me know where I might find the gluten free version ?
Thank You !
Tarah
Do you have any idea if I could use a Zojirushi automatic bread maker to prepare the dough? We don’t have a kitchen aid. Also, would butter or some type of oil work rather than shortening. Thanks so much! We love your recipes!
Maggie
Hi Tarah, I think you can use a bread maker. My mom uses a bread maker to make my baking recipes. They usually come out alright but it might require a longer kneading time.
Both butter and oil should work fine.
Butter – you should use softened butter and add it at the same stage. It will affect the texture and taste of the dough. The dough might come out a bit wet due to the water in the butter.
Oil – you should add at the beginning. If the dough is too wet after a bit kneading, you might need to add more flour and knead it further.
I think butter will work better because it requires less moderation of the recipe.
angela w
We’re making this now. Pork has been marinating since yesterday. Hoping for the best as I had to use almost a cup more cake flour than called for in order to form a dough ball. I’ll post an update!
Peter Szutu
Well I may not have executed this recipe exactly but pretty darn close. I used unbleached all purpose flour instead of the low gluten flour. My dough did not rise much at all. Could be a number of factors but that would not be my biggest problem with this recipe. It’s simply too salty, reduce or leave out the oyster sauce. It’s so salty, that I can’t eat it without drinking water or something bland. Another surprise was my bao came out golden brown instead of white. Could be the unbleached flour instead of bleached flour. Still it went into the steamer white and came out brown as if it was baked. I’ll make it again but will reduce the salty oyster sauce. Hopefully the bread will rise better.
Maggie
Hi Peter, I’m sorry to hear you didn’t like the result of the recipe. The dough is designed for cake flour (or low-gluten flour) so I’m afraid all-purpose flour is not gonna work. I’m not sure why the dough came out golden brown. I might have something to do with flour, but I don’t think unbleached will cause a problem. We actually test it many times and the cake flour result will be slightly whiter than low-gluten flour, but none is golden brown.
Stephanie O.
I never rate recipes, but I feel this one deserves an exception. I followed the recipe to the letter (ok I winged it a bit when I closed up the baos), and even though mine didn’t come out as cute, these are amazing! I also used the Char Siu Pork recipe and had enough pork to double this recipe, and I still have a bit pork left over for fried rice. The dough is very workable, soft, and forgiving of my mistakes. I’m so excited that you shared this, and it definitely isn’t as scary as I thought it’d be. This should have more stars than I can give. I can’t speak enough for how great it is!
Jacqueline
Thank you, these looks amazing! I see that you say to freeze the buns after steaming, I was considering freezing the buns before steaming, then allowing them to come to room temp before steaming at a later time. Do you think that would taste fresher or should I just steam them all when I prepare them?
Maggie
Hi Jacqueline, I’m afraid the freezing will mess up the second rise (once you wrap the buns, they will need time to rise before steaming) and the buns might collapse after thawing and handling. I would recommend freezing the steamed ones and they should taste just as fresh.
PS. Even commercial brands always sell frozen cooked buns. I suspect it’s due to the same reason.
David
Maggie, do you have any recommendations for what to do with extra pork filling left over from this recipe? I ended up with quite a lot still left over! It’s delicious, but I’m curious what the best applications are.
Maggie
Hi David, you can use the leftover filling to make fried noodles or fried rice.
For noodles, you can refer to this recipe: https://omnivorescookbook.com/pork-lo-mein since the filling is coated with sauce already, I think you should halve the sauce in this recipe.
For fried rice, use this recipe: https://omnivorescookbook.com/chicken-fried-rice/ Skip the chicken and marinade. Same idea like the noodles, you should halve the sauce, or a splash of soy sauce might be enough.
Emily
Hi Maggie, I’ve been using many of your recipes, and my family loves the Char Siu. The dough for these buns are perfect, a little sweeter than some other recipes, which is what I was looking for. The filling, however, is cloyingly sweet. My daughter, who wanted a sweeter bbq pork bun than I’ve made the past, also thought these were over-the-top sweet, and a bit heavy-handed on the 5-spice powder. The sauce is almost the same as your marinade/glaze for the Char Siu, a recipe that we love. I guess it was just too much of a sweet and flavorful sauce for the bun filling. I’ll definitely be using the dough recipe again, but will cut back on the sugar and 5-spice. It was a great way to use leftover Char Siu. Thank you for your detailed, authentic recipes!
Phyllis
I was so excited to try this after my success with your milk bread buns but I’m currently stuck – my dough barely rose after 3 hrs. Nothing wrong with my yeast either – it was a fresh 1lb package and I got a good foam when activating. I did have trouble kneading the dough at 6 on my mixer – it kept knocking my bowl out of the locked position so I had to do it at a lower speed and hold in place. After it didn’t really rise last night I stuck it in the fridge and now I’m wondering if it will be salvageable today if I let it get back up to room temp… curious if you have any tips! Thanks!
Maggie
Hi Phyllis, I’m so sorry to hear your dough didn’t rise. The only problem I think that might have caused the problem is the sugar. I always weigh my ingredients and I used an online converter for measuring the sugar in spoons. Today I re-measured everything and realized that the sugar is closer to 4 tablespoons in real life, not the 5 tablespoons that are suggested online. Maybe the extra tablespoon sugar is too much for the yeast to handle.
Unfortunately I don’t think there’s anything you can do with the dough. Because the yeast either died somewhere along the rising process, or if there is still any yeast alive the dough doesn’t have any sugar left to eat.
Phyllis
Fascinating. I’ll give it another shot with less sugar and hope for the best :).
Maggie
I really hope it will go well this time! Fingers crossed. Let me know how the buns come out 🙂
Phyllis
Happy to report that round 2 was successful! Cut back the sugar and had no issues with the rise. Only thing I did wrong was I forgot to flip them for the 2nd rise so the bottoms are a little flat but now I know how to fix for next time! Super tasty, thank you again! Can’t wait to try more recipes!
Maggie
Amazing! I’m so happy to hear the second time worked and you liked the result 🙂 Can’t wait to see what you’ll be cooking the next!
Sonia Quah
Hi Maggi, will 2 cups of all purpose flour n 1 cup of cornstarch good enough? Also, can I substitute shortening with oil? Being in the lockdown now it’s hard to get some ingredients. Look forward to your reply. Thank you.
Maggie
I think you don’t need that much cornstarch to make cake flour. The method I saw is to measure 1 cup all-purpose flour, remove 2 tablespoons from it, then add 2 tablespoons cornstarch so you get 1 cup cake flour substitution.
The shortening is actually quite important. I’m sure you can replace it with oil, but the texture of the buns will change.
Zakura Shinohara
Can you make it without the oyster sauce?
Makos – The Hungry Bites
These buns look delicious! Love the detailed photos 🙂
Sandra U.
Hi Maggie,
Thank you for sharing your yummy recipes with us. For the dough mixture, can oil be used instead of shortening?
Marsha
I am anxious to make these (because I’ve loved every recipe of yours that I’ve tried), but I have a question. Is there any reason I can’t use the dough setting on my bread machine to do the kneading?
Maggie
Hi Marsha, I think the bread machine would work just fine. My mom uses a bread machine and she made some of my baking recipes without any problem 🙂
Happy cooking and let me now how it goes!
tsi
You rock! Now we know why something like a pig was created: He knew you’d make this! 🙂 Happy New Year. niio
Maggie
Thank you! Happy New Year 🙂