Hand pulled noodles, known as Lā Miàn 拉面, are a traditional Chinese noodle made by repeatedly stretching and folding wheat dough into long strands by hand. They are a staple of northern Chinese cuisine and are valued for their chewy texture and simple ingredients. Plus, noodles are one of the core elements of Chinese food culture, and they show up in many of my Authentic Chinese noodle recipes for that reason.
As you might already know, handmade noodles can be hard to find and often expensive outside of China, including here in New York. That is exactly why I decided to share this recipe, along with my expert tips from years of cooking Chinese food at home and developing recipes professionally.
Whether it is a hot bowl of noodles in a restaurant or freshly made noodles cooked at home, I love that this is one of the most affordable ways to prepare a filling and hearty one dish meal. With my recipe, I walk through the dough mixing, resting, and pulling process step by step using only flour, water, and salt, with a little active work once the dough has rested. Let us start.
Why make hand pulled noodles at home
Even though noodles are inexpensive at restaurants, I still enjoy making them from scratch at home. The reasons are simple:
- Easy to make: Once I learned the technique, making hand pulled noodles at home became very simple.
- No additives: I like that homemade noodles use only basic ingredients without added preservatives.
- Better taste: Freshly made noodles taste far better than packaged dried ones.
There are countless types of noodles in China, and here I introduce the hand pulled variety known as 拉面, la mian. It might sound daunting to make this type of noodle at home, especially if you’ve ever watched a noodle dance in China. But the truth is, hand-pulled noodles are one of the easiest handmade noodles for beginners to make.
Hand Pulled Dough Method
There are two main approaches to making hand pulled noodles:
- In professional kitchens, cooks usually knead the dough for a very long time to build strong gluten, then rest it for an extended period so it can be pulled. That method works well in restaurants but is not very practical at home.
- After many test runs, I found that kneading just until the dough is smooth works much better for home cooks. By avoiding excessive gluten development, the dough needs much less resting time and is easier to handle. This approach uses minimal active kneading and produces a soft, springy dough that pulls easily.
How to make
1. Prepare the dough – 1 short rest
To make the dough without developing too much gluten, you don’t need to knead the dough for very long time and it will not be smooth after first kneading. But once the dough rest the first time, it only takes a few kneading to smooth out the dough.

Mix the dough: Slowly drizzle the salt water into the flour while mixing. Continue until the water is fully incorporated and the flour forms shaggy threads.
Knead: Bring the dough together and knead, adding a small amount of water if dry flour remains. Continue kneading for about 2 minutes until a rough ball forms, taking care not to overwork the dough.
Rest: Let the dough rest for 20 minutes before kneading it again, for just 1 to 2 minutes, until the dough becomes smooth.
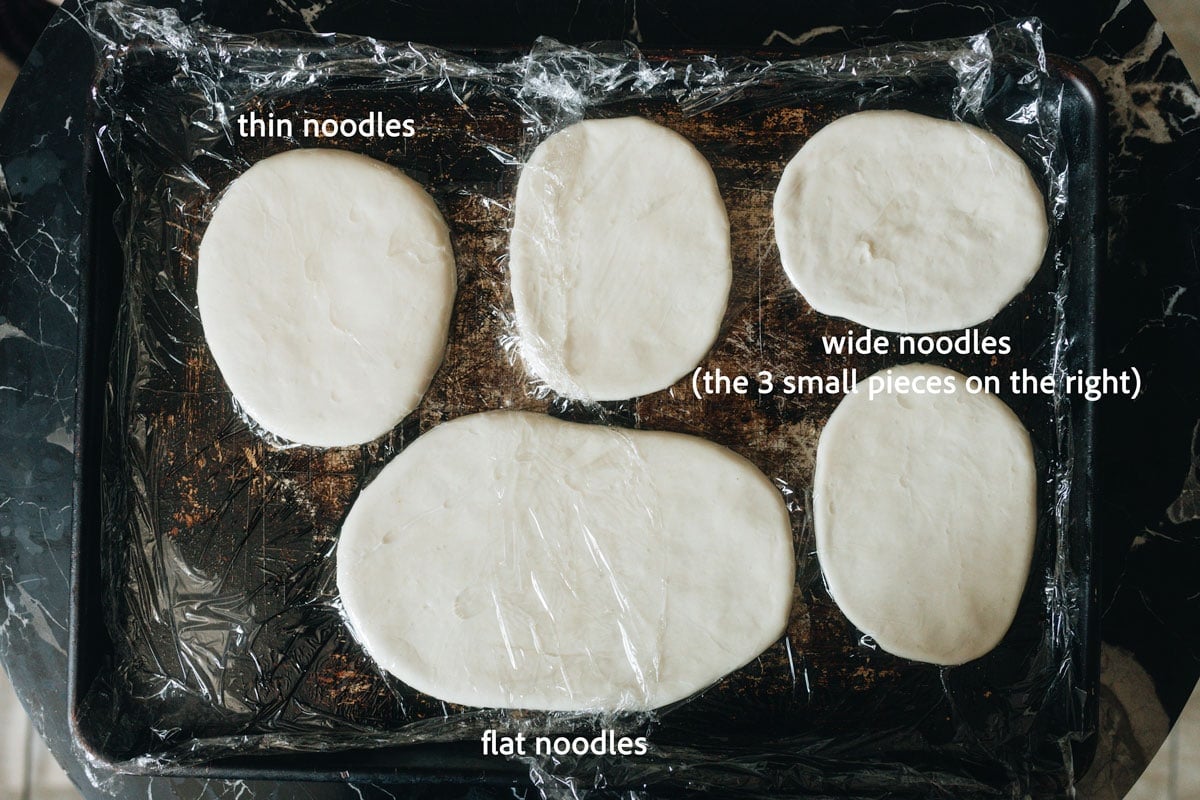
2. Shape the dough – 2nd resting
Roll out the dough depending on the type of noodles you want to make and let it rest for 2 hours to fully relax the gluten before pulling and cooking.
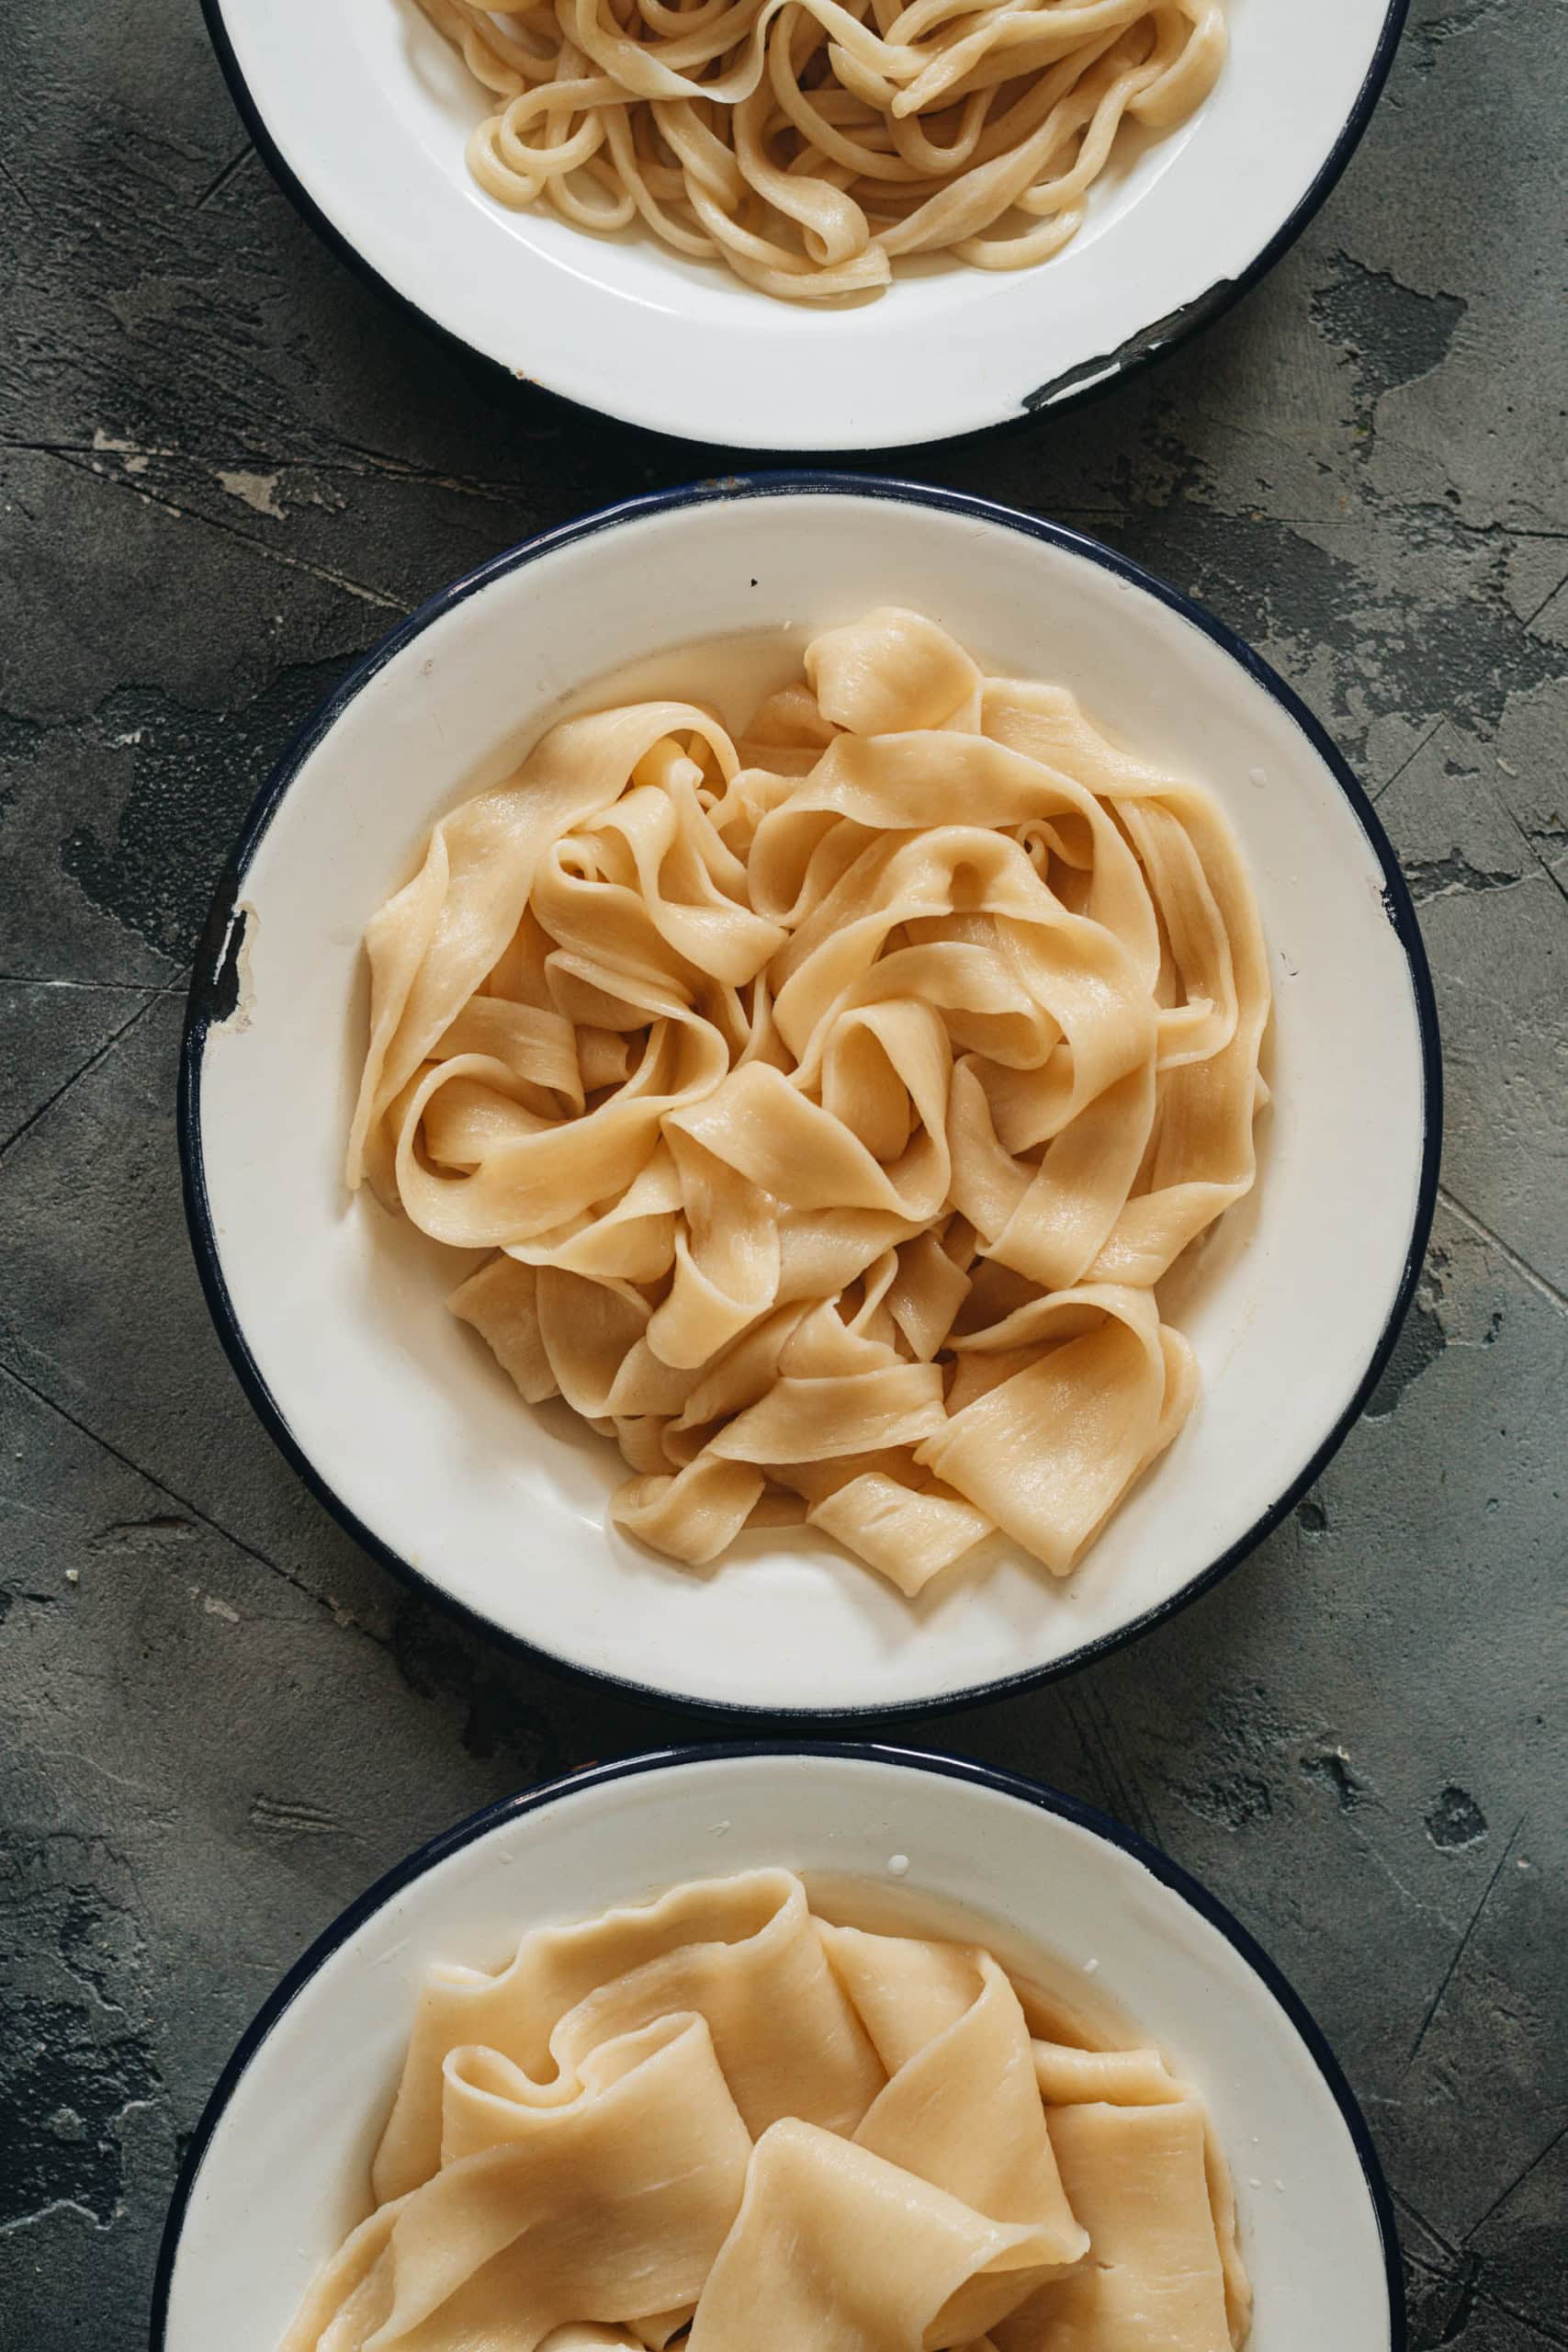
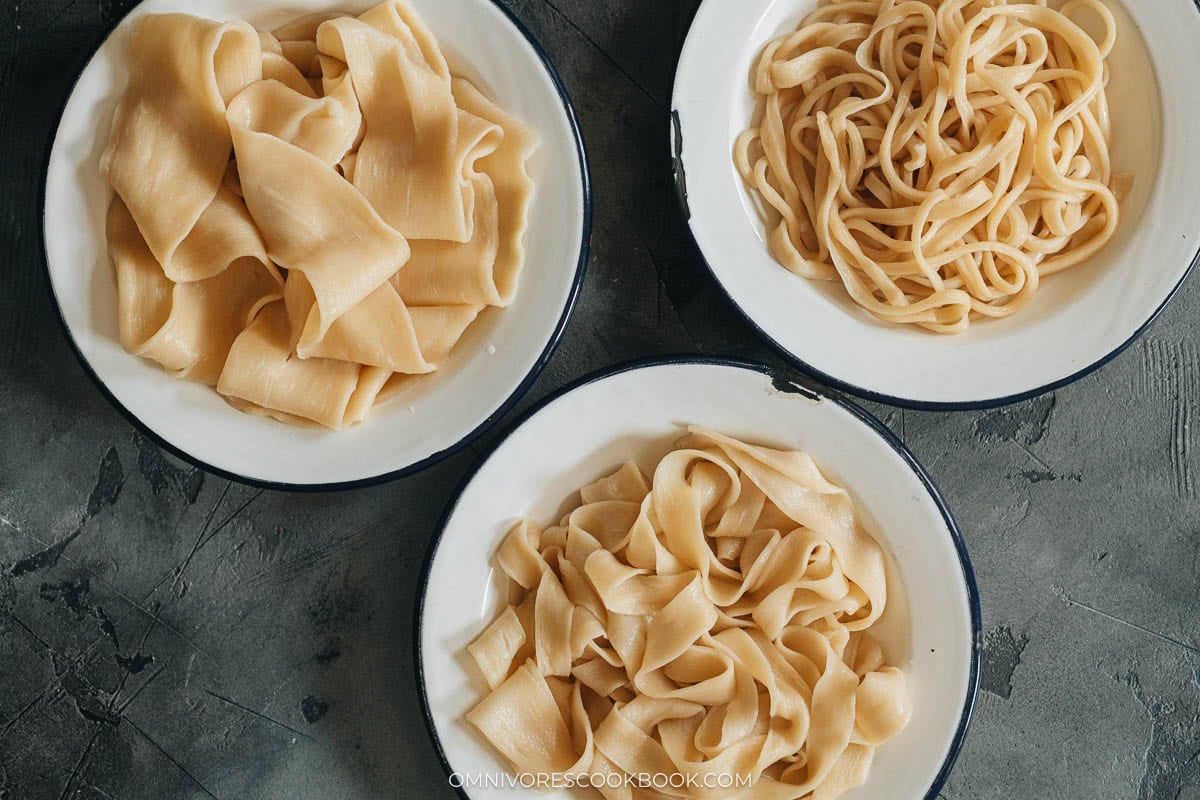
I’ve included three types of noodle doughs in this recipe, so you can choose the type you prefer:
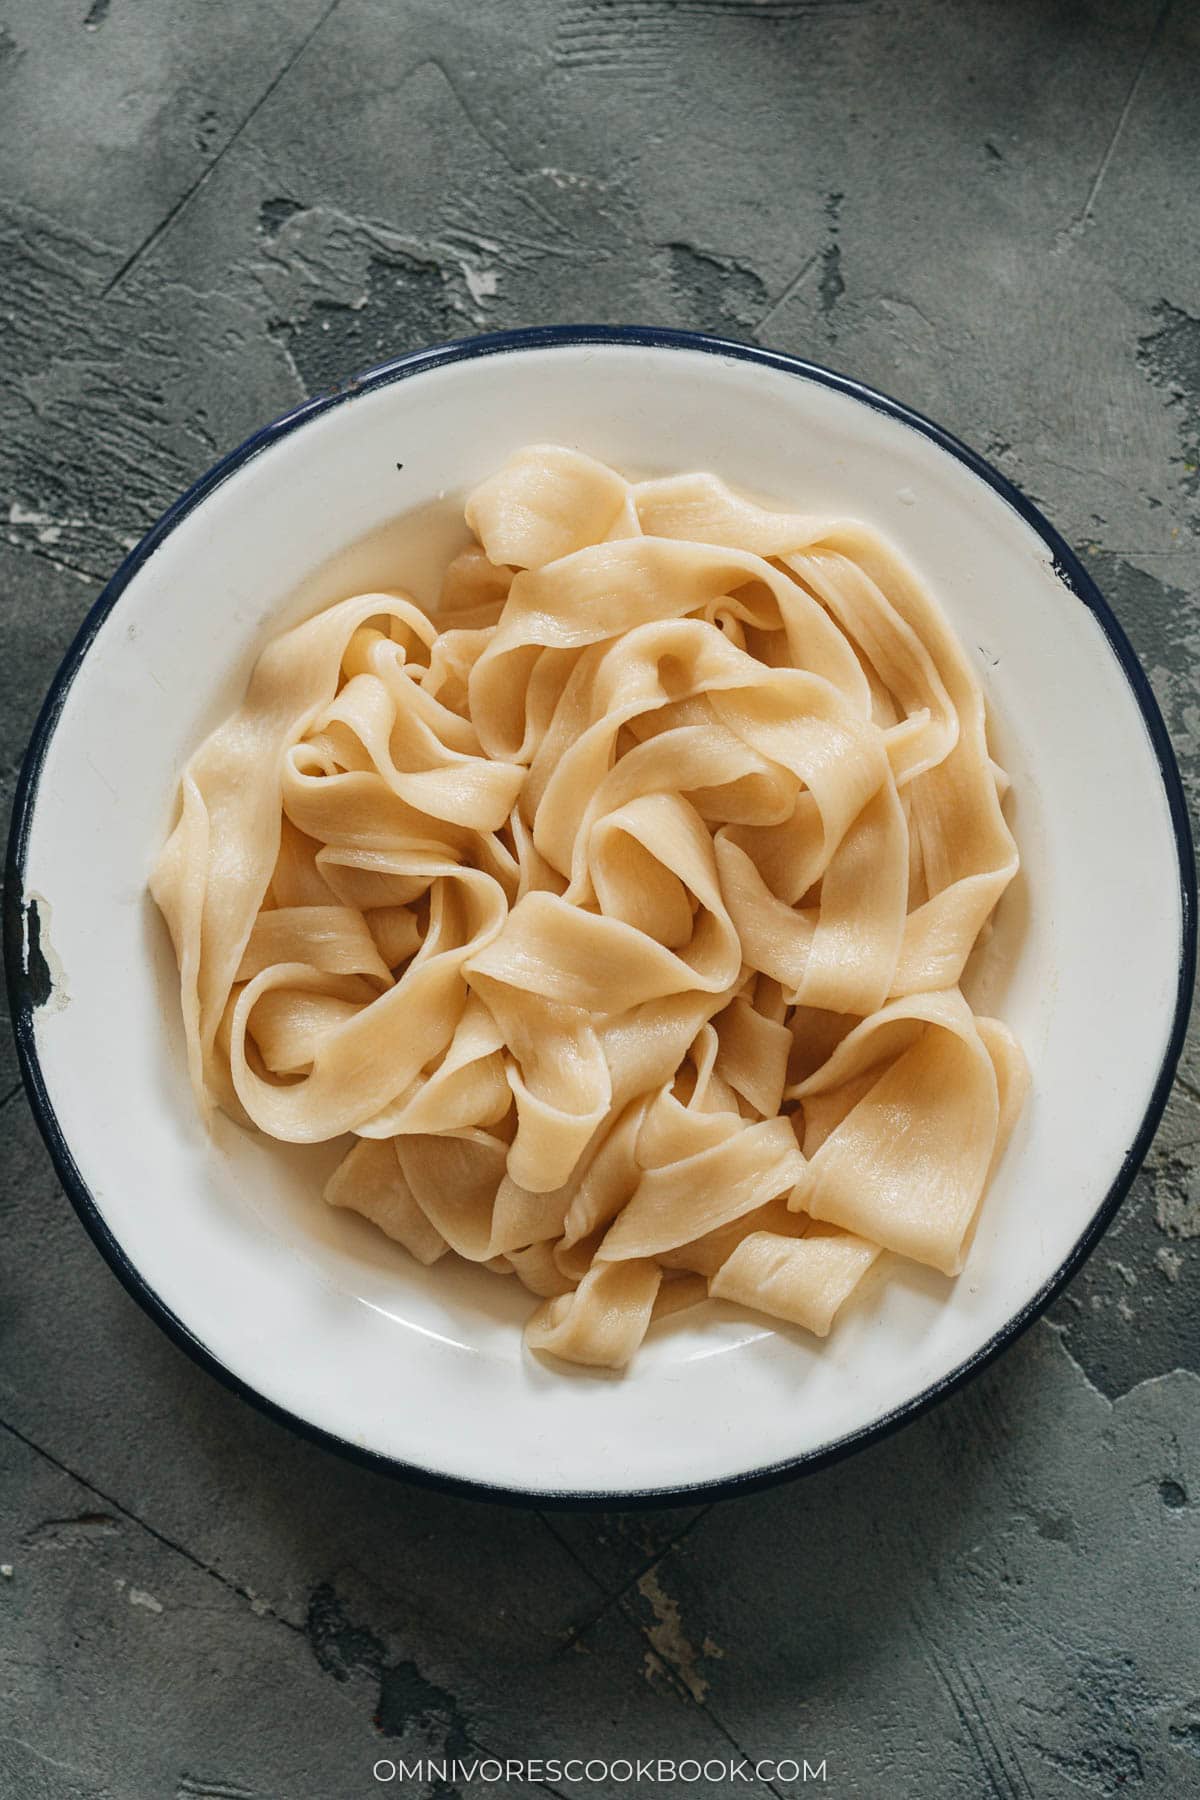
- Thin noodles: great for noodle soup, fried noodles, or lo mein noodles
- Flat noodles: good for noodle soups or noodles served with a sauce
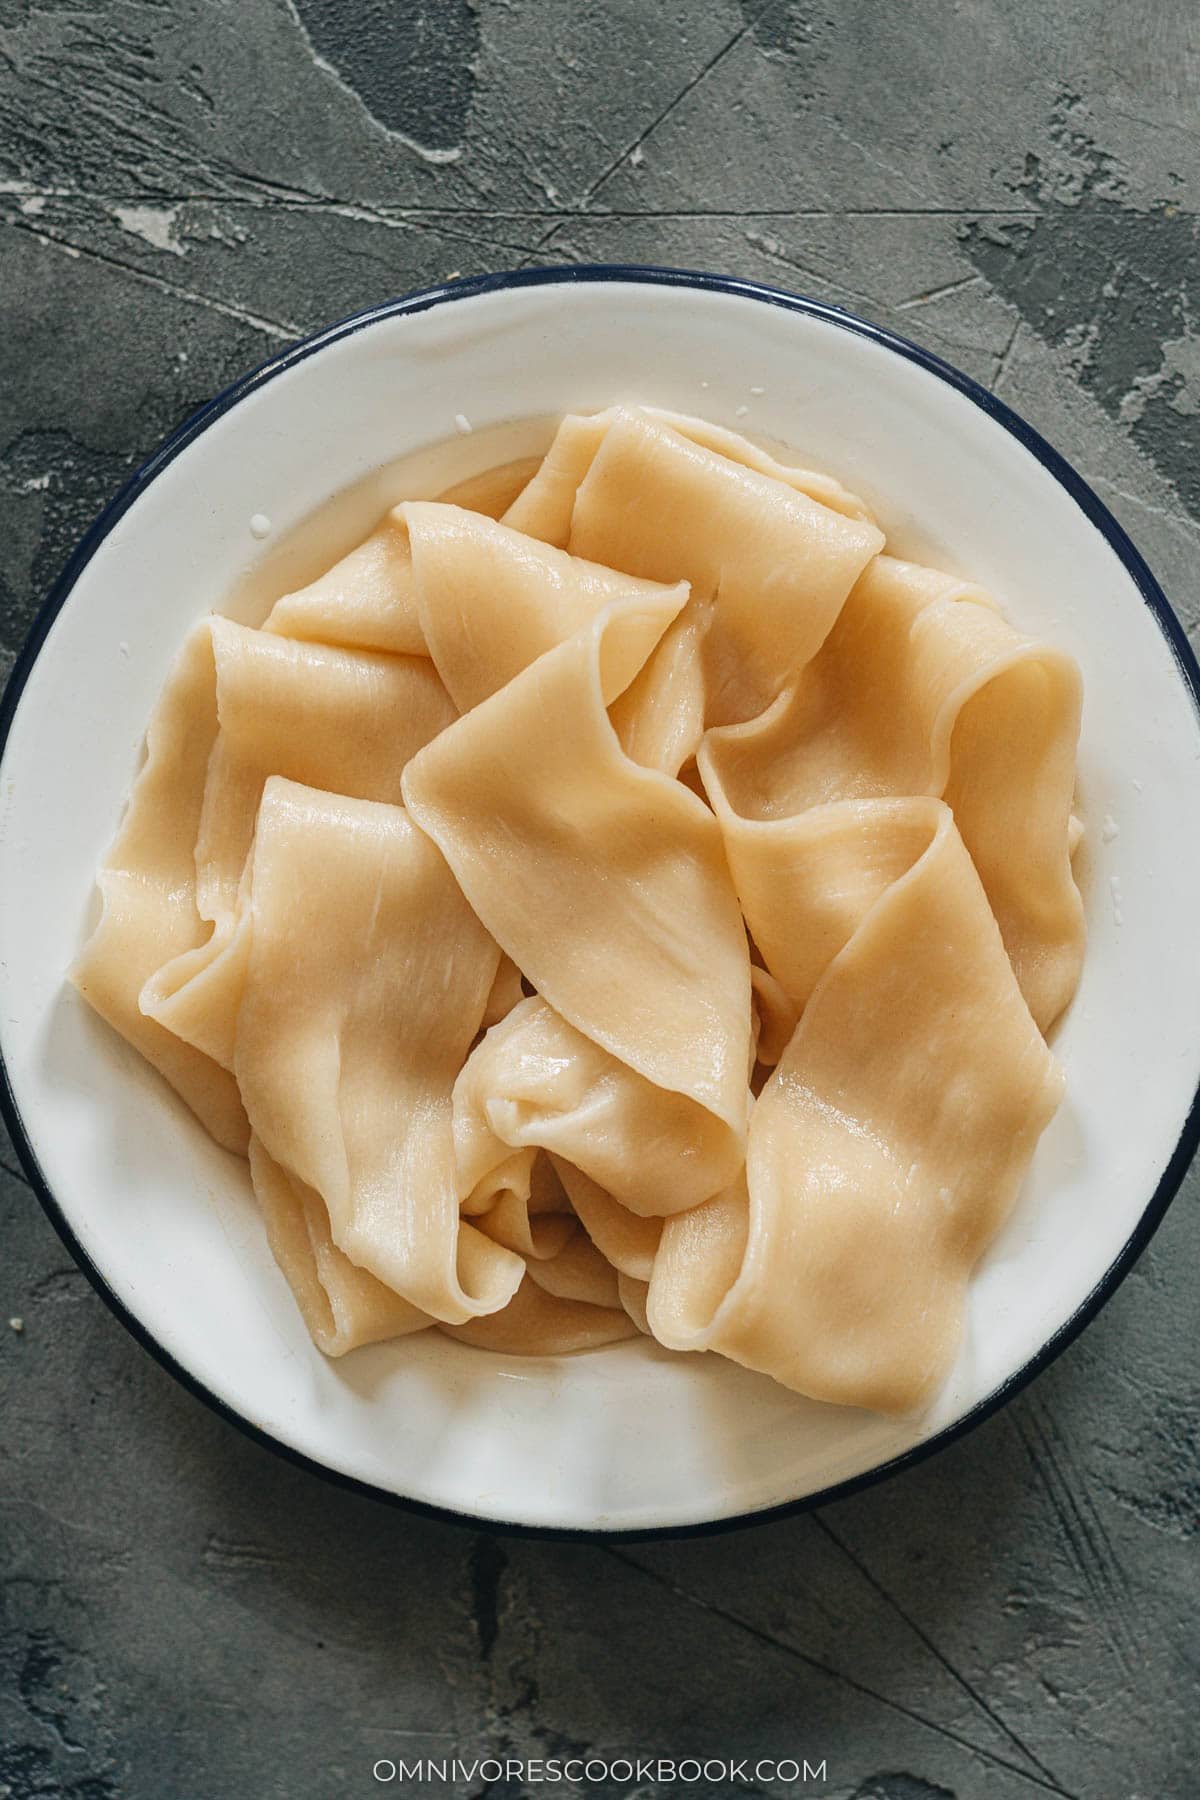
- Wide noodles: good with a super heavy sauce such as cumin lamb or da pan ji
Note: Oil the dough and cover it to prevent sticking and drying out.

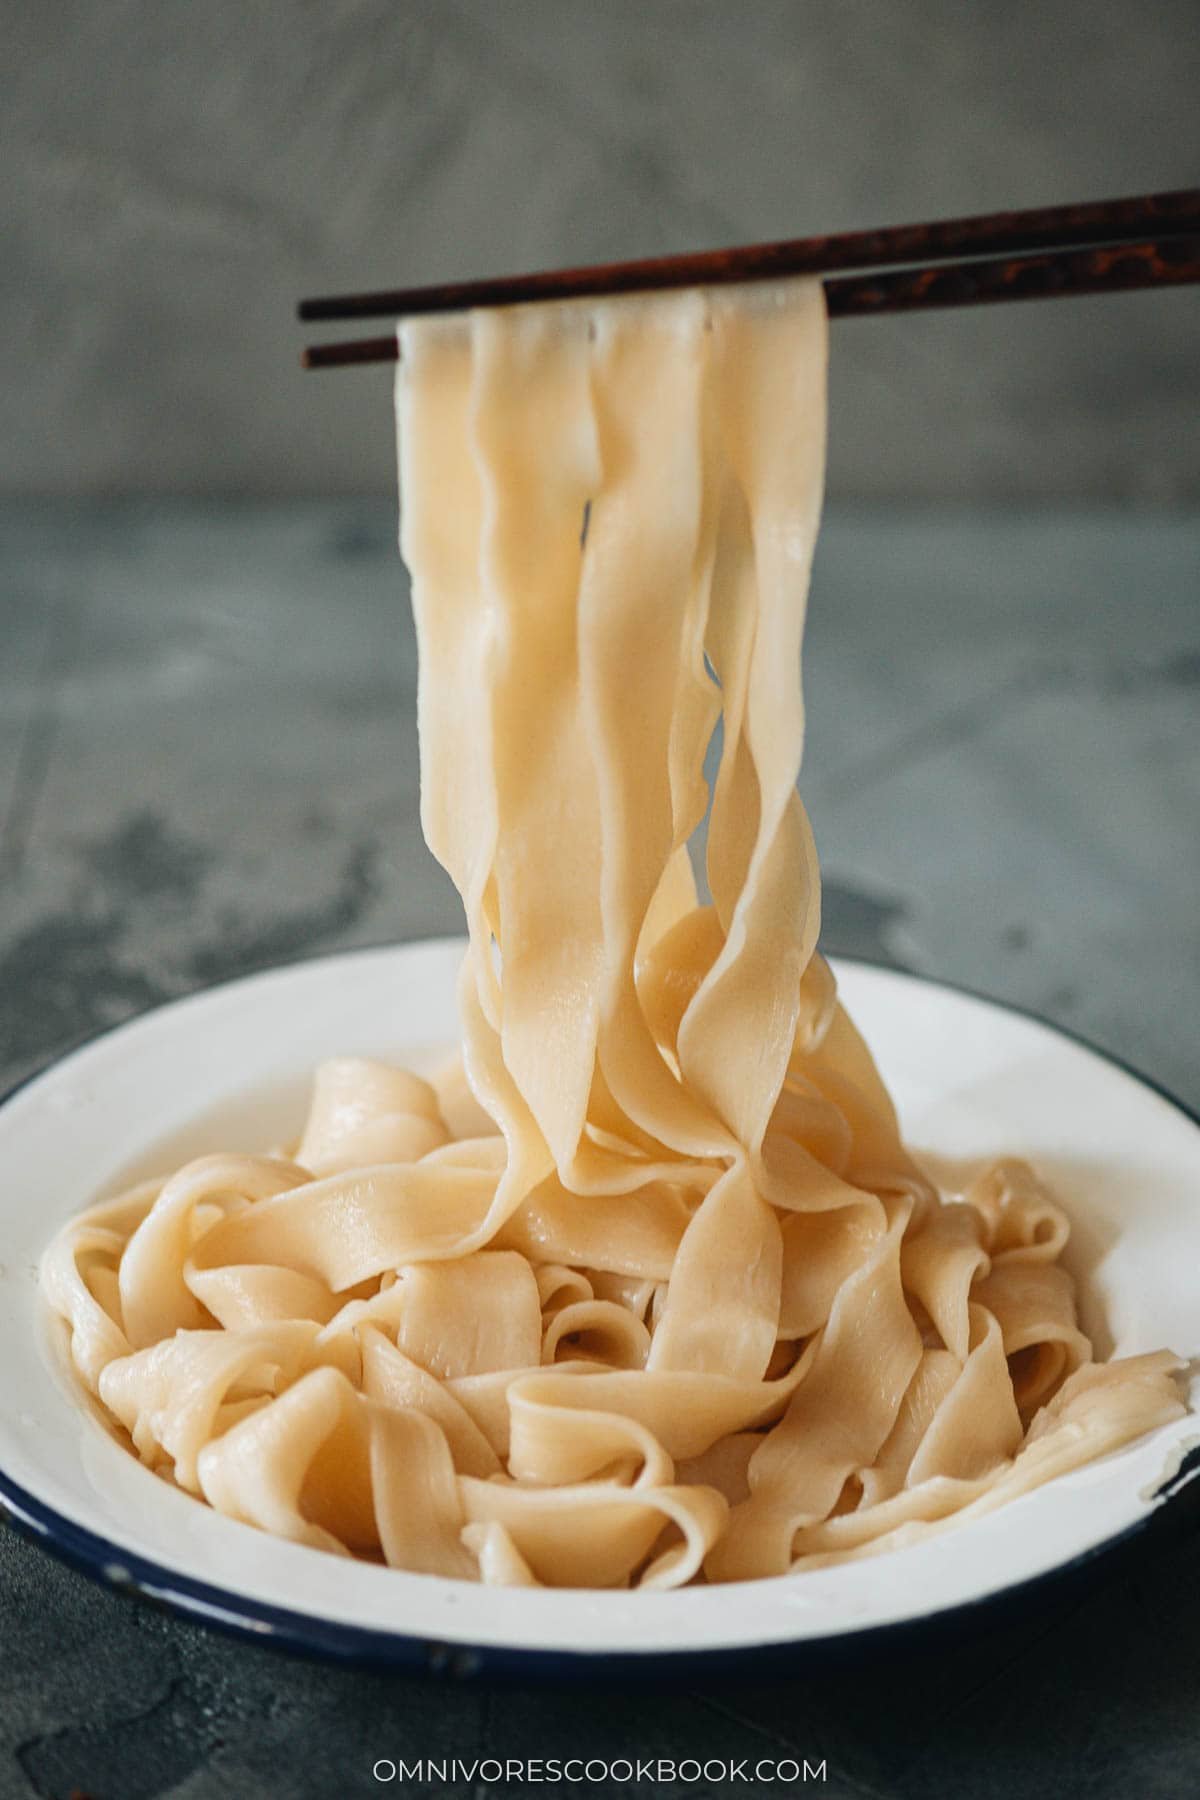
3. Pull the noodles
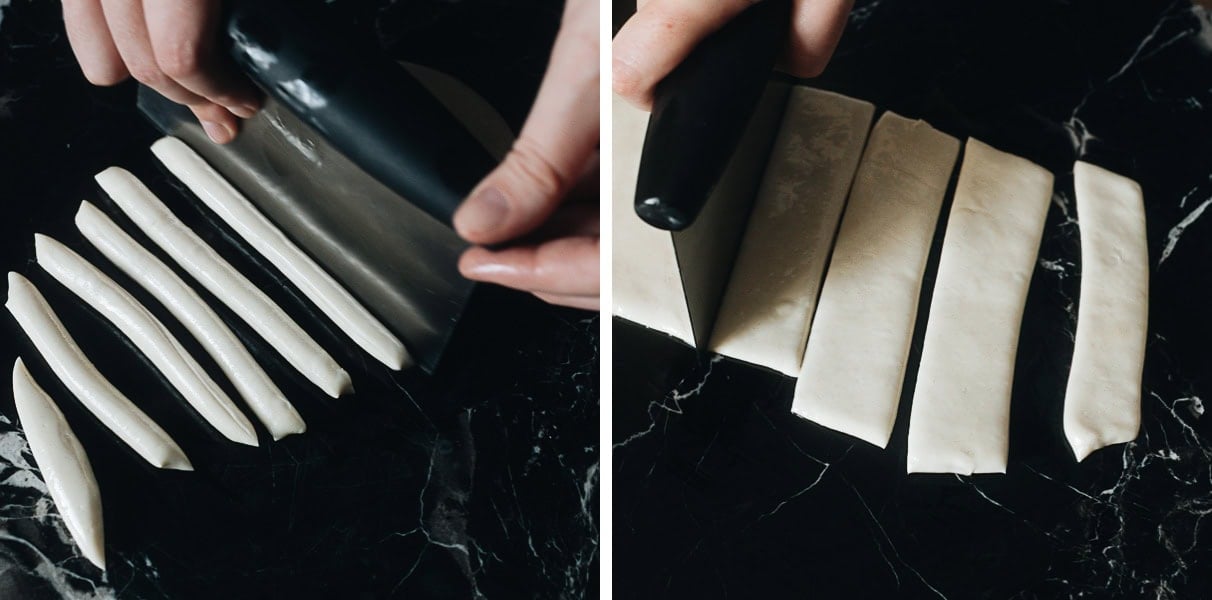
Cut the dough: Cut the dough into pieces based on the width of noodles you want to make. It’s important to keep the cut noodles covered with plastic wrap so they don’t dry out.
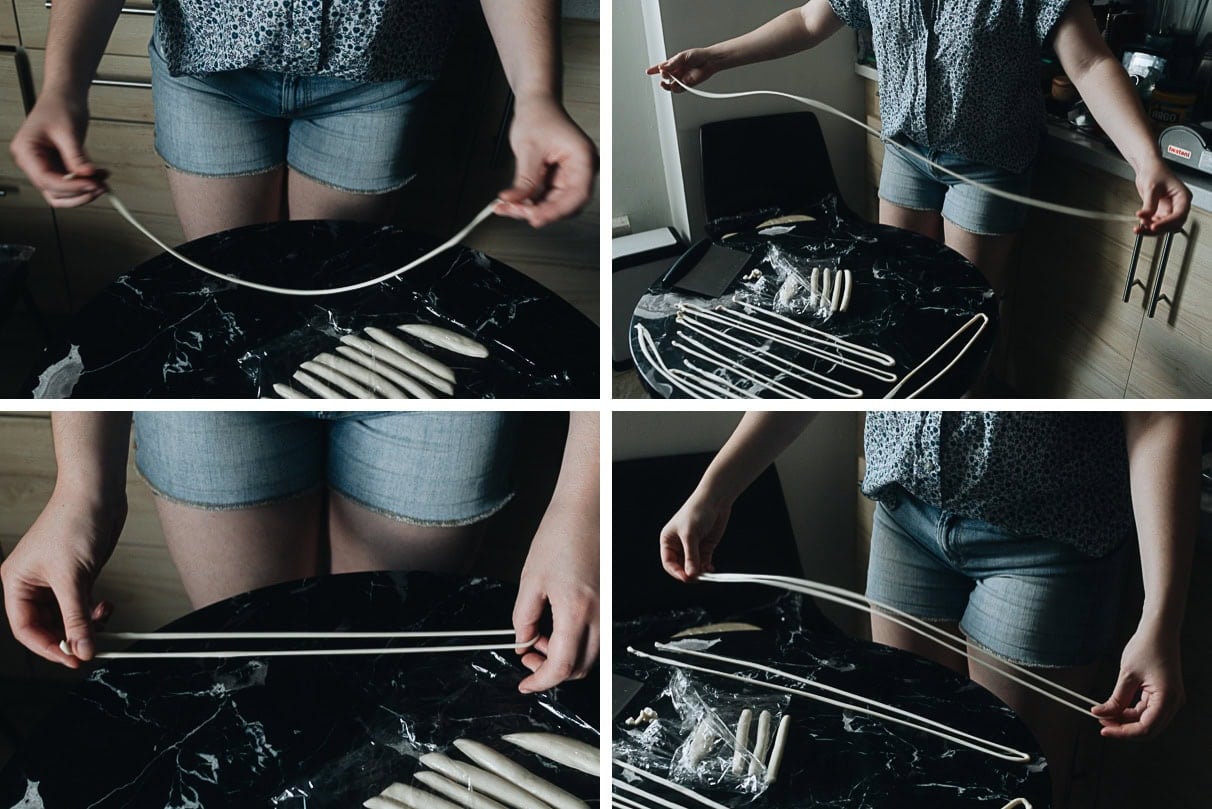
Pull: Pull the dough into a long thin strip in one motion, then continue pulling and bouncing it on the table to stretch it thinner. Fold the strand, then pull and bounce again until it reaches the desired thickness, except for flat or wide noodles, which do not need folding.
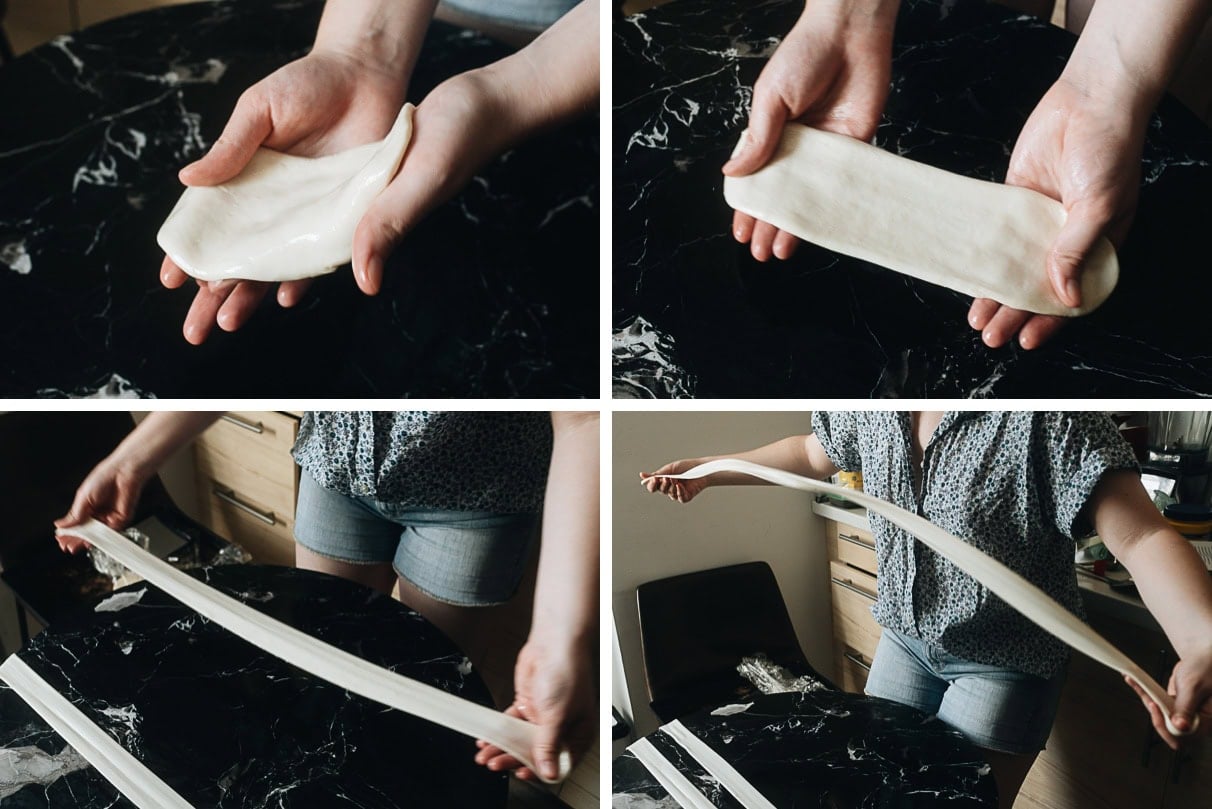
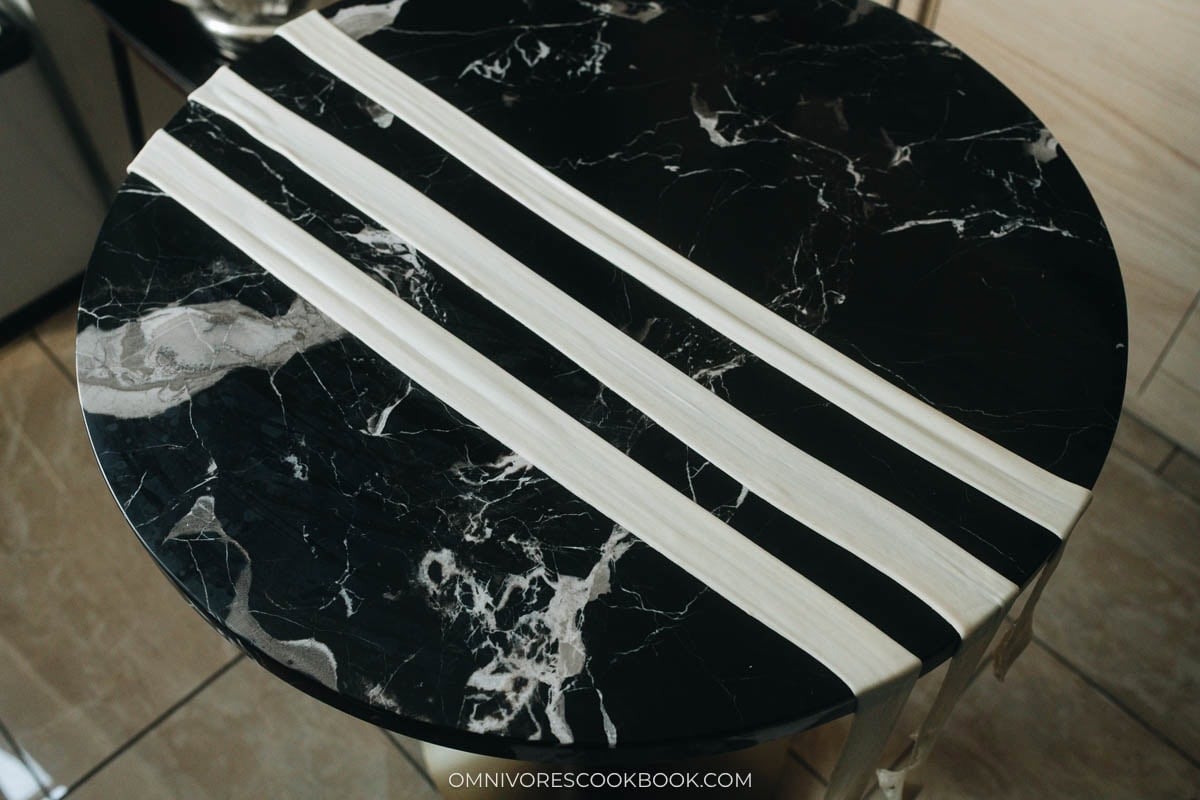
Rest: Place the pulled noodles on the work surface without overlapping. If space is limited, lightly dust them with flour so they do not stick when placed close together.
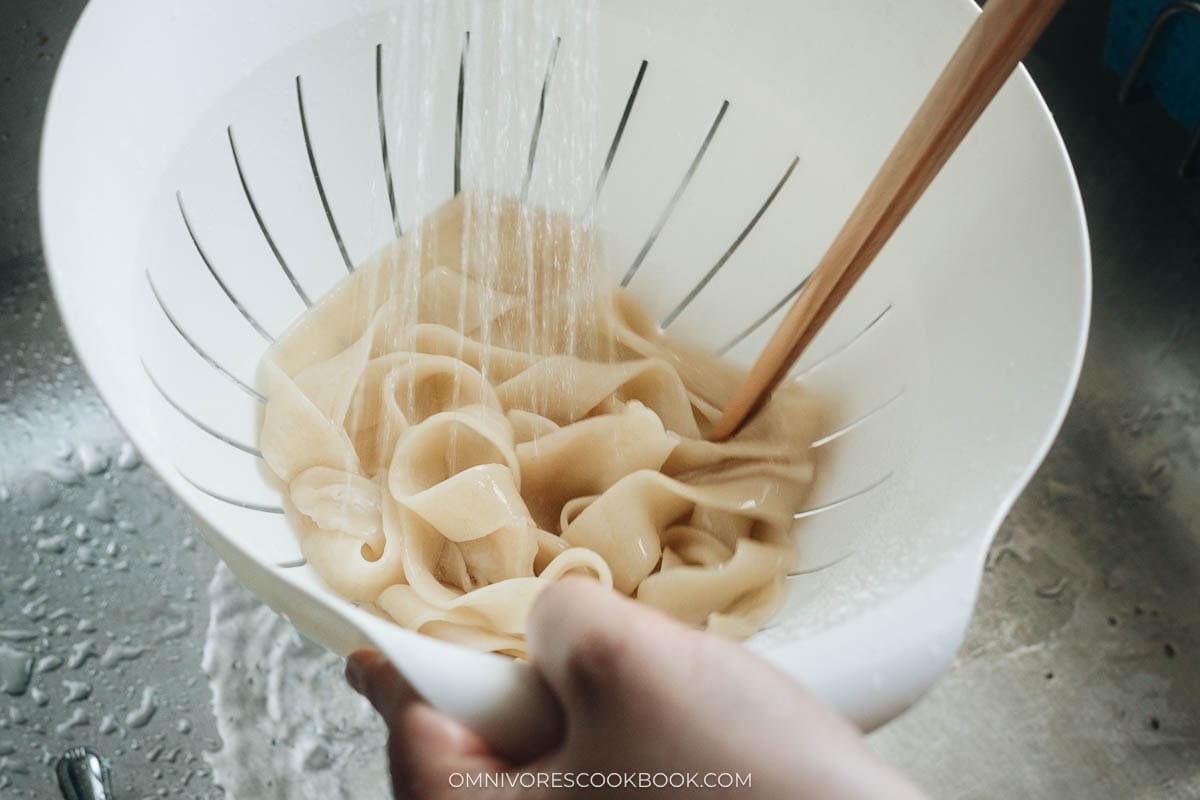
4. Cooking
Boiling: Drop a few strands of noodles into boiling water at a time and cook until they are cooked through and springy, boiling slightly longer if a softer texture is preferred.

Rinse the noodles: Transfer the noodles to a colander and rinse with tap water to stop the cooking.
Recipe update notes
I created this recipe back in 2015 while I was still living in China. It’s a family recipe and I created a short hand pulled noodles video to show the process.
Over the years, I have received many positive comments and questions from readers. After moving to the US, I also realized that all purpose flour here is different from the flour commonly used in China, mainly because it has higher protein content.
That is why I decided to retest the recipe using various types of flour in the US and slightly refine the process, so the results are more consistent and closer to ideal each time.
Serving suggestions
When I serve hand pulled noodles at home, I keep the focus on the noodles by pairing them with simple sauces like my easy peanut nodles or my real deal sesame noodles. When I’m hosting, I enjoy using them in my Dan Dan Noodles recipe or Biang Biang Noodles to create a satisfying noodle focused spread.
Frequently asked questions
Can I store the raw hand-pulled noodles?
Unfortunately, NO. It’s very important to cook the noodles immediately once you’ve pulled them. In fact, the pulled noodles should be dropped directly into boiling water (that’s how they do it at restaurants). If you want to store the raw noodles, you must use starch (or flour) to coat them so they won’t stick together. But the dough will change in texture during this process.
If you want to store raw noodles, check out my rolled noodles recipe.
Can I store the cooked noodles?
YES! This is the best way to store them. You can slightly undercook the noodles if you plan on storing them. So they reach the perfect consistency once they’re reheated. You can see more notes on how to reheat in the recipe card below.
Can I store the noodle dough?
Yes. Once you roll out the dough and let it rest at room temperature for 2 hours, you can cover the dough and move it to the fridge. Cut, pull, and boil the noodles when you plan to serve them.
What brand and kind of flour did you use?
I tested with various brands and types of flour and finally achieved a consistent result no matter what brand we were using. In the pictures I used all-purpose flour from the King Author brand (11.7% protein content).
I also tried a mixture of 370 g (3 cups) of cake flour and 30 g (3 tablespoons) of bread flour. This mixture produces a slightly smoother dough (marginally). It’s possible to use different blend to achieve different texture, even 100% bread flour, but I do not recommend using 100% cake flour.
I saw professional hand-pulled noodles use alkaline water. Why don’t you use it?
Using alkaline water in the noodle dough increases the chewiness of the texture and it doesn’t affect the pulling process. I found that even if you skip the alkaline water, you will produce a great result with a chewy texture (without the noodles getting too tough). So I decided to skip this ingredient, which makes the recipes a bit more complicated.
Want to Save This Recipe?
Enter your email below & we’ll send it to your inbox. Plus get great new recipes from us every week!
Watch video
Hand-Pulled Noodles
Ingredients
- 2 2/3 cup all-purpose flour (*Footnote 1)
- 1/2 teaspoon salt
- 1 cup water , room temperature
- Vegetable oil to coat the dough
Instructions
Make the dough by hand (Option 1)
- Combine the water and salt in a small bowl. Stir to dissolve the salt.
- Add the flour into a large bowl. Bit by bit, pour the water into the flour, mixing with a pair of chopsticks or a spatula as you go.
- Once all the water is added, the dough should be in shaggy threads with little/no dry flour in the bowl. Begin pressing the dough together. If you find the dough is too dry and there’s still dry flour that’s hard to incorporate into the dough, drizzle more water onto the dry flour and mix it again, until there’s no dry flour left. Knead the dough until a rough, firm ball is formed, about 2 minutes.
- Cover the bowl with plastic wrap and let it rest for 20 minutes.
- Once the dough is rested, knead it again until it becomes smooth, 1 to 2 minutes.
Make the dough using KitchenAid (Option 2)
- Mix the flour and salt in the bowl of the KitchenAid mixer and add the dough hook. Turn it to the mix setting. Slowly drizzle the water down the side, all along the bowl. This should take about 1 minute. Once the water is incorporated, turn to setting 2 and knead until a rough dough ball is formed, another 2 to 3 minutes.
First rest
- Cover the dough with plastic wrap and let it rest for 20 minutes.
Second kneading
- Either knead in the machine on setting 4 for 30 seconds or by hand for 1 to 2 minutes. Then shape the dough.
- (Optional) If you plan to store/freeze the dough, coat the dough with oil and store it in a sealed plastic bag. Refrigerate for up to 2 days or freeze for up to 3 months.
Shape the dough
- FOR THIN NOODLES: Divide the dough to halves and roll each dough into a 1/2” (1 cm) thick oval.
- FOR FLAT NOODLES: Divide the dough to halves and roll each and roll each dough into a 1/4” (1/2 cm) thick oval.
- FOR WIDE NOODLES: Cut the dough into 8 pieces. Roll each piece into approximately 3”x5” (8×13 cm) ovals, 1/4” (1/2 cm) high.
Second rest
- Coat the dough(s) generously with oil and cover with plastic. Let rest for 2 hours.
Pull and cook the noodles
- Bring a medium-sized pot of water to a boil.
- FOR THIN NOODLES: Cut long the longer side of the oval, slicing the dough into 1/2” (1 cm) wide strips and rolling each piece slightly to the side with each cut to prevent them from sticking together. Cover the cut pieces with the plastic again to prevent them from drying out. Starting with the first strip you cut off, pick it up on both ends. (*Footnote 2) In one swift motion, tug the noodle about an arm’s length and gently bounce it on the working surface once or twice until it forms a long, thin noodle. Rest the noodle on your working surface as you fold it over, so that both ends are in one hand. Hook the other side with your thumb. Give it a couple light tugs and bounces until the noodles get longer and reach the desired thin shape. Then pull off the thick ends collected in one hand and lay the noodle out on the working surface. Repeat with the rest of your noodles.
- FOR FLAT NOODLES: Cut along the longer side of the oval, slicing the dough into 1 1/2” (3 cm) wide strips. Cover the cut pieces with the plastic again to prevent from drying out. Starting with the first strip you cut off, pick it up on both ends. (*Footnote 2) In one swift motion, tug the noodle to about an arm’s length and gently bounce it on the working surface once or twice. Rest the noodle on your working surface for 10-20 seconds, then give it a couple extra-light tugs and bounces until it forms a flat long noodle. Then pull off the thick ends and lay the noodle out. Repeat with the rest of your noodles. Drop the noodles into the boiling water, a few at a time, and cook for 1 to 1.5 minutes.
- FOR WIDE NOODLES: One at a time, grip the short ends of a strip (*Footnote 2) and pull it apart in one swift motion until the dough feels taut. It should be between 1 to 2 feet. Bounce it on the table a couple times. Pull off the thick ends and lay the noodle out, covering it with plastic to prevent drying out.
Cook the noodles
- Drop the noodles, a few pieces at a time, into the boiling water and cook for 1 to 1.5 minutes, until tender but still with a chewy texture. Do not cook too many noodles at a time! It’s hard to control the texture that way and the noodles might stick together.
Storage
- Store the cooked noodles: If you plan on reheating, you can slightly undercook the noodles (to al dente) to create a better texture once reheated. Store the noodles in an airtight container or a ziplock bag in the fridge for up to 3 days or in the freezer for up to 3 months.
- For frozen/refrigerated dough; let the frozen dough thaw in the fridge overnight. Transfer the refrigerated dough to room temperature. Rest for 2 hours. The dough will become super soft and can be gently shaped, rested for another 10 minutes or so, and pulled. Cook according to the instructions above.
Reheating cooked noodles
- To reheat, bring a pot of water to a boil and add the cooked noodles. Separate with a pair of chopsticks and cook until the noodles are just heated through.
- For a quicker and lazier reheating method (for leftovers), reheat the refrigerated noodles in the microwave until heated, then quickly rinse the noodles with tap water in a colander. Drain the water thoroughly before serving.
- If you plan to use the thin noodles for fried noodles, you don’t need to reheat them before using. Thaw them if frozen. Then run the noodles with tap water in a colander and separate gently with chopsticks. Drain thoroughly before using for stir fried noodles.
Notes
- If you do not have all-purpose flour, you can use 370 g (3 cups) cake flour + 30 g (3 tablespoons) bread flour instead.
- If you do not have a lot of space for the pulled noodles or if you’d like to try pulling a few noodles at a time (it takes practice but it’s possible!), you should dust the noodle dough with extra flour to prevent them from sticking together.
Nutrition

Did you make this recipe?
I’d love to hear how it turned out for you! Please take a moment to leave a 5-star rating ⭐️ and share your thoughts in the comments further down the page. It really helps others discover the recipe too.
Lilja Walter is a part of the Omnivore’s Cookbook team and worked closely with Maggie to develop and test this recipe.
red
Yeah, wow! You and my mother, the royalty of noodle makers.
But, we’re gluten intolerant and use starch to make dough (fermented rice, usually), but the dough is brittle and breaks easily. I wonder if guar gum would work to make pulled noodles. Add to shopping list: Lots of chicken. 🙂
Zoe
I made these last night and they were awesome!!!! I did a veggie stir fry then added the noodles and your Hoisin sauce and of course my homemade chili sauce! All your recipes. Thank you so much. My family loved it all. Thank you.
Kristin
Hi, just made my own noodles for the first time without good instructions so they turned out… okay. Which is why I’m here. LOL. Anyway, I was wondering, can this work with whole wheat flour? What adjustments would I have to make if any? Thank you!
Maggie
I wouldn’t use whole wheat flour because the texture is so tough. I’m afraid I don’t have good tips on using whole wheat flour without testing it out. Will keep it in mind and maybe develop a whole wheat noodle recipe in the future.
Lucie Marcq
First, I want to tell you how much I love your recipes & explanations. I have made several of your recipes & now am feeling confident about cooking Chinese dishes because of your site. Thank you! I made the noodles (1c semolina flour & rest AP Canadian flour). I did all the resting. I made 1 addition – I cut in 8 pieces for wide flat noodles & rolled the dough in a little oil for the 2hr rest (which I rested overnight in fridge). Let them come to room temp next day. They were easy to stretch & some I even rolled out the wide noodle thinner. My negative experience was cooking them. I only did 2 at a time but as they hit the water they sprung back shorter & thicker & took at least 5-7 mins. Once cooked, I had to recut to size desired. Do you have any idea why this happened? They were definitely delicious but not as easy or as described in your recipe. Should the water be salted as well? Was it the oil?
Maggie
Hi Lucie, sorry to hear you came across some issues while making the recipe. I believe the issue is caused by the Semolina flour. It is a high gluten flour, plus it has a different grit than regular flour. The noodle recipe wants minimal gluten development, so I wouldn’t use the combination of Semolina with regular flour. Next time you could try only using AP flour and see how it goes.
londondeon
I a m looking for canned lotus seed paste for mooncakes . any suggest ions as to where I can order it?
Maggie
I have a recipe for it and it tastes way better than canned: https://omnivorescookbook.com/homemade-lotus-seed-paste/
For the canned ones, you can usually find them in Chinese or Asian markets.
Felix
Is this recipe possible to make with any gluten free alternatives? One of the gluten free flours here is a combination of rice flour, maize flour and potato starch. Maybe if I added xanthan gum to make up for the absence of gluten?
Maggie
Hi Felix, I’m afraid this recipe is not able to adapt into a gluten free recipe. They key of the recipe is to develop the gluten so the noodles bind together and possible to stretch. I’ve never tried a gluten-free flour before, but I think it will be more suitable for a rolled out and cut dough, not the hand pulled type.
Felix
Hi Maggie,
Thanks for such a quick response. Do you have a recipe that you could recommend then that would work best as a gluten free alternative?
Thanks!
ELIZABETH MIRANDES
Hello Maggie,
Can I use a pasta maker to make and cut the noodles? My hands are a little messed up with severe arthritis.
Maggie
Hi Elizabeth, I’m afraid you can’t use this dough on a pasta machine. It is too soft and will stuck.
I have another noodle recipe that is perfect for pasta machine: https://omnivorescookbook.com/rainbow-longevity-noodles/
Gchow
Hi Maggie,
I feel very conflicted. Your noodles recipe asks for all purpose flour while a few others said to use bread flour or cake flour. They claim that the AP flour in the U.S. won’t work with biang biang noodles because it will break. I did try with AP flour (Product of Korea) for noodles that I bought from HMart. It’s 10% protein. It broke when I tried to pull. What did I do wrong? You made it look so easy.
Maggie
I think you didn’t knead the dough enough to develop the gluten if the dough break apart easily. You will also need to let the dough rest long enough, so the gluten will relax and it’s possible to pull. This is not the Chinese street vendor style pulled noodles which you can use a lot of strength. It’s more like you rest the dough enough so you can use gravity to stretch the dough.
About flour, the AP flour in the US is different from Asian type. I developed this recipe long time ago while I was in China, and I did find the AP flour in the US doesn’t work as well. But it should still able to stretch.
I’ll be updating the recipe soon with slightly refined instructions. (We tested many types of flour and actually they all work. It’s more of the kneading and shaping that matter more)
Gab
Super easy. For me the trick was to let the weight of the dough pull itself, and to be willing to discard ends that wouldn’t stretch. My sense is that the resting time enables the gluten to align and makes it easier to stretch. If parts don’t stretch they will turn out more like dumplings than noodles. So don’t be afraid to let the dough tell you what it wants to do. Too much pulling means the proteins aren’t aligned and there’s not much point to stretch. They’ll simply clump in the water. We used them for pad see ew. Worked like a charm.
Shannon
This recipe turned out so fantastically and was straight forward to follow! My noodles turned out puffier looking which I think means my dough was too thick or I cooed them too long but they tasted so good, were chewy and delicious. Definitely will be making this again
Mimi
Hi,
I just came across this and was wondering if I can cut the noodles thinner before pulling to get thinner noodles? Would it work or to hard to handle?
Maggie
You totally can. The dough is quite flexible and you can shape the noodles to whatever shape you prefer. Sometimes I cut them wider for fatty noodle ribbons and sometimes I do the thin noodles. Both will work.
andrew smith
Easy to follow and well organized!
frank
Thank you so much for sharing. thats the recipe i am looking for because i only mix and knead by hand.
1) will there be any problem if i leave the dough longer than what you have advised?
2) to clarify, do i need to cook the noodle before storing into the fridge?
Maggie
Hi Frank, yes you can leave the dough to rest longer. In China noodle shops make the dough ahead, grease the dough with a bit oil (to prevent from sticky), and store them in the fridge until ready to use.
And yes you should cook the noodle before storing. The raw noodles are very delicate and they will stick together after pulled, and need to be cooked immediately.
Esther
Hi Maggie,
Thank you for the recipe! Just wondering – how many cups are you using. For 200g, it seems to be at least 1 1/2 cups? I found that 140ml of water was not enough. What do you think?
Maggie
Hi Esther, 200 g flour is about 1 1/3 cup. But depending on how to pack the cup, you might end up getting more flour than 200 g.
When you slowly add the water and stir with the flour, you should able to get most of the dry flour off the bowl. If it seems too dry, simply add a bit more water, 1 tablespoon at a time and keep stirring, so it will form a dough for kneading.
Ted
Hi, I spend my winters in Penang, Malaysia. The hawkers there seem to pre-cook their noodles and keep them in the fridge until need. Can I do this with these? By the way they came out terrific!!!
Maggie
Hi Ted, I’m sure you can cook the noodles, store them in the fridge and serve later. These noodles might be a bit more delicate than the hawker-style noodles, because it contains more moisture. If the noodles stuck together after storing, you can put them in a pot of hot water and gently stir with chopsticks to separate them while heating them up.
El
How much cups of water do I need?
El
Can you use bread mixer to mix the dough instead of knead with hand for 10mins. ?
What is the measurements in a cup?
Maggie
Hi El, the flour is 1 1/4 cup. And yes, you can use a mixer to mix the dough.
Melanie Sparkes
I didn’t think it was possible to make your own noodles or it had never occurred to me but I have never liked bought noodles so was excited to see this recipe. They are absolutely amazing! Almost melt in the mouth. Thank you so much and to your grandma’s housekeeper!
Stephanie
Can I make the noodles, then instead of boiling, let them hang dry to save for another day? Only have time on weekends to make this, would love to have it for a weekday
Maggie
Hi Stephanie, we never tried drying the noodles made from this recipe, but I don’t think it will work. The dough is too soft and it’s designed for cooking fresh. I don’t think it will rehydrate properly and still have the good texture if you dry them. If you want to make noodles and cook later, you need a harder dough, like the one in this recipe: https://omnivorescookbook.com/fresh-homemade-noodles (it’s rolled and cut noodles, not the hand-pulled).
T Falck
Do not, I repeat, do not do these with whole wheat flour! Big mistake! The texture is horrible and the wheat germ or husk (whatever it is) just makes it taste horrible. This is the first time I’ve had a first try at something taste so horrible but look so good! T_T I will be trying it again with white flour. Hopefully it will taste better lol. No rating right now as I am the one who made the error. XD