What is Cheung Fun?
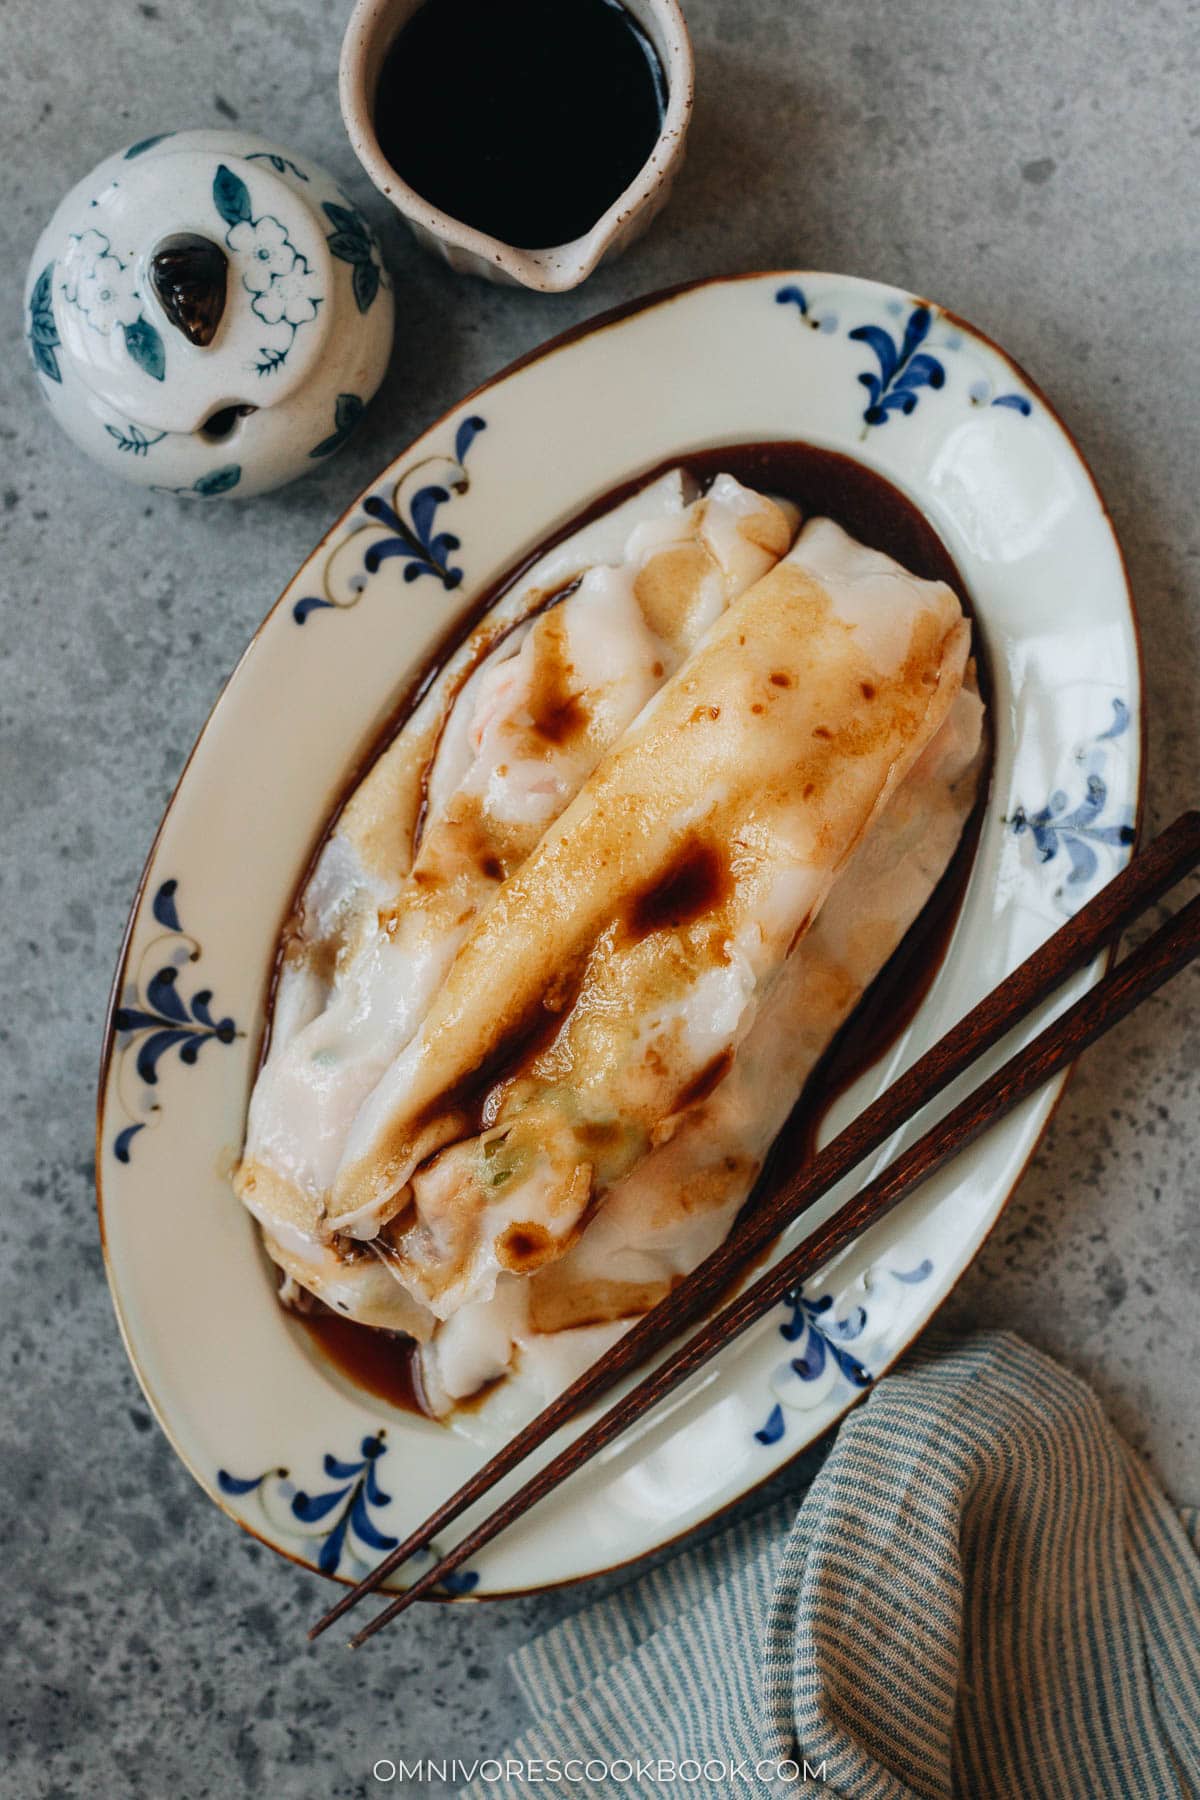
Cheung fun (肠粉, Chang Fun) is a beloved Cantonese dish and a dim sum classic. It is a thin, steamed rice noodle roll made from a simple batter of rice flour, starch, and water. The rice batter is steamed into thin sheets, then rolled up plain served or with a variety of fillings. It can be filled with many types of fillings such as meat slices, minced beef, seafood, eggs, vegetables and even You Tiao (Chinese savory fried donuts). It’s usually finished up with a sweet seasoned soy sauce, often a specialty and a trade secret of the dim sum restaurant. Cheung fun is also a popular street food, though the street version is usually less delicate than the dim sum type.
Why this recipe
I’ve tried making cheung fun countless times to perfect the recipe. And I can confidently tell you that this recipe yields a great result like you’d get from a dim sum restaurant.
- It produces very thin rice rolls with a smooth silky texture that is soft. The texture is much nicer than most street-food style cheung fun, which often has a very thick roll and a gumminess to it.
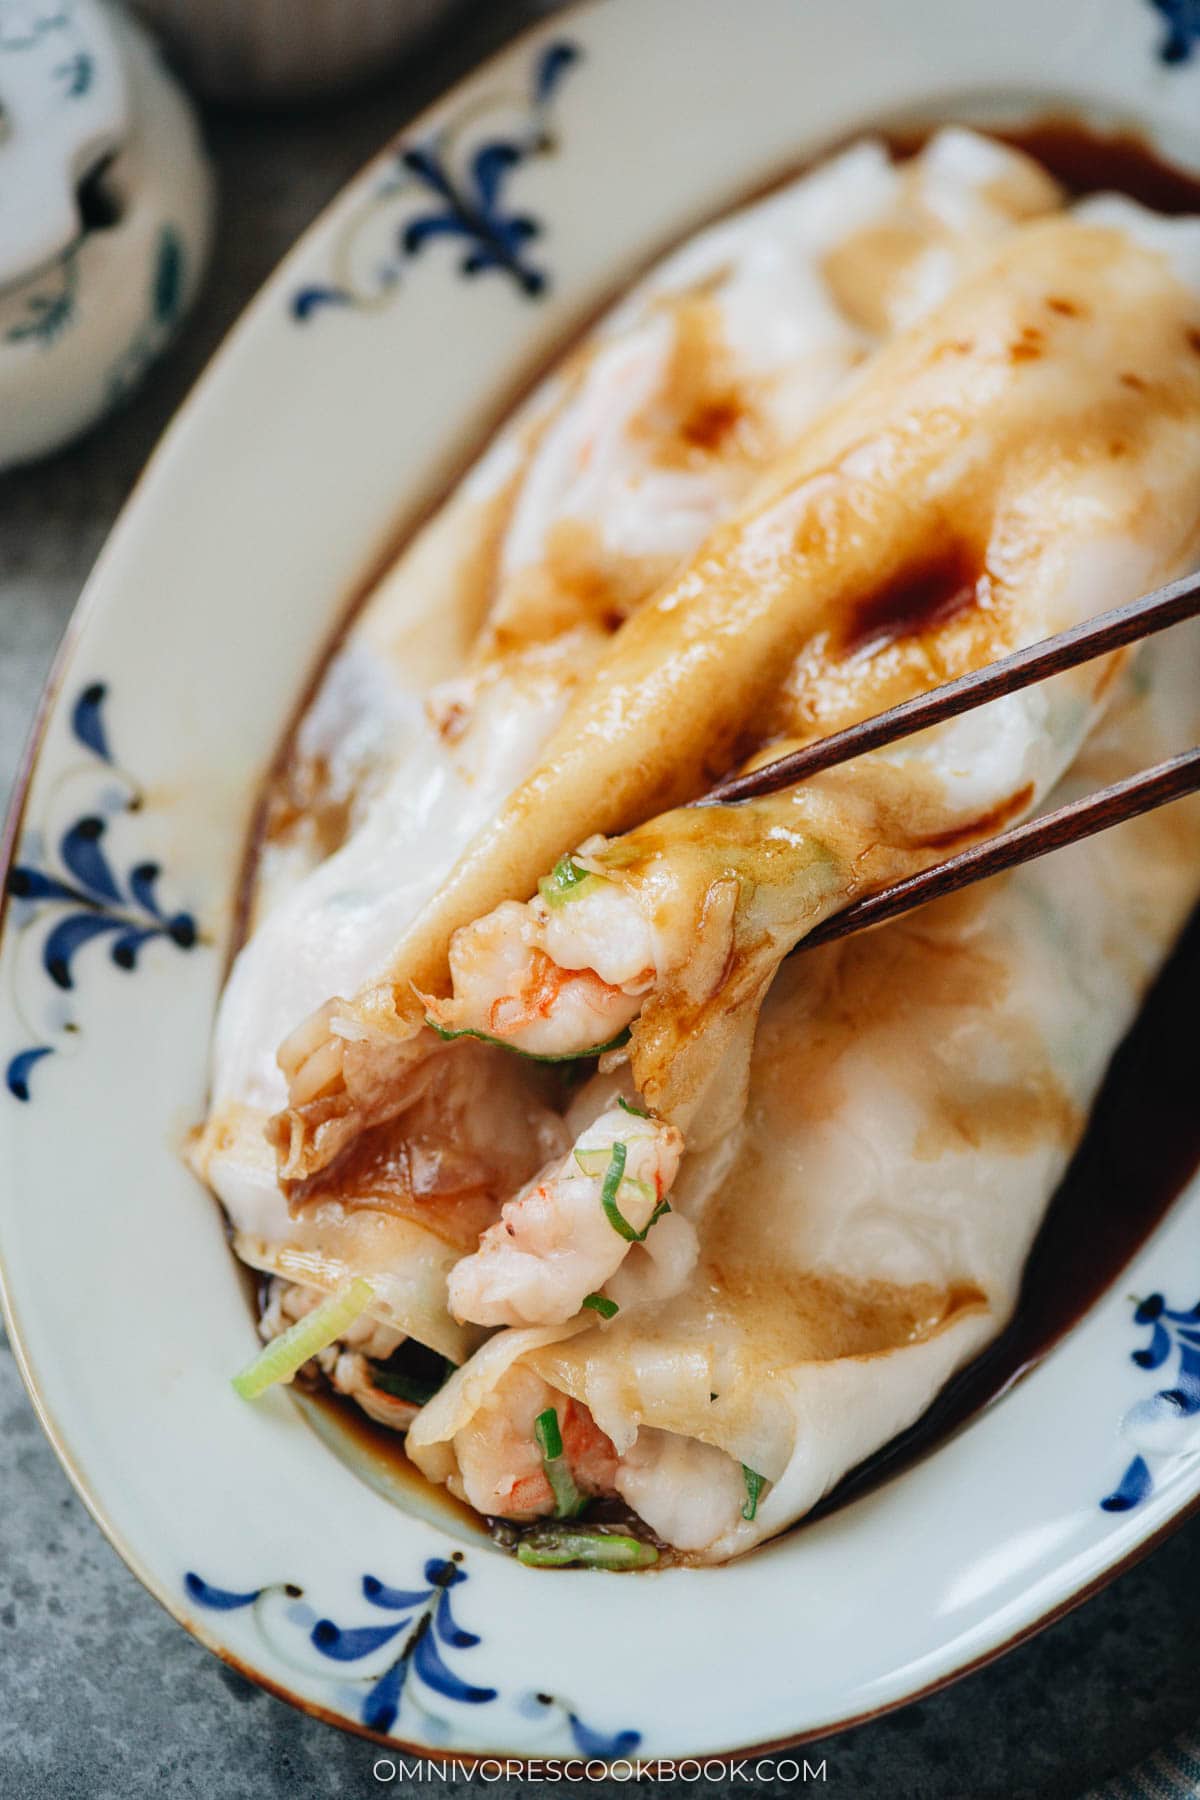
- The shrimp filling is quite generous, steamed with the roll together just like a dim sum restaurant, to preserve the fresh flavor and create the best texture.
- The seasoned soy sauce is very fragrant and easy to put together. It elevates the cheung fun one more level.
- The recipe shares all the key techniques that allow you to have a flexible setup depending on the cooking tools you have.
That being said, remember that cheung fun is one of the hardest dim sum items to make really well. It takes years of training and only senior chefs are put in charge of the cheung fun station at a restaurant. For me, good cheung fun requires 40% science, 40% technique and 20% art. You will probably need a few tries to get the hang of cooking and rolling it. But rest assured, even without a perfect presentation, the end result will be delicious nonetheless.
Specialty ingredients
Rice flour
Rice flour is the main ingredient in this recipe. You can easily find it in most Asian markets and sometimes even at regular supermarkets. I used Erawan rice flour, which is quite common and you can find it on Amazon.
Note, make sure you are using regular rice flour in this recipe, and not glutinous rice flour, which can have a very similar look.
Wheat starch
Wheat starch is another main ingredient in the recipe, giving the rice roll a smooth glossy texture. It is commonly sold in Chinese markets and you can find it on Amazon as well.
Note, if you cannot find wheat starch, you can experiment with other types of starch (like cornstarch or potato starch). They will yield a different texture and I cannot guarantee that the result will be as good. I highly recommend sourcing wheat starch if possible.
The tools you need
Large wok / skillet & steaming rack
To make cheung fun, you will need to set up a steamer that can hold a tray to make the cheung fun in.
I’m using a 14.5” flat bottom wok with a steaming rack inside.
A large and deep skillet is also usable, but you will need to make sure that the skillet can hold your tray and still cover it.
A stainless steel tray
A flat stainless steel tray that can fit into your wok (or skillet) is required. I used a 10.4”x8” tray from MUJI. It’s slightly smaller than a quarter sheet pan and can fit perfectly in my wok.
If you have a larger wok, a quarter sheet pan might fit. Alternatively, you can also use a 9”x9” baking pan.
In either case, use a stainless steel tray if possible. When heated up well and brushed with oil, you can easily release the rice roll using a bench scraper.
I found that a nonstick pan is not ideal because the surface is too smooth and does not offer any grip. Your rice roll will end up very thick if you use a nonstick tray.
Bench scraper and a brush
You need a bench scraper to roll the cheung fun. And you need a pastry brush for brushing oil onto the tray.
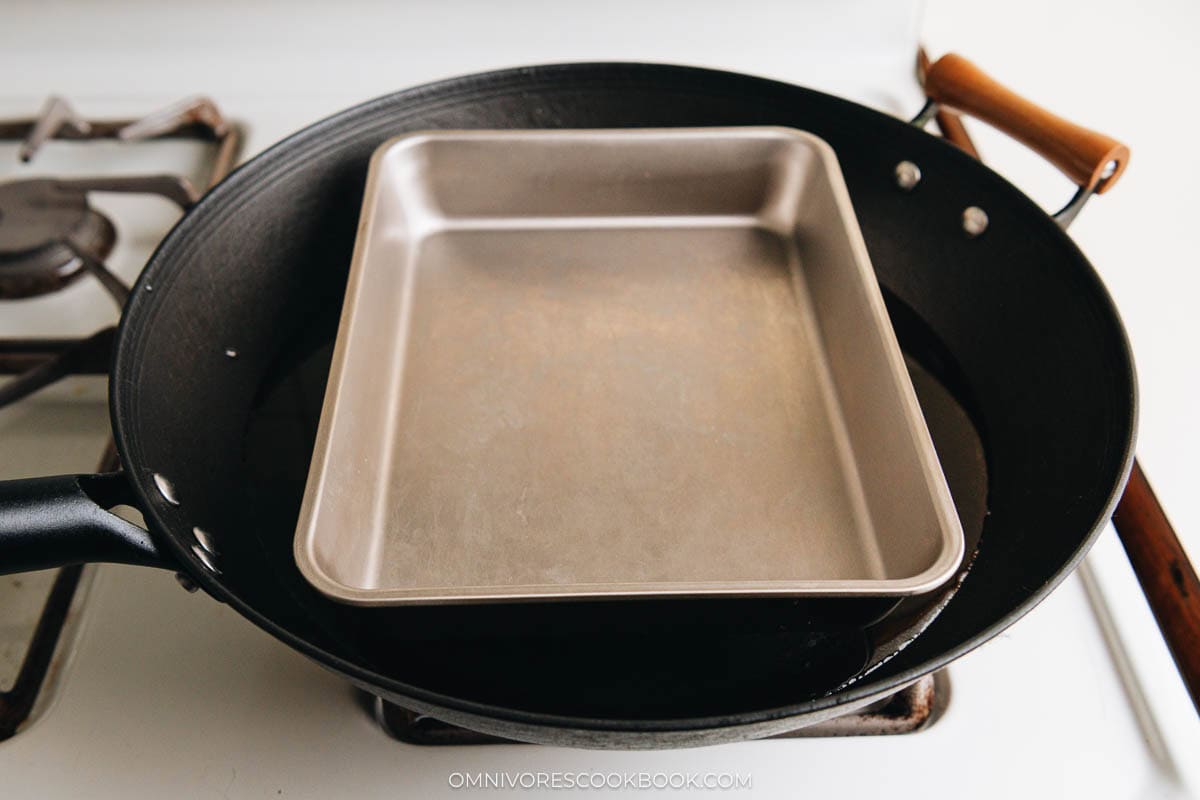
How to set up cheung fun station
Set up the steamer as follows:
- Place the steam rack in the center of the wok.
- Add water almost all the way to the top of the rack.
- Place the tray on top of the rack. Tweak it so it’s as level as possible.
If you have a round bottom wok with a wok ring, it’s easier to move around the wok during the cooking to keep the tray level. Some recipes suggest setting the tray directly over water so it floats. But I do not recommend it. Because you will be moving the tray in and out of the wok to roll the cheung fun. And a tray with boiling water makes it messy and hard to operate.
Cooking process
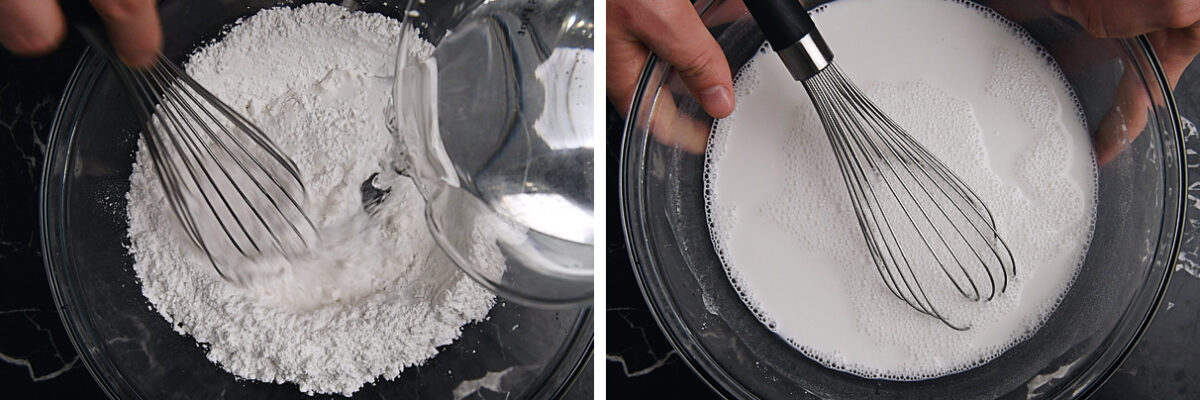
Mix the batter
Mix the batter at the very beginning. The batter is super thin and runny, and it’s easy to mix together. You want the batter to sit for as long as possible, so the starch hydrates well.
In China, this step often starts with soaking white rice in water and proceeding to blend it together, instead of using rice flour.
Marinate the shrimp
To marinate the shrimp, we start by slicing the shrimp across the center into two simple pieces, then vertically into four small pieces.
We found that it’s very challenging to use whole shrimp, because the shrimp curl up once cooked and become very tall. It takes extra practice and effort to be able to roll up the cheung fun. Alternatively, it’s much easier to fill it with more shrimp and roll it if using smaller shrimp pieces.
Once the shrimp is cut, mix it with the rest of the seasonings and cornstarch to marinate. The seasoning is quite mild, aiming to bring out the shrimp flavor. And the cornstarch keeps the mouthfeel very smooth.

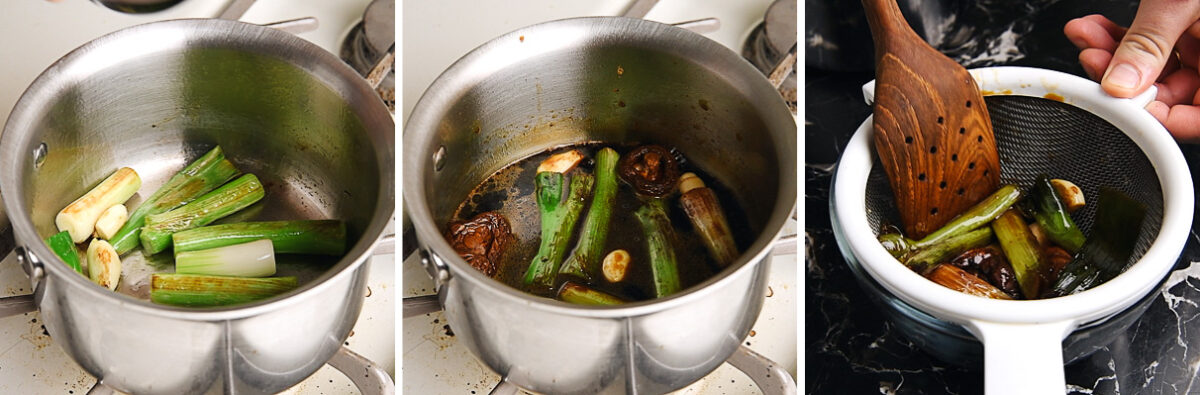
Make seasoned soy sauce
Making seasoned soy sauce is super easy.
- Brown the scallion and garlic.
- Add the rest of the seasonings and bring to a boil.
- Steep the ingredients to infuse flavor, then drain once cooled.
The sweet soy sauce is very balanced and has a lot of aroma to it, making it perfect for cheung fun and other dumplings as well.
Steam the cheung fun
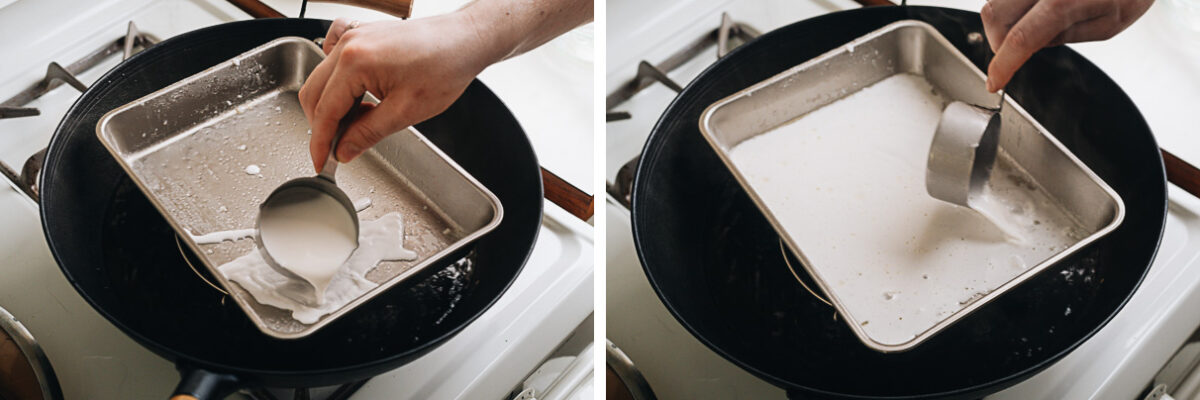
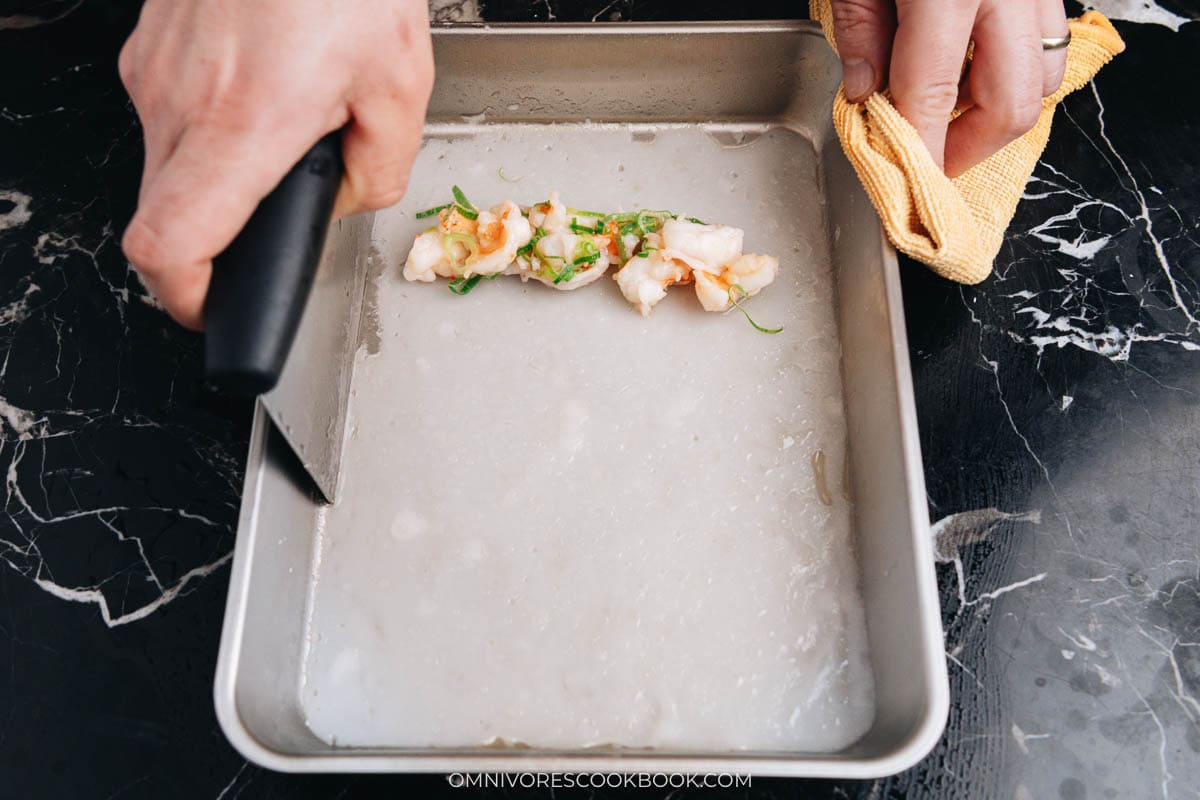
Now comes the exciting part. To steam cheung fun, make sure you heat up the tray until very hot. It’s like heating a frying pan before making your stir fry. A hot pan will cook the rice roll properly and it will be easier to release later. Once the pan is heated up, brush it with oil.

Stir the rice flour batter again and pour just enough into the tray. Quickly use the measuring cup to disperse the batter so it covers the tray fully. You can also tilt the tray slightly to spread the batter. Do this in a rapid manner and cover the wok immediately. If your tray is not level, the batter might not spread evenly. In this case, try your best to tweak the tray and the steaming rack to level the tray as much as possible.
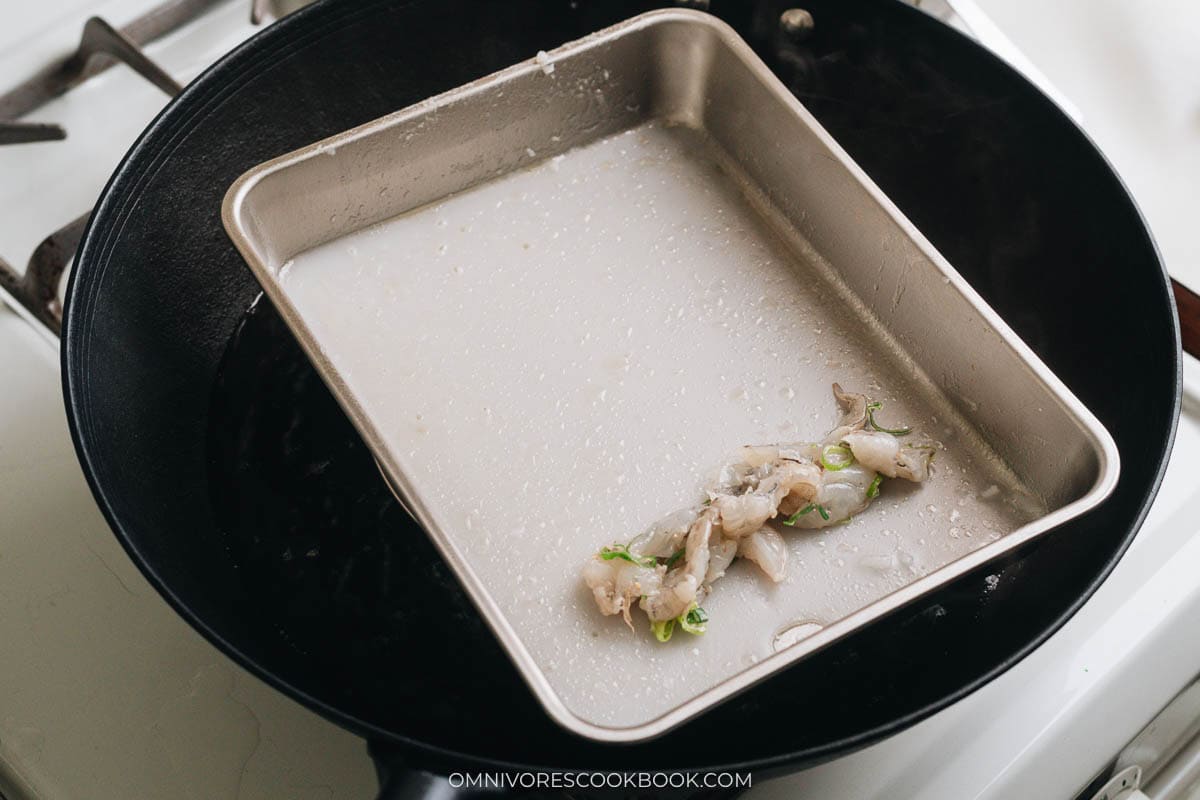
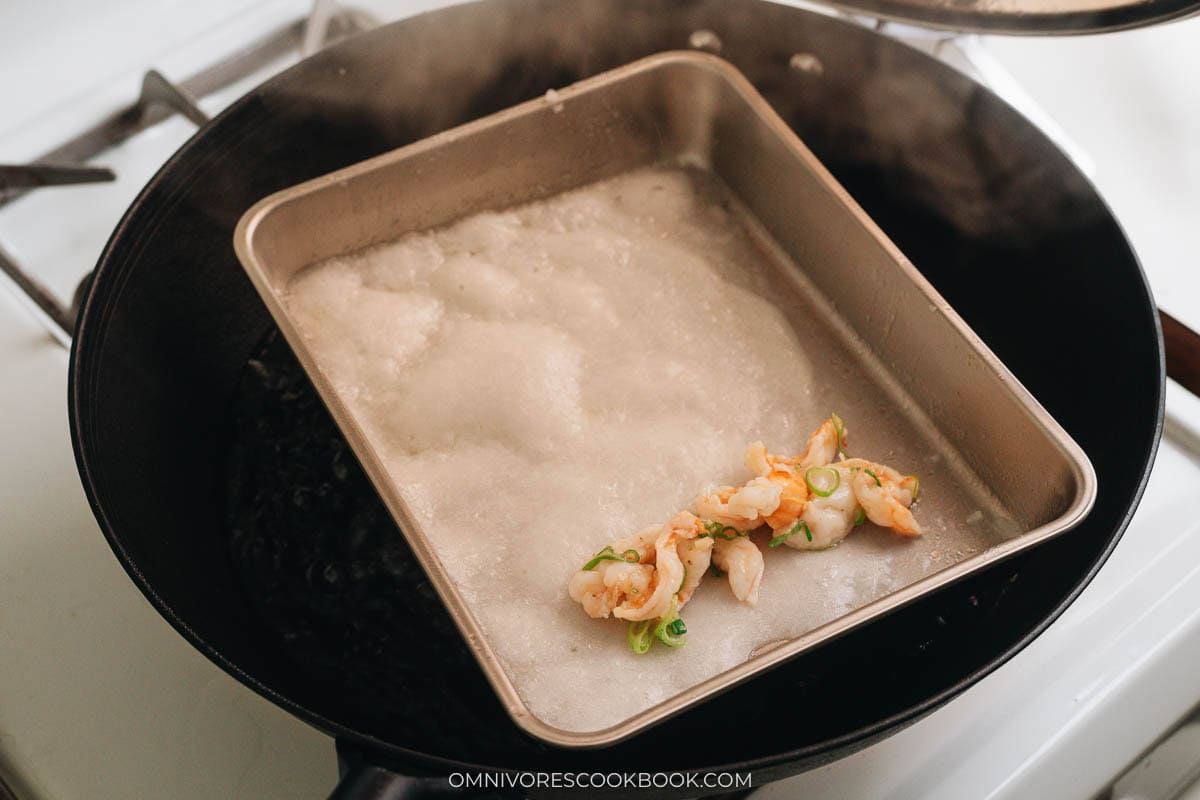
After steaming for 1 minute, add the shrimp filling. Then steam for another 2 minutes.
If you heat up the stainless steel tray properly, you will find that the rice roll is lifting up the tray once it’s steamed.
Then transfer the tray onto your working surface. Use a bench scraper to release the edges.
Slowly and carefully, use the bench scraper to roll up the shrimp into a single roll. This process requires a little practice and you might need a few tries to get the hang of it. I highly recommend watching my video. So you can see it’s totally OK to break the rice roll a bit and still get a good result.
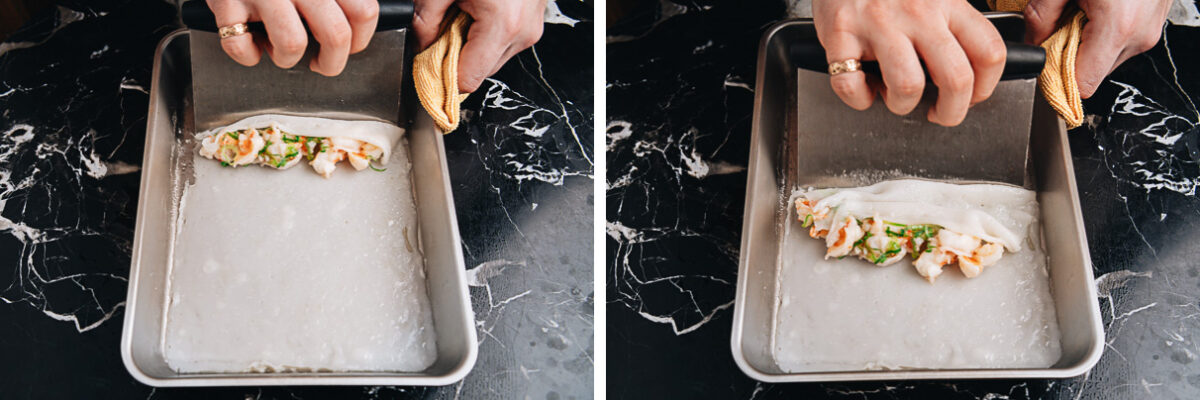
Before making the next cheung fun, make sure to scrape any excess batter off the tray and preheat the tray again before making another one.
How to serve and store cheung fun
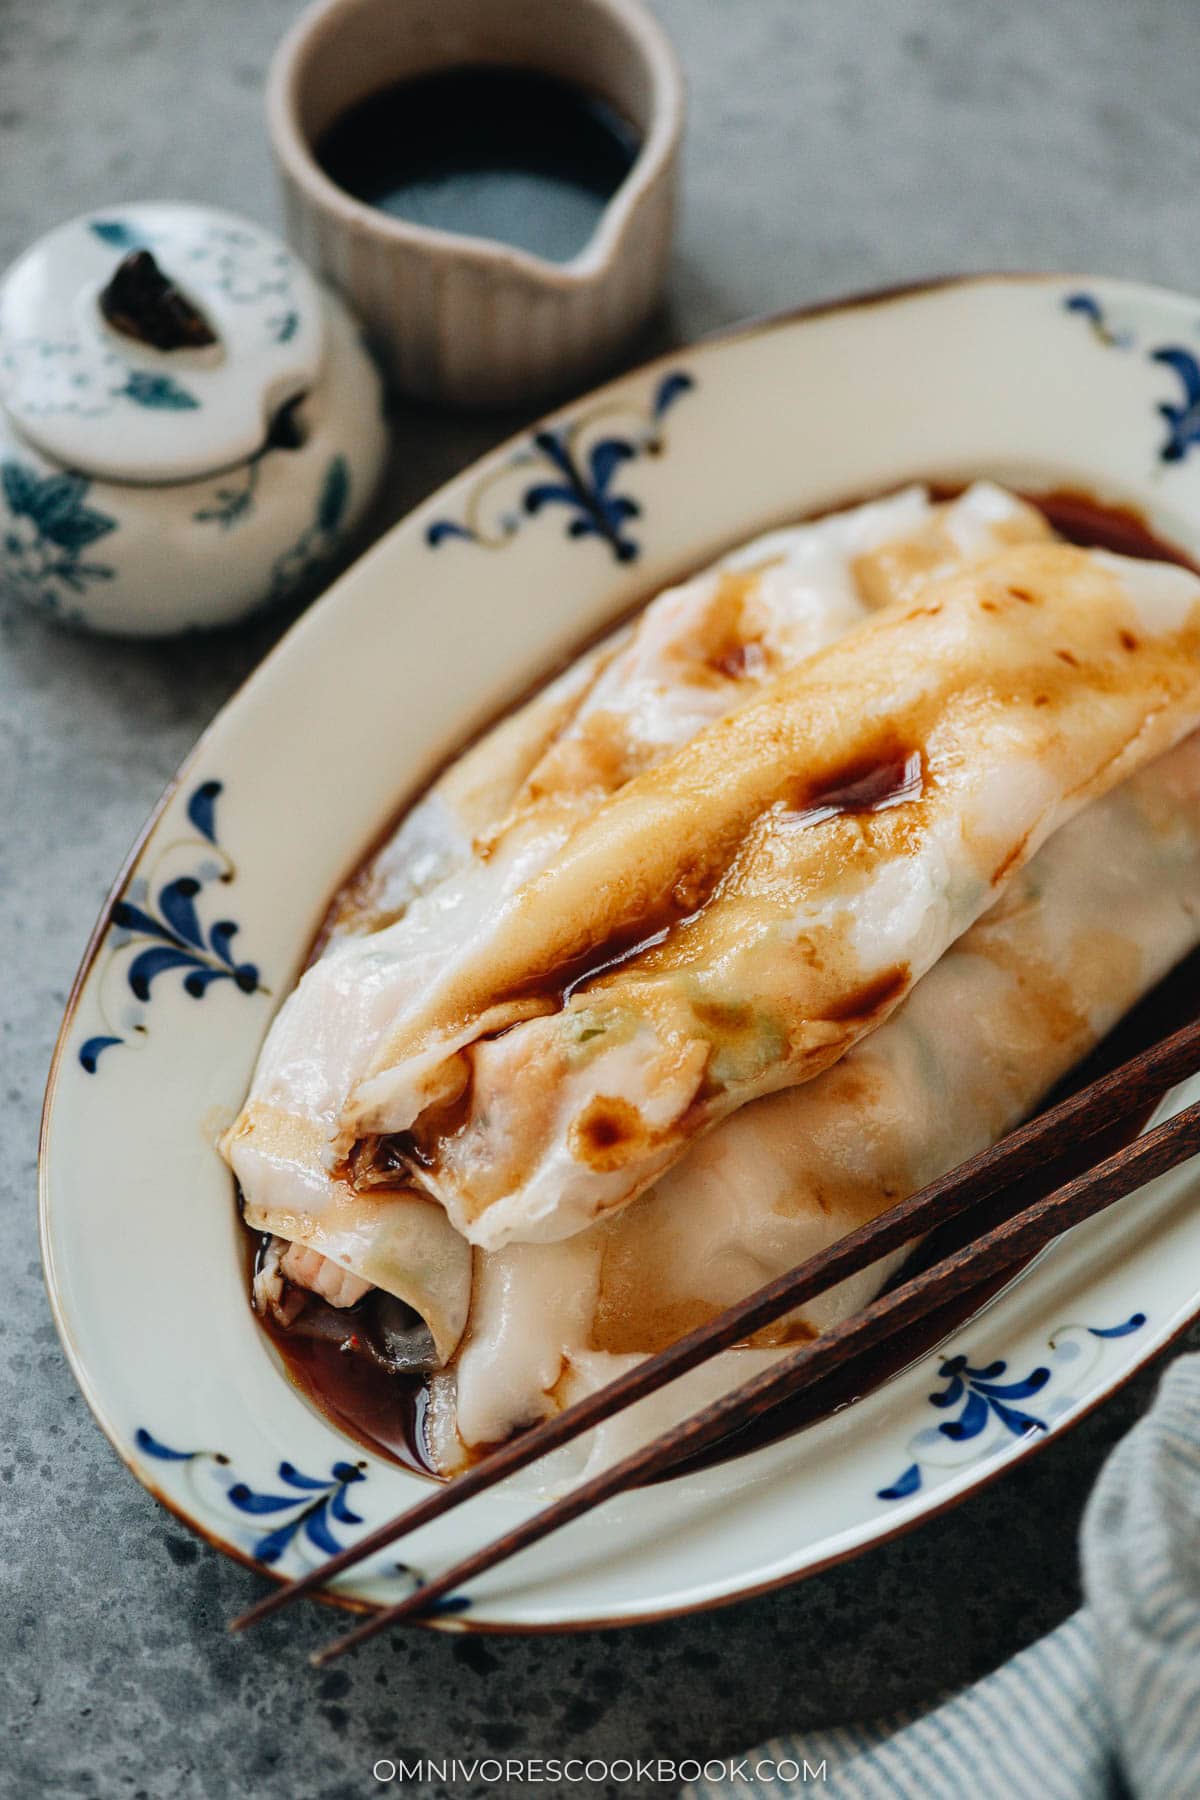
Once you make the cheung fun, drizzle it with the seasoned soy sauce and serve them while it’s warm.
This could be easier said than done, because in a home setting, it’s hard to make them rapidly.
If you have a very casual setting, the best way to enjoy cheung fun is to eat them right after you roll them. Or serve a small plate immediately once you make a few of them.
If you want to make all of them and serve them all together, you might consider covering up the ones you’ve already made to keep them warm.
I don’t recommend storing cheung fun to serve later, because the rice roll stiffen up once refrigerated. That being said, if you have to save them for later, you can steam the cheung fun again to heat them through before serving.
Other dim sum classics
If you’re hosting a dim sum party, consider making a few things that could be prepared ahead of time, some cold dishes, and a simple veggie dish. Here are some recommendations:
- Air Fryer Char Siu Pork – Marinate overnight, cook ahead of time and serve at room temperature.
- Cantonese Shumai with Pork and Shrimp – Wrap ahead of time and cook right before serving.
- Chinese Broccoli with Oyster Sauce (Gai Lan) – Quick to make. Can be made right before serving or ahead of time.
- Char Siu Bao (Steamed BBQ Pork Buns) – Make ahead and reheat before serving.
- Hong Kong Egg Tart – Make ahead and warm up before serving.
- Sesame Balls – Make ahead and reheat before serving.
- Braised Chicken Feet – Make ahead and reheat before serving.
Afterthoughts
It does take some time and practice to make cheung fun at home. But once you try it out, you’ll find the result very rewarding. Using this recipe, you will make a dish that tastes just as good—if not better—than what you’d find at a restaurant.
In the recipe, I shared the most popular shrimp filling (it’s also my favorite!). If there is another filling you’d like to learn, leave a comment below and let me know. I’d love to share another recipe in the future.
Chinese Cooking Made Easy
Are you new to this website? This free email series is a great place to start. I’ll walk you through a few of my most popular recipes and show you how and why they work. You’ll quickly start to cook better Chinese food in your own kitchen.
Watch video
Cheung Fun with Shrimp (鲜虾肠粉)
Ingredients
Batter
- 1 cup rice flour
- 1/2 cup wheat starch
- 1/2 teaspoon salt
- 3 cups water
Filling
- 1/2 lb shrimp , peeled and deveined
- 2 scallions , sliced (greens only)
- 1/2 tablespoon cornstarch
- 1/2 tablespoon water
- 1/4 teaspoon salt
- 1/4 teaspoon sugar
- 1/4 teaspoon toasted sesame oil
- Pinch of white pepper
Seasoned Soy Sauce
- 1 teaspoon vegetable oil
- 2 scallions , sliced into 2” (5-cm) pieces (white part only)
- 2 garlic cloves
- 5 tablespoons water
- 2 tablespoons light soy sauce
- 1 tablespoon dark soy sauce
- 2 tablespoons sugar
- 1 tablespoon oyster sauce
- 2 dried shiitake mushrooms
- Pinch of white paper
Special equipment
- Large wok (or large deep skillet with cover)
- Stainless steel tray , that can fit into your wok or skillet
- Steaming rack
- Bench scraper
- Brush
Instructions
- To make the batter: Combine the rice flour, wheat starch and salt in a large bowl. Mix with a whisk. Pour in the water. Mix until the flour is fully incorporated. Let the flour hydrate while preparing the rest of the ingredients.
- To make the filling: Slice the shrimp across the center lengthwise in half, then slice across vertically into 2/3” (1.5 cm) pieces. (*Footnote 1) Transfer the shrimp into a medium bowl, add the scallion greens, cornstarch, water, salt, sugar, sesame oil and white pepper. Mix well and set aside to marinate.
- To make the sauce: Heat the oil over medium heat in a small pot until hot. Add the scallions. Let cook until the surface turns lightly golden, 1 to 2 minutes. Then add the garlic. Cook for another minute, until the garlic turns golden brown. Add the water, light and dark soy sauce, sugar, oyster and shiitake mushrooms. Stir to mix. Keep cooking until the sauce is boiling and the sugar has melted. Remove the pot from the stove. Leave with the aromatics in the pot to infuse the flavor, until the sauce has fully cooled. Strain the sauce into a small bowl.
Make the cheung fun
- Set up the steamer: In a large wok, place a steaming rack in the center, and place a rectangular stainless steel tray onto the rack, the short side facing you. Make sure the wok lid can cover the wok properly. (Footnote 2) Keep the tray as leveled as you can. Fill the wok with water until just below the rectangular tray. Heat over high heat until the water is boiling. Keep the wok covered to heat up the stainless tray for at least 5 minutes, until very hot.
- To make cheung fun: Brush a thin layer of vegetable oil across the tray. Stir the batter before using every time, so the rice flour is fully incorporated. Pour 1/3 cup of batter onto the tray. (*Footnote 3) Use the cup to disperse the batter to cover the tray. You can also use a dish towel to hold the tray, and tilt the tray to evenly spread out the batter. Pour in a little more batter to fully cover the tray, if needed. (*Footnote 4) Cover and cook for 1 minute, until the batter just sets but is not fully cooked.
- Add the filling: Place approximately 2 tablespoons worth of filling in a tight row on the cheung fun batter, about a third of the way up, across the short side of the pan facing you. Cover again and steam for an additional two minutes, until the shrimp is fully cooked and the cheung fun is set.
- Roll the cheung fun: Use a dish towel to transfer the steaming tray from the wok onto a clean work surface. Keep the wok covered. Using a bench scraper, first gently separate the cheung fun from the tray’s sides. Then use the bench scraper to roll the cheung fun, starting with the side that the shrimp are closest to. Gently lift the cheung fun from the tray’s edge, and roll until a cylinder is formed. (*Footnote 5) If the cheung fun is having trouble lifting off the tray once rolled, gently tip the tray over a plate, so the roll comes off the tray in one piece.
- To make the rest cheung fun: Place the stainless tray back into the wok. Reheat for a few minutes until hot before using. Repeat the process until all the batter and shrimp are used up.
- To serve: Pour a few spoonfuls of the seasoned soy sauce over the cheung fun. Serve warm as an appetizer or a snack.
- Store and reheat: You can keep the cheung fun in an airtight container in the fridge for 1 to 2 days, or in the freezer for a month. Steam to reheat until heated through.
Notes
- We found that using whole shrimp, or halved shrimp makes it very difficult to roll the cheung fun without a lot of practice. Because the shrimp will curl up and become very tall. This is why we slice the shrimp thinly, then further into smaller pieces, to prevent it from curling up too much.
- I used a 14.5” wok and a stainless steel tray that is 10.4” long and 8” wide. It was the perfect size to make one cheung fun. An alternative way is to use a 9”x9” baking dish or any tray that can fit into your wok or a large deep skillet (like a large stainless steel pan or a wide dutch oven).
- For the size of my tray (10.4”x8”), I can use anywhere from 1/3 cup to 1/2 cup of the batter to make a roll with good texture. A 9”x9” tray uses the same amount of batter. For other sizes, you might need to adjust the amount of batter accordingly. The goal is to create a layer that’s possible to roll up, but still semi transparent and as thin as possible for the best texture.
- Your batter might not stay in a thin sheet if the tray is not level. If that happens, try to use a pair of tongs to gently move the steaming rack and try to level the tray as much as you can.
- It’s totally OK if the rice sheet breaks a little during the rolling. It happens quite often, especially if you try to keep the rice roll thin. Once rolled, you shouldn’t notice the small breaks.
- To make the dish gluten-free: Use tamari to replace soy sauce. Make sure to use a gluten-free oyster sauce.
Nutrition

Did you make this recipe?
I’d love to hear how it turned out for you! Please take a moment to leave a 5-star rating ⭐️ and share your thoughts in the comments further down the page. It really helps others discover the recipe too.
Maxine
My favourite dim sum treat! Thanks for sharing this, quite excited to try it! Can you post a beef filling recipe? That’s my actual favourite! Appreciate the tasty recipes on your site!
Maggie Zhu
Yes I’d love to develop the beef filling recipe too! Are you looking for the minced beef or the sliced beef? Both are quite common. I think the minced type is more popular in the US (saw it often in dim sum restaurant), and the sliced beef filling is quite common in China.
Valerie
Go for the minced beef! Nice website and congrats on the ATK collab!