Thanks, I’m sending it over now.
Check your inbox for the saved recipe. When you make it, I’d love for you to leave a rating and let me know how it turned out; I always enjoy hearing from you directly!
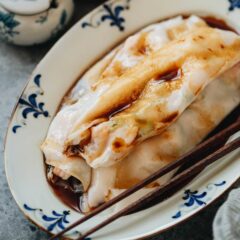
Cheung Fun with Shrimp (鲜虾肠粉)
A cheung fun recipe that yields a very thin rice roll with a silky smooth texture, juicy shrimp, and an aromatic seasoned soy sauce that is just as good as the restaurant one. Replicate this dim sum favorite in your own kitchen by following my step-by-step photo and video guide.
Ingredients
Batter
- 1 cup rice flour
- 1/2 cup wheat starch
- 1/2 teaspoon salt
- 3 cups water
Filling
- 1/2 lb shrimp , peeled and deveined
- 2 scallions , sliced (greens only)
- 1/2 tablespoon cornstarch
- 1/2 tablespoon water
- 1/4 teaspoon salt
- 1/4 teaspoon sugar
- 1/4 teaspoon toasted sesame oil
- Pinch of white pepper
Seasoned Soy Sauce
- 1 teaspoon vegetable oil
- 2 scallions , sliced into 2” (5-cm) pieces (white part only)
- 2 garlic cloves
- 5 tablespoons water
- 2 tablespoons light soy sauce
- 1 tablespoon dark soy sauce
- 2 tablespoons sugar
- 1 tablespoon oyster sauce
- 2 dried shiitake mushrooms
- Pinch of white paper
Special equipment
- Large wok (or large deep skillet with cover)
- Stainless steel tray , that can fit into your wok or skillet
- Steaming rack
- Bench scraper
- Brush
Instructions
- To make the batter: Combine the rice flour, wheat starch and salt in a large bowl. Mix with a whisk. Pour in the water. Mix until the flour is fully incorporated. Let the flour hydrate while preparing the rest of the ingredients.
- To make the filling: Slice the shrimp across the center lengthwise in half, then slice across vertically into 2/3” (1.5 cm) pieces. (*Footnote 1) Transfer the shrimp into a medium bowl, add the scallion greens, cornstarch, water, salt, sugar, sesame oil and white pepper. Mix well and set aside to marinate.
- To make the sauce: Heat the oil over medium heat in a small pot until hot. Add the scallions. Let cook until the surface turns lightly golden, 1 to 2 minutes. Then add the garlic. Cook for another minute, until the garlic turns golden brown. Add the water, light and dark soy sauce, sugar, oyster and shiitake mushrooms. Stir to mix. Keep cooking until the sauce is boiling and the sugar has melted. Remove the pot from the stove. Leave with the aromatics in the pot to infuse the flavor, until the sauce has fully cooled. Strain the sauce into a small bowl.
Make the cheung fun
- Set up the steamer: In a large wok, place a steaming rack in the center, and place a rectangular stainless steel tray onto the rack, the short side facing you. Make sure the wok lid can cover the wok properly. (Footnote 2) Keep the tray as leveled as you can. Fill the wok with water until just below the rectangular tray. Heat over high heat until the water is boiling. Keep the wok covered to heat up the stainless tray for at least 5 minutes, until very hot.
- To make cheung fun: Brush a thin layer of vegetable oil across the tray. Stir the batter before using every time, so the rice flour is fully incorporated. Pour 1/3 cup of batter onto the tray. (*Footnote 3) Use the cup to disperse the batter to cover the tray. You can also use a dish towel to hold the tray, and tilt the tray to evenly spread out the batter. Pour in a little more batter to fully cover the tray, if needed. (*Footnote 4) Cover and cook for 1 minute, until the batter just sets but is not fully cooked.
- Add the filling: Place approximately 2 tablespoons worth of filling in a tight row on the cheung fun batter, about a third of the way up, across the short side of the pan facing you. Cover again and steam for an additional two minutes, until the shrimp is fully cooked and the cheung fun is set.
- Roll the cheung fun: Use a dish towel to transfer the steaming tray from the wok onto a clean work surface. Keep the wok covered. Using a bench scraper, first gently separate the cheung fun from the tray’s sides. Then use the bench scraper to roll the cheung fun, starting with the side that the shrimp are closest to. Gently lift the cheung fun from the tray’s edge, and roll until a cylinder is formed. (*Footnote 5) If the cheung fun is having trouble lifting off the tray once rolled, gently tip the tray over a plate, so the roll comes off the tray in one piece.
- To make the rest cheung fun: Place the stainless tray back into the wok. Reheat for a few minutes until hot before using. Repeat the process until all the batter and shrimp are used up.
- To serve: Pour a few spoonfuls of the seasoned soy sauce over the cheung fun. Serve warm as an appetizer or a snack.
- Store and reheat: You can keep the cheung fun in an airtight container in the fridge for 1 to 2 days, or in the freezer for a month. Steam to reheat until heated through.
Notes
- We found that using whole shrimp, or halved shrimp makes it very difficult to roll the cheung fun without a lot of practice. Because the shrimp will curl up and become very tall. This is why we slice the shrimp thinly, then further into smaller pieces, to prevent it from curling up too much.
- I used a 14.5” wok and a stainless steel tray that is 10.4” long and 8” wide. It was the perfect size to make one cheung fun. An alternative way is to use a 9”x9” baking dish or any tray that can fit into your wok or a large deep skillet (like a large stainless steel pan or a wide dutch oven).
- For the size of my tray (10.4”x8”), I can use anywhere from 1/3 cup to 1/2 cup of the batter to make a roll with good texture. A 9”x9” tray uses the same amount of batter. For other sizes, you might need to adjust the amount of batter accordingly. The goal is to create a layer that’s possible to roll up, but still semi transparent and as thin as possible for the best texture.
- Your batter might not stay in a thin sheet if the tray is not level. If that happens, try to use a pair of tongs to gently move the steaming rack and try to level the tray as much as you can.
- It’s totally OK if the rice sheet breaks a little during the rolling. It happens quite often, especially if you try to keep the rice roll thin. Once rolled, you shouldn’t notice the small breaks.
- To make the dish gluten-free: Use tamari to replace soy sauce. Make sure to use a gluten-free oyster sauce.
Nutrition
Serving: 1serving, Calories: 365kcal, Carbohydrates: 62.4g, Protein: 15.9g, Fat: 5.3g, Saturated Fat: 1.2g, Cholesterol: 116mg, Sodium: 1277mg, Potassium: 171mg, Fiber: 1.3g, Sugar: 6.7g, Calcium: 62mg, Iron: 1mg