As I was growing up, my parents played very different roles when it came to cooking.
My mom was in charge of “mundane” everyday cooking that was fast and healthy. My dad only cooked once in awhile, when he’d showcase his amazing recipes inherited from my grandma. It was a bit like good cop bad cop – while my mom was trying hard to convince me to eat more veggies daily, my dad would pass me a big plate of fried food on the weekend. I don’t need to tell you which I loved the most as a kid, right?
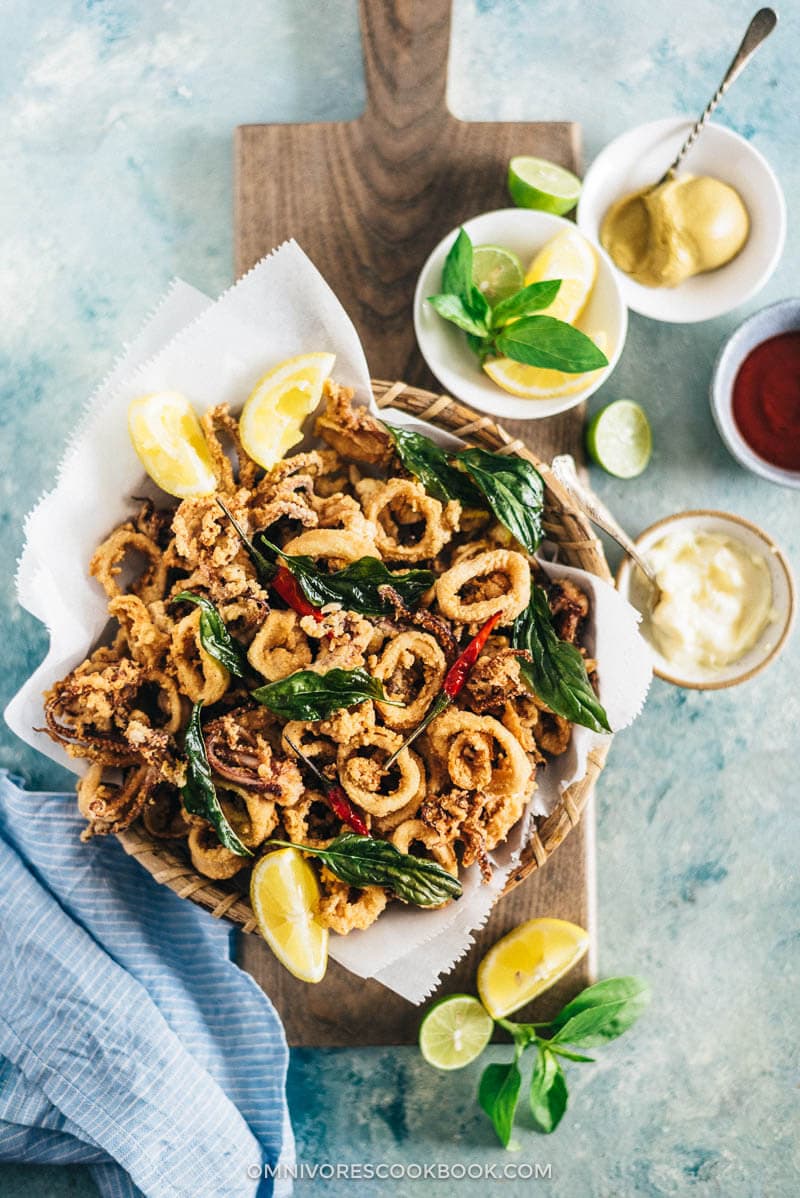
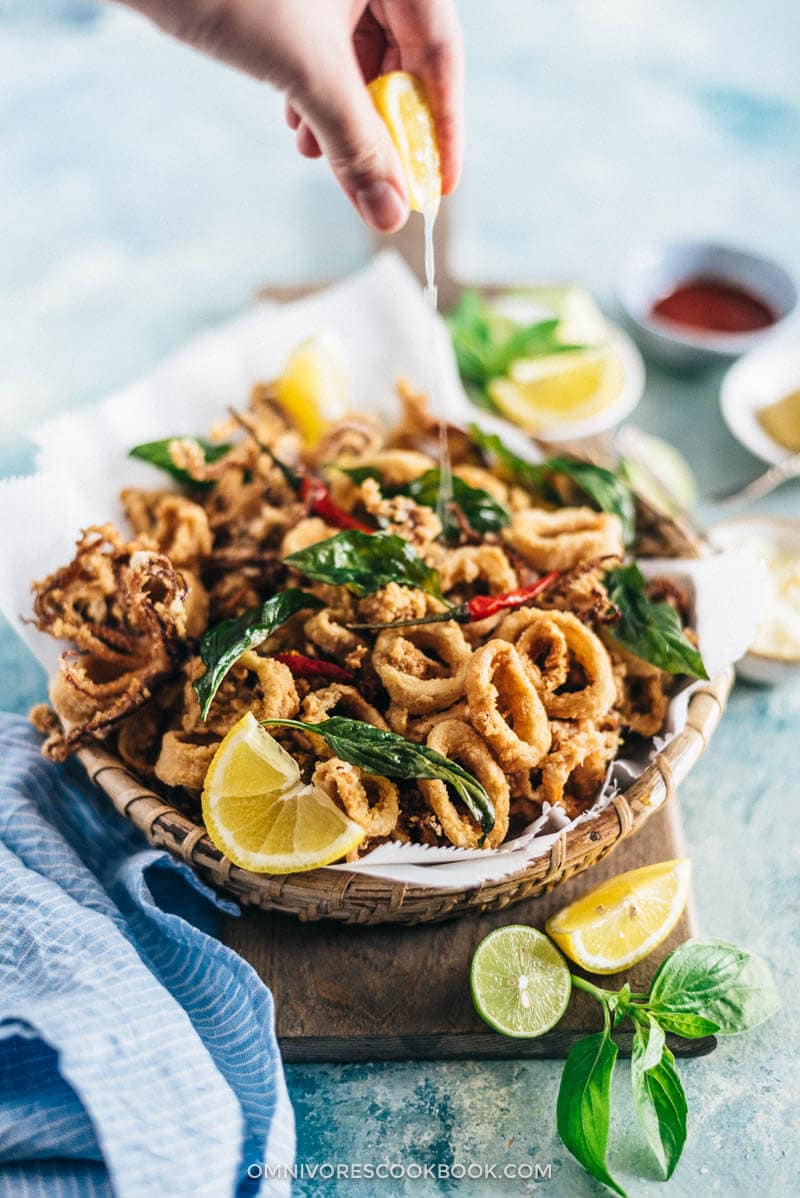
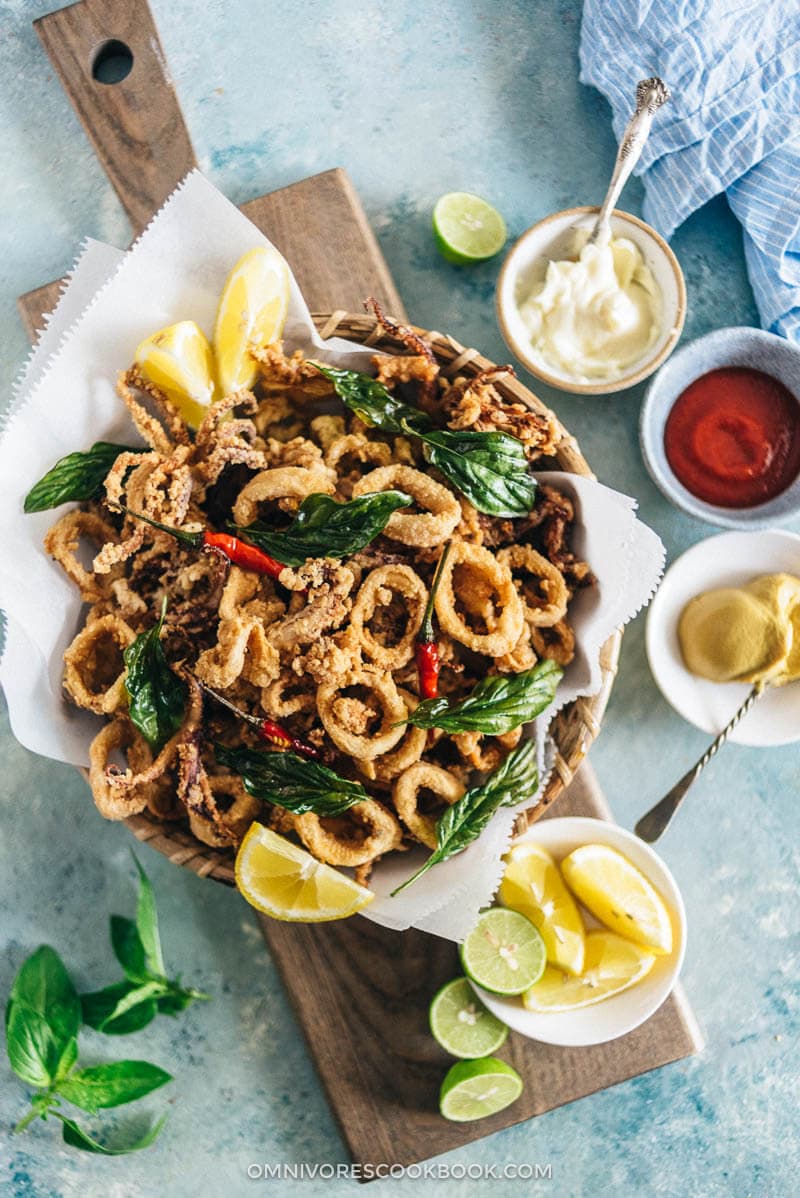
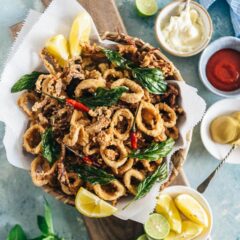
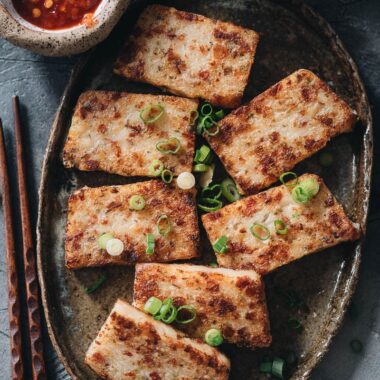
Salt and Pepper Squid is one of my childhood weekend treats that I remember most fondly.
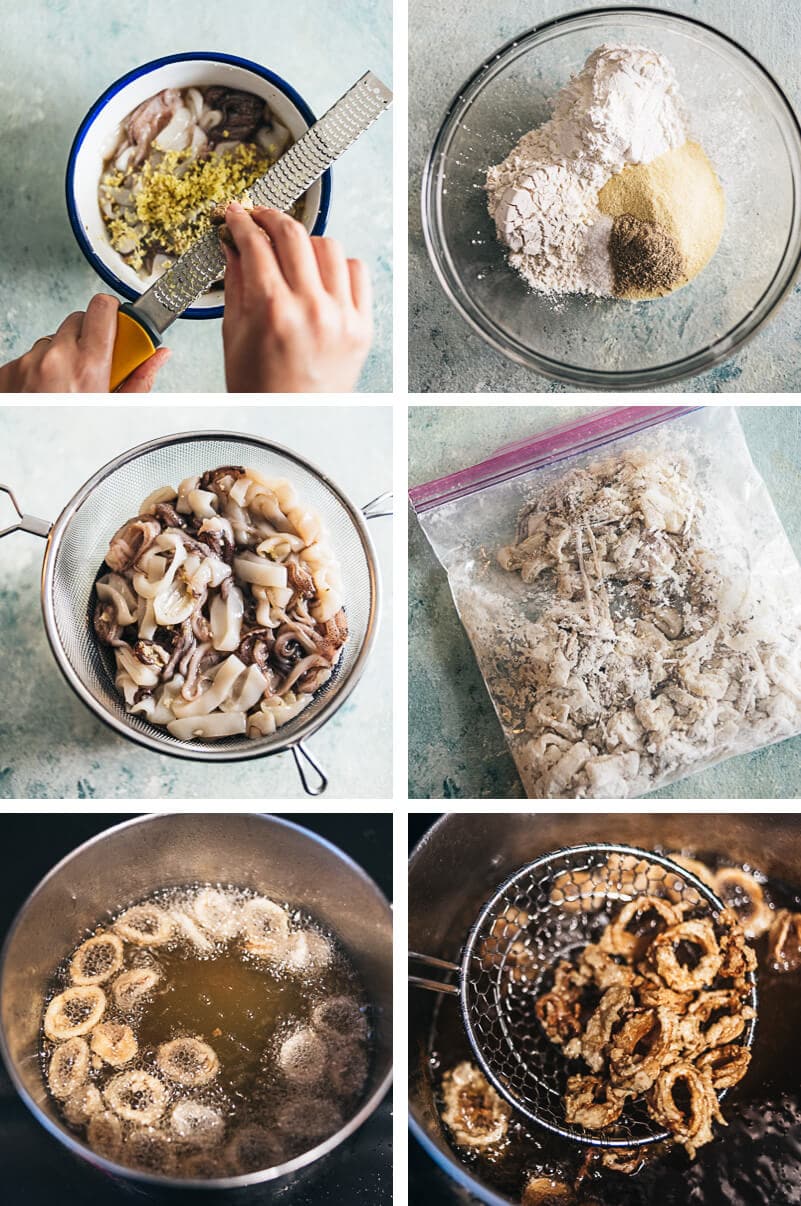
My dad would marinate the squid rings with Shaoxing wine and tons of ginger. Then he’d coat them with a simple batter seasoned with salt and pepper, frying them until they were a beautiful golden yellow.
Since I’m the only child in the family, I’ve had all the privilege. My dad would fry the squid rings in small batches, serve the fresh first batch on a plate and pass it directly to me, nudging me to eat them before anything turned cold.
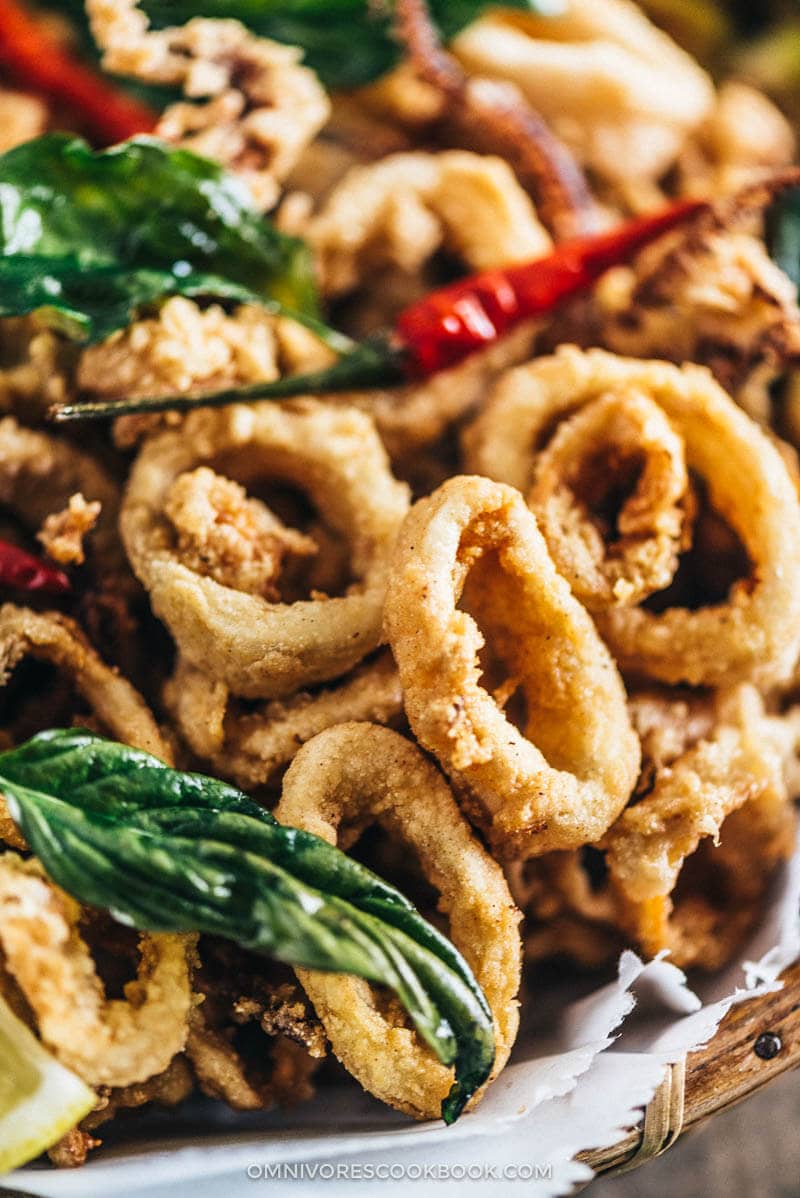
The squid is melt-in-your-mouth tender; the batter as addictive as chips.
They’re usually an appetizer before our Sunday lunch – but as you can imagine, I rarely actually make it to lunch without having my belly full of delicious salt and pepper squid 😉
Cook restaurant-style Salt and Pepper Squid at home
The other day, while chatting with my husband, I suddenly missed my childhood Sunday special treat. I had to run to Central Market to grab a big bag of baby squid and announced that we’d have a fancy snack for dinner!
- What type of squid to choose?
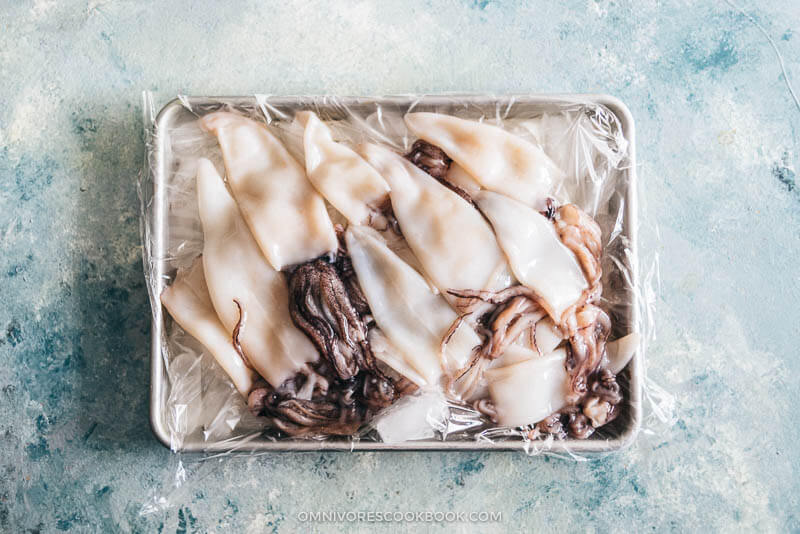
Baby squid has very tender meat and yields the best results. Alternatively, you can get bigger squid as well – try to slice it into thinner rings and you’ll still get great texture. Avoid buying giant squid that weighs like a pound, as the meat is usually super tough.
- How to store squid properly before cooking
Get extra ice from the fish market. Once you return home, immediately unseal the bag. Spread the ice in a tray, cover it with plastic wrap, spread the squid on top of the wrap, then transfer the tray into the fridge. If you plan to leave it in the fridge for longer, you can loosely cover the tray with plastic wrap. The squid will stay fresh for a day. If you plan to cook a few days later, always freeze the squid to maintain its freshness. This rule applies to fish and other seafood as well.
- Marinating is very important
It eliminates any fishiness from the squid and gives it a nice aroma. Ginger contains enzymes that tenderize the meat, which is an extra bonus.
- The formula for creating that crunchy, crispy, airy texture
The short answer is – cornstarch plus a high oil temperature.
To cook the best fried squid, we need to fry it for a short amount of time (about 2 to 3 minutes) to keep the meat from overcooking. A higher oil temperature (375°F to 400°F) will crisp up the coating at lightning speed.
The other essential is the coating. To add crunchiness to the texture, blend cornstarch into all-purpose flour. I also added cornmeal on top to get a bit extra chewiness, like the salt and pepper squid served in a restaurant.
If you want a gluten-free dish, you can even replace the all-purpose flour with cornstarch. Your finished squid rings will have a lighter color, but they will remain crunchy crisp.
- Sauce? No sauce?
When it comes to cooking with seafood, I always prefer the most simple seasonings so you can taste the deliciousness of the pure ingredients. And trust me, once you fry a batch of this salt and pepper squid, you’ll finish a plate even before you can reach for a bottle of sauce in the fridge.
My favorite seasoning is freshly squeezed lemon juice, just the way Japanese restaurants serve karaage (fried chicken thigh).
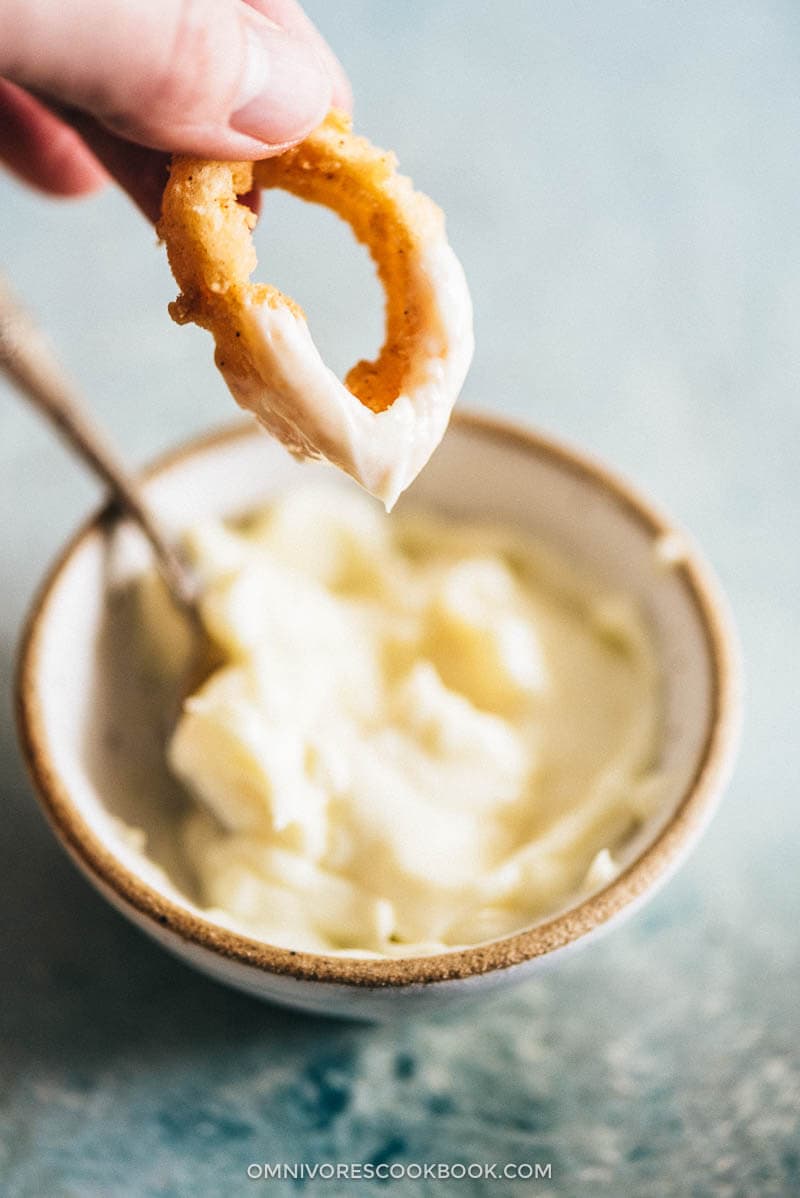
Some of other great sauces include mayonnaise, Sriracha, mustard, and wasabi mayo.
That’s all you need to know to cook the best salt and pepper squid at home!
So what happened last Sunday when I cooked the dish at home?
My husband happened to be in a telephone meeting in another room while I was cooking, so I had to suppress my urge to burst in the middle of the meeting and offer the hot-off-the-stove squid! Half an hour later, he complained that he’d been dying out there with the wonderful smell! And instructed me that in future, I’m “allowed to interrupt any meetings” when I cook salt and pepper squid.
We finished one and a half pounds of squid before dinner, then came to the conclusion that this salt and pepper squid does not work for a party – because none will survive before any guest arrives.
More delicious seafood recipes
- Cheesy Shrimp Baked Spring Rolls
- Steamed Mussels with Ginger Oyster Sauce
- Mini Tuna Pizzas
- Steamed Fish with Black Bean Sauce
- Seafood Congee
If you give this recipe a try, let us know! Leave a comment, rate it (once you’ve tried it), take a picture and tag it @omnivorescookbook on Instagram! I’d love to see what you come up with.
Chinese Cooking Made Easy
Are you new to this website? This free email series is a great place to start. I’ll walk you through a few of my most popular recipes and show you how and why they work. You’ll quickly start to cook better Chinese food in your own kitchen.
Salt and Pepper Squid
Ingredients
- 1 and 1/2 pounds baby squid
- 6 cups vegetable oil
- 1 batch basil for garnish (Optional)
- 4 to 5 Thai chili peppers for garnish (Optional)
Marinade
- 2 tablespoons Shaoxing wine (or dry sherry, or Japanese sake)
- 1/4 teaspoon salt
- 2 tablespoons ginger , minced
- 2 cloves garlic , minced
Coating
- 1/3 cup all-purpose flour (*footnote 1)
- 1/3 cup cornstarch
- 1/4 cup cornmeal
- 1/2 teaspoon salt
- 1/2 teaspoon white pepper
- Serving options
- Lemon wedges
- Mayonnaise ketchup, Sriracha hot sauce, wasabi mayo, or mustard as dipping sauce
Instructions
- Rinse squid with running water and drain. Slice the cap into 1/3-inch (1 cm) rings and leave the tentacles in one piece. If you use larger squid, you can slice the tentacles into 2-inch (4 cm) bite size pieces.
- Transfer everything into a big bowl and add marinate ingredients. Mix thoroughly by hand. Mariante in the fridge for at least 15 minutes to up to 1 hour.
- Meanwhile mix all the ingredients for the dry coating in a big bowl.
- When you’re ready to cook, add 2 to 3 inches (5 to 7 cm) oil in a medium-size deep pot. Heat over medium-high heat until the oil reaches 375 to 400 degrees F (190 to 200°C). If you do not have a thermometer, place a clean bamboo chopstick into the oil. You should see small bubbles rapidly form around the chopstick. Turn to medium heat.
- While heating up the oil, set up the deep fry station by placing a large wire rack on a big tray. Or you can use a few plates instead. (*Footnote 2)
- Drain the squid and discard the liquid. Transfer half of the coating and a half of the squid into a large ziplock bag. Shake and the bag to coat the squid well. Then transfer everything into a big bowl.
- Separate the squid pieces and place them on a large spider sieve or slotted spoon. Lower into the hot oil. Add in small batches at a time so your pot won’t become crowded. Fry until the squid turns golden brown, 2 to 3 minutes. Transfer to the prepared wire rack. Continue to cook the remaining batches using the same method.
- (Optional) If you want to present the dish like in a restaurant, fry basil leaves and chili peppers for garnish. Dry them thoroughly and lower them into the oil using a sieve. This step might cause splatter since the basil contains a lot of liquid. Fry for 30 seconds, or until the basil leaves turn dark and crispy. Transfer to a plate to cool.
- Serve the squid hot with lemon wedges on the side. You can also serve sauces such as mayonnaise, ketchup, Sriracha, and/or mustard if you prefer. Be prepared for the wows from your family when they see you can cook salt and pepper squid like a professional chef!
Notes
- Replace all-purpose flour with cornstarch for a gluten-free dish. The squid coating will have a lighter color but it doesn't affect taste.
- Resting the squid on a cooling rack is the best way to drain oil while keeping the rings crispy. Avoid using layered paper towels on a plate; it’ll absorb oil but the paper traps hot air and moisture that will “steam” the squid and make it soggy.
Nutrition
Have a question or feedback? Add a Comment
Did you make this? I want to see! Tag @OmnivoresCookbook on Instagram, and rate the recipe below.

Lisa
What can I replace the shaoxing wine with? As I need to cook a halal version
Maggie Zhu
You can use some chicken broth to replace the Shaoxing wine.
Fritz
This is the best salt and pepper squid recipe! I am saving this and gonna be using this recipe for the rest of my life! Super easy and yummy! Thank you for sharing this to the world!
Dave Miller
Oops, I forgot the pepper, but it was still delicious with the heavy fried garlic/ginger flavor. So Yummy! Thank You!!! So much better than the local China restaurants!
Adaptations. I used tiny whole squid like the restaurants use in the cold salads. Two parts Hushpuppy mix combined with one part cornstarch. Peanut oil.
Hal
Ju yim yau yu.
Mare
Hi Maggie-
Would frozen squid (defrosted) be ok to use instead of fresh for this?
–Mare
Maggie
Yes Mare, you could use the defrosted squid for this recipe. Happy cooking and hope your dish turns out great 🙂
Rebeca
I absolutely LOVE salt & pepper squid! I have no objection to fried foods either, but never deep fry at home because I don’t like how it stinks up the apartment (hood filter is useless) and I also don’t like to hold on to large amounts of “frying” oil. So I cringe to ask, but do you know of a way to make something similar by oven “frying”?
Milena | Craft Beering
I bet the Shaoxing wine makes the squid meat taste sweet-ish in addition to tenderizing it. This is too good to pass! You are so lucky on the dad front:)