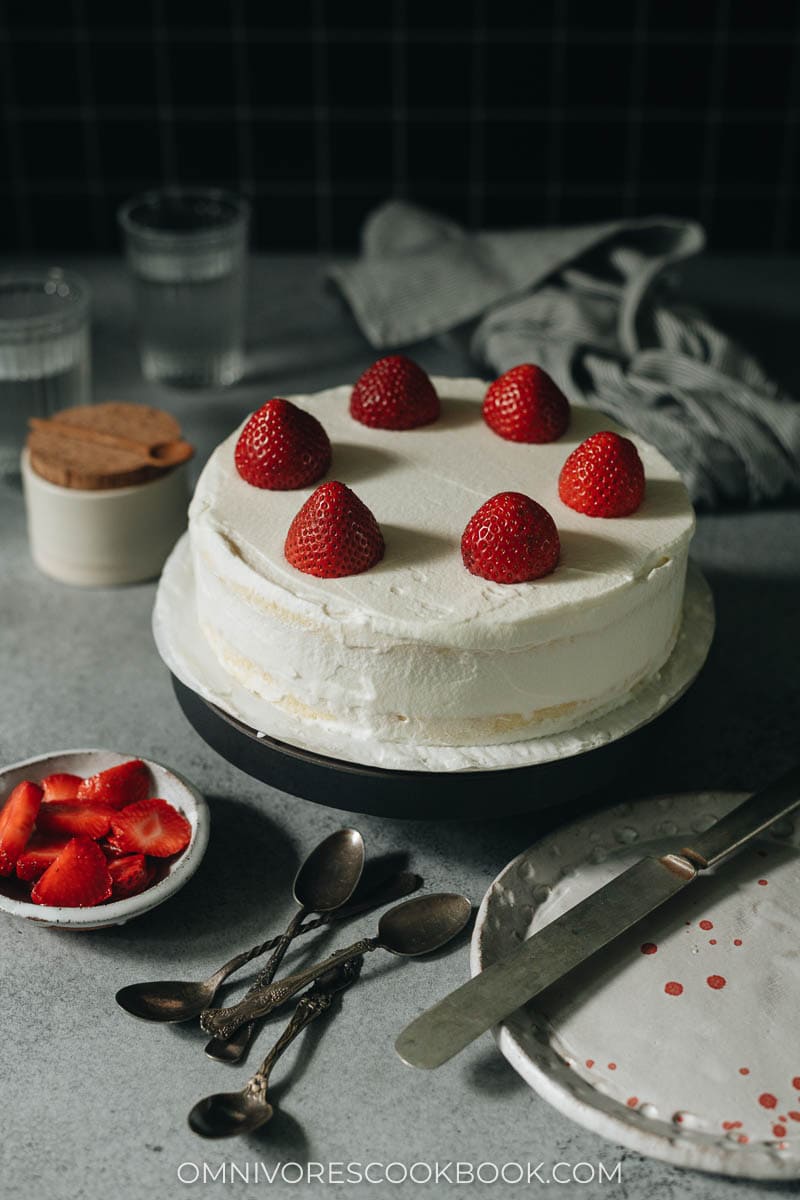
Japanese-style strawberry cake has a special place in my heart. Growing up in China in the early 90’s, we had very limited access to baked goods. All of my birthday cakes came from the bakery of a famous local Russian restaurant. The cake was on the denser side, and the cream frosting was quite thin. When I was in elementary school, some fancier bakeries opened and my mom started to buy baked goods from them. I cannot remember exactly where these bakeries came from, but their style was definitely learned from Taiwanese and Japanese baking. I was hooked on the lighter and fluffier cake immediately.
After graduation from college I spent two years in Japan. For my first birthday there, I used the money earned from working part-time in a ramen shop to buy a tiny strawberry cake to share with the rest of the staff at the ramen shop. Coincidentally, the wife of the boss of the ramen shop made a small cake for me that day, and she told me “you should never buy your own cake on your birthday!” lol But man, that strawberry cake was the best one I’d ever had. It was extremely light and fluffy, and not too sweet. I could taste the freshness of the milk, flour, and cream like no other cake could have achieved.
Why this recipe
A few years back and quite early in my life as a blogger, I posted a strawberry cake recipe I learned from a Japanese recipe site. I liked the result a lot, but it was nowhere near the perfect Japanese-style strawberry cake from a bakery.
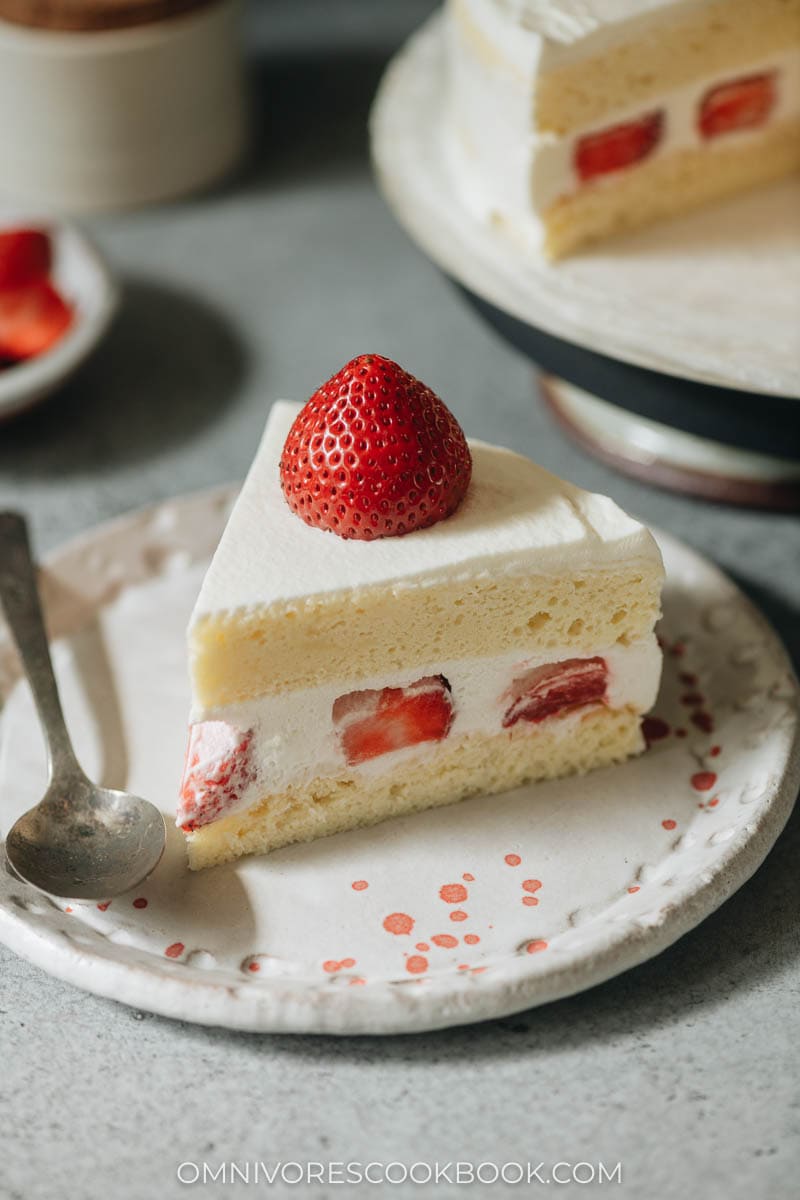
Fast forward to this year, I decided to improve the cake recipe together with my sous chef Lilja, who’s way more experienced in baking than I am, attempting to get a better result. The project has lasted many months and involved extensive testing with different formulas. We finally have a winner!
This recipe:
- Uses beaten egg white and minimal flour to create a super fluffy texture
- Uses a water bath to bake the cake, for the super delicate texture
- Brushes syrup between the layers with macerated strawberry for a bit of sweetness
- Features a not-so-sweet frosting to bring out the flavor of the fruit
- Has a stabilized cream frosting so you can easily store and transfer the cake
To sum up, the cake is so light, moist and fluffy that you’ll feel like you’re biting into a cloud. It’s truly like the bakery-style Japanese strawberry cake with that delicate texture and taste.
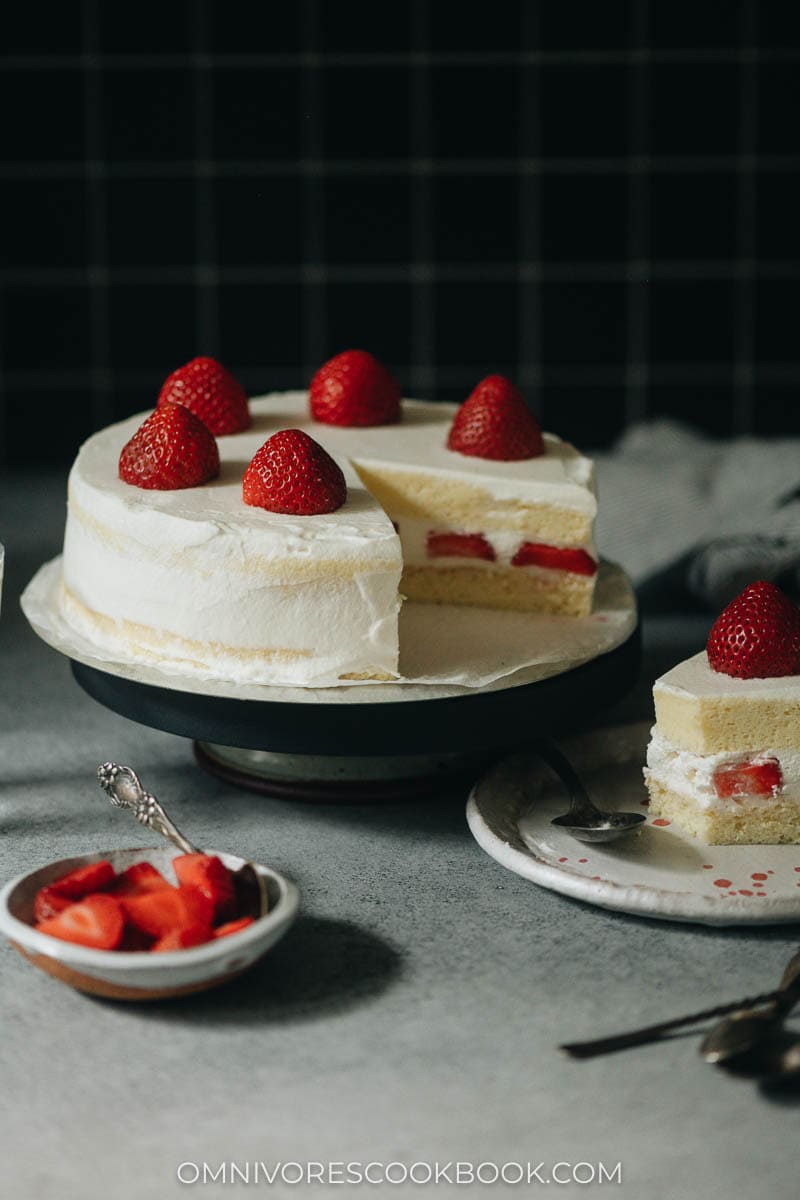
Ingredients
The ingredients for this recipe couldn’t be more simple. You can get all of them from a regular grocery store.
Bakeries often use a commercial stabilizer to make whipped cream frosting that stays good on the shelf for longer. To make stabilized whipped cream with common ingredients, we found that gelatin is the best option. By using this ingredient, you’ll help your cake stay perfect for a few days in the fridge.
Equipment you need
- 8” round cake pan
- A deep pan or baking dish that is almost as tall as the cake pan and can fit the cake pan in it
- Parchment paper
- Stand mixer (or hand mixer)
- Spinning cake stand (you can make one by placing the cake pan upside down, and top it with a flat plate or the removable bottom of a pie pan)
- Offset spatula
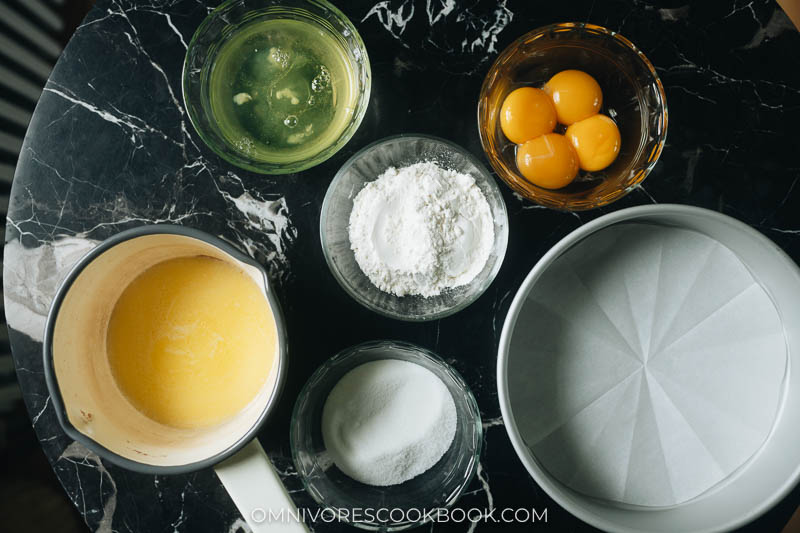
Cooking process
Prepare the cake part 1
- Sift the cake flour into the milk butter mixture
- Mix well
- Add the egg yolks
- Mix until smooth
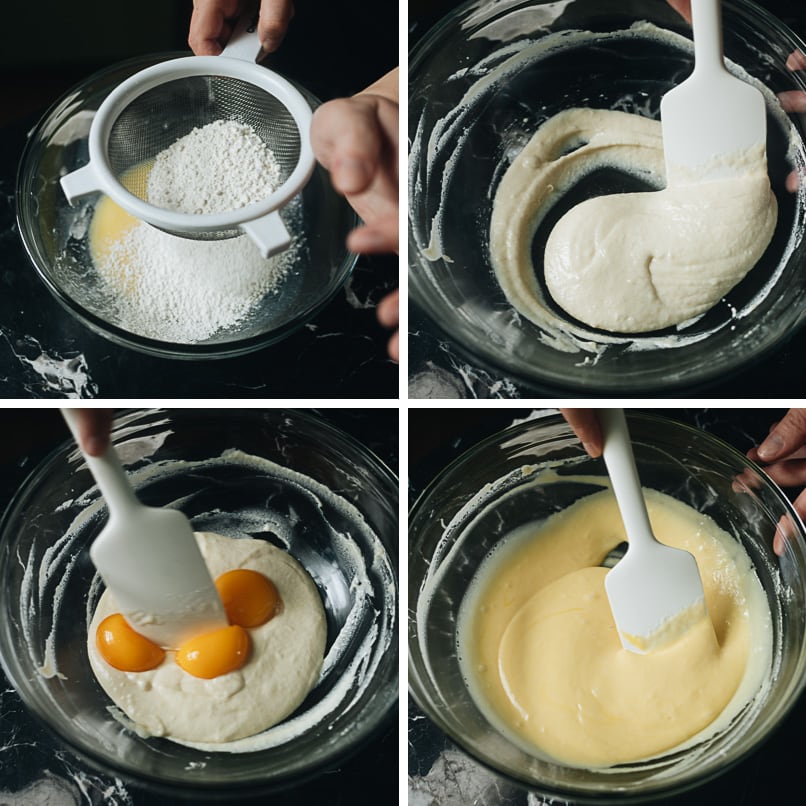
Prepare the cake part 2
- Whip the egg whites until frothy
- Continue whipping as you add the sugar
- You should get a medium-peak texture
- Add some of the whipped sugar into the egg yolk mixture you just made, and mix well
- Add the mixture back to the mixing bowl
- Stir gently to combine
- Pour the mixture into a lined cake pan
- Bake in a water bath until cooked through
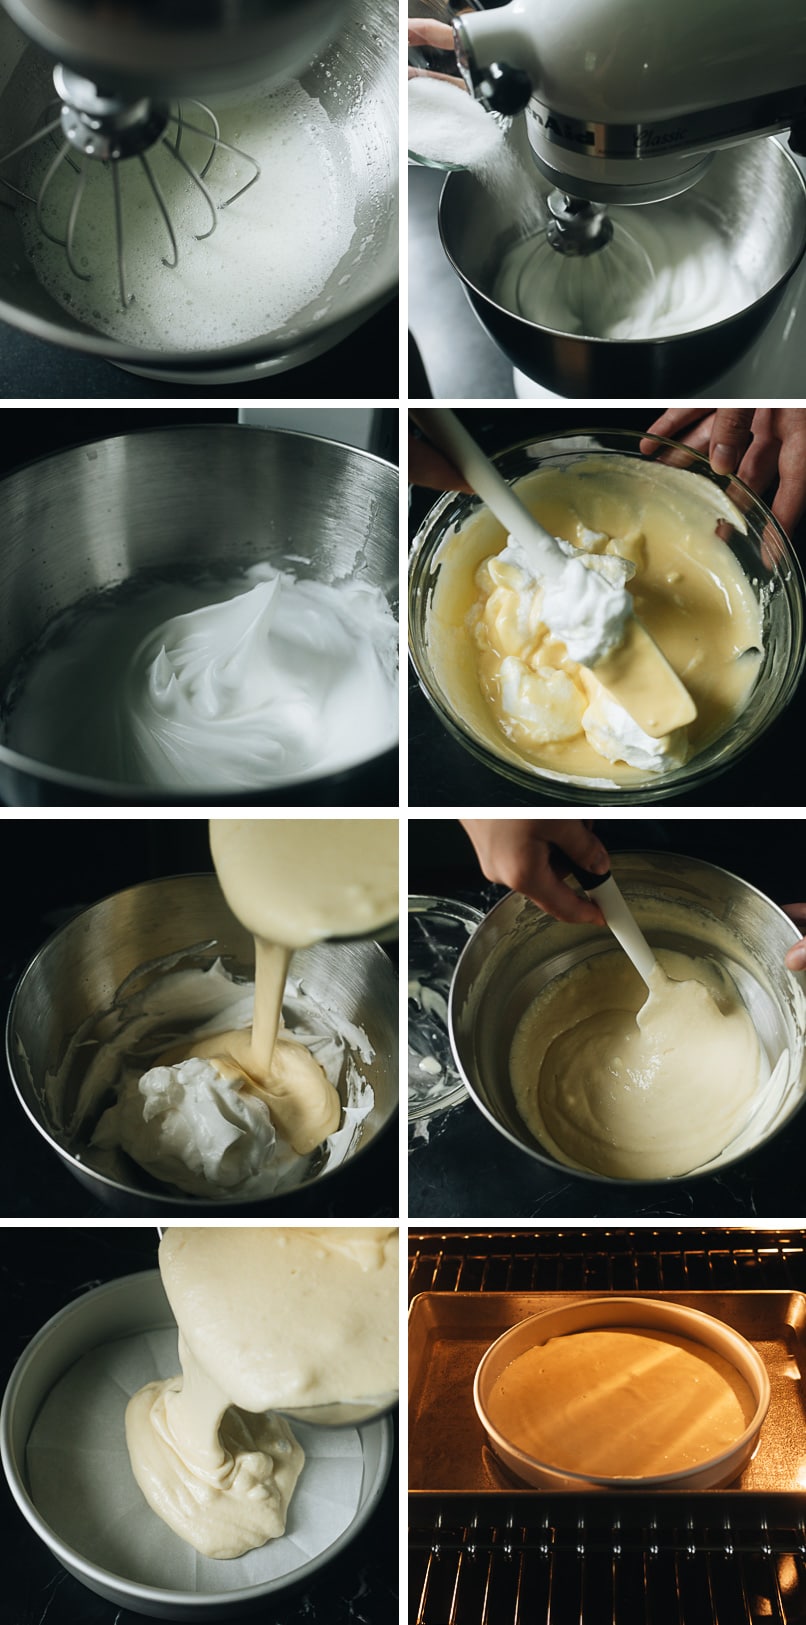
Make the macerated strawberries
- Add the sugar to the sliced strawberries
- Let sit so the strawberries become sweeter
- Let the macerated strawberries dry a bit before using
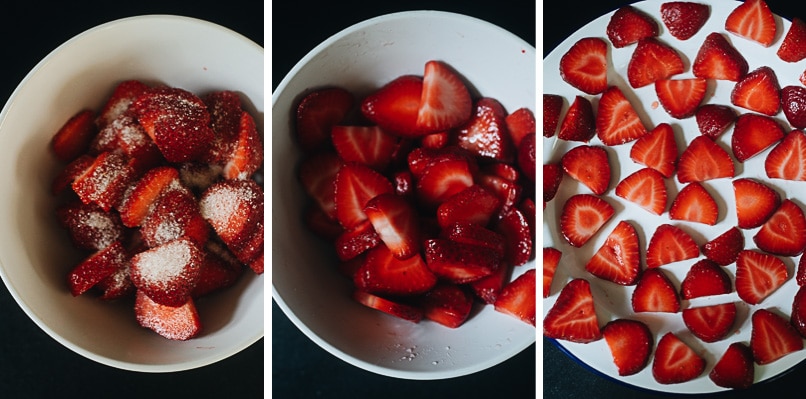
Make the stabilized whipped cream
- Sift the confectioners sugar into the heavy whipping cream
- Dissolve the gelatin in water
- Whip the cream until soft peaks form, then add a small amount into the dissolved gelatin
- Add the gelatin mixture into the whipped cream and whip again
NOTE: You can make regular (non-stabilized) whipped cream as well and I’ve included the method in the recipe below.
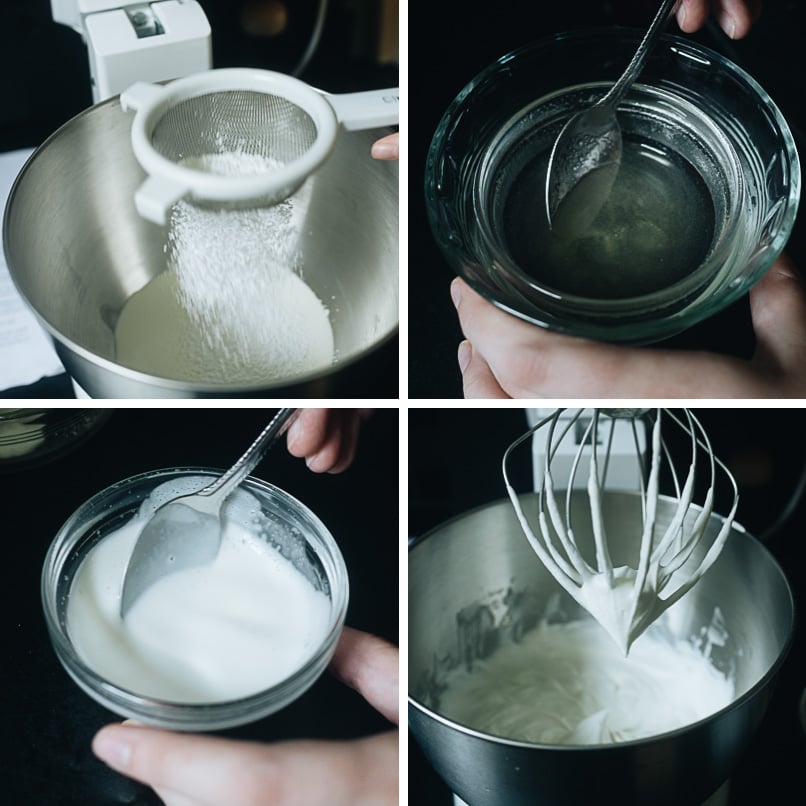
Assemble the cake
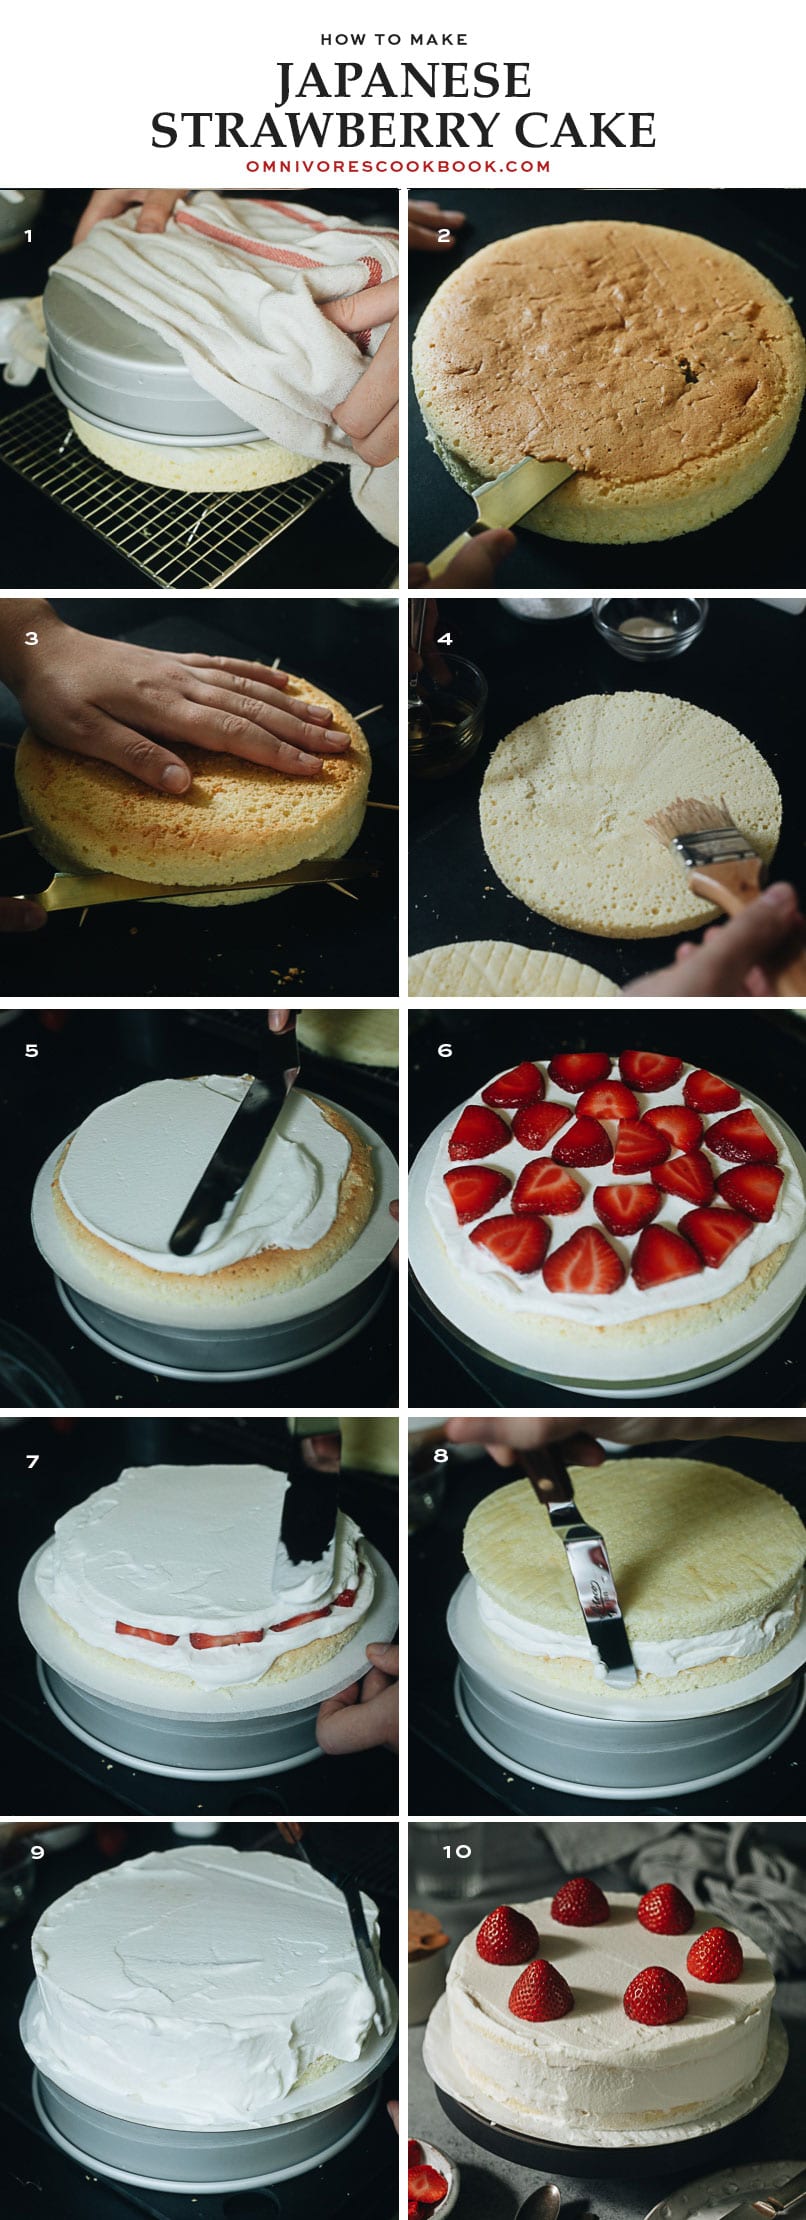
- Use a knife to loosen the sides of the cake pan. Flip the cake pan onto a rack to remove the cake. Peel the parchment paper off and let the cake cool.
- Slice off the brown part off the cake
- Use toothpicks to mark halfway between the layers, then cut the cake into two layers
- Brush the syrup onto each cake layer and place the top layer onto a cake stand
- Add the cream to the cake and spread it on evenly
- Add as many strawberries as you can onto the cake
- Add another layer of cream and spread it out
- Top with the other layer of cake
- Keep adding cream to all sides and smooth it out
- Decorate the cake with more strawberries
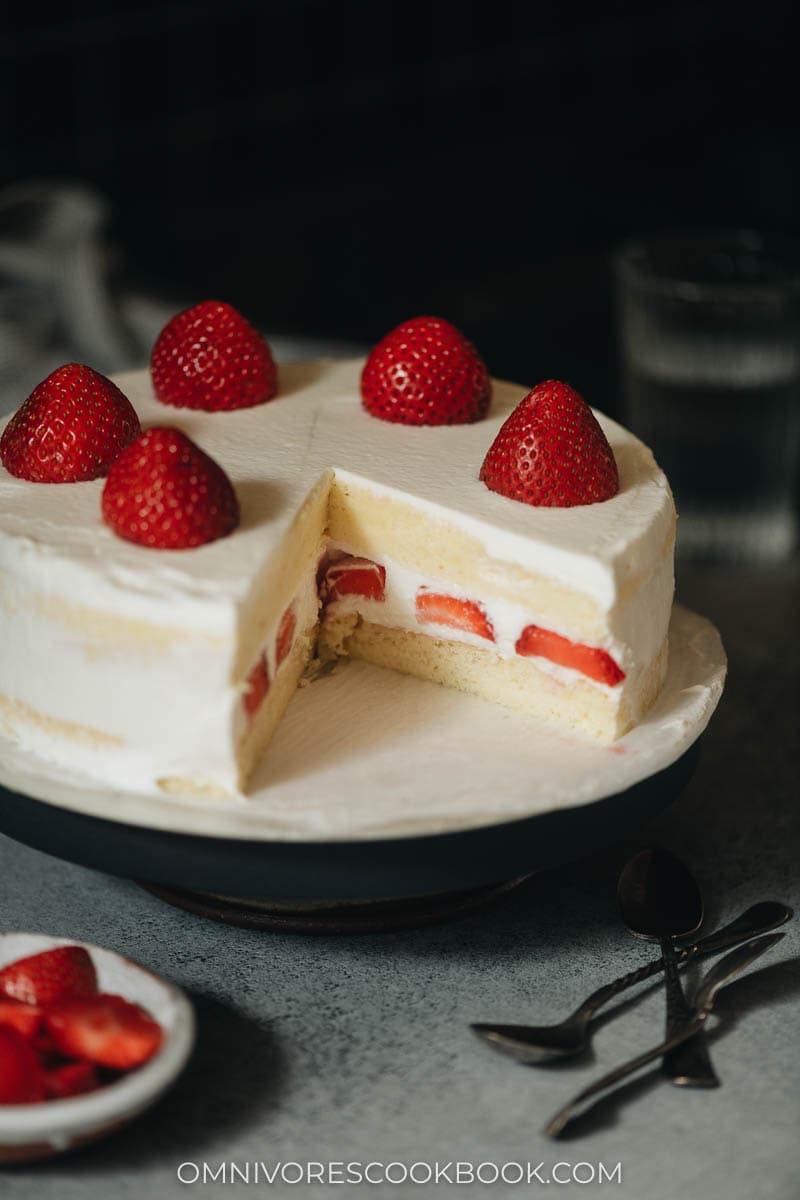
Once done, you’ll need to store the cake in the fridge for an hour if using the stabilized cream, so the cream will set fully.
Important notes
Use gram measurements
It’s important to have precise measurements for this recipe in order to make it work. I highly recommend a kitchen scale to measure all the cake ingredients.
Precise oven temperature matters
It’s important to know your true oven temperature by using an oven thermometer because many ovens run hotter or colder than the temperature you set.
When I was baking the cake using my new oven, it failed at first because I realized later that my true oven temperature was 15°F lower than the actual temperature (my oven came with an embedded thermometer, but I added three thermometers later to test it out).
We ended up changing the cake formula a little so it’s less sensitive to oven temperature, but it’s still super helpful to know your true oven temperature. If your temperature is off by a lot, the cake might not rise properly.
If you’re using a toaster oven, you should bake this cake at 325°F (150°C) because the cake will be closer to the heat source.
Do not over-whip
If you over-whip the egg white, the cake might not rise. It’s important to whip to medium peak stage and not firm peak.
Use hot water in the water bath
Using hot water in the water bath helps the cake to rise properly. We tried many times with and without, and found out using hot water directly instead of preheating cold water in the oven tremendously helps the cake to rise.
Afterthoughts
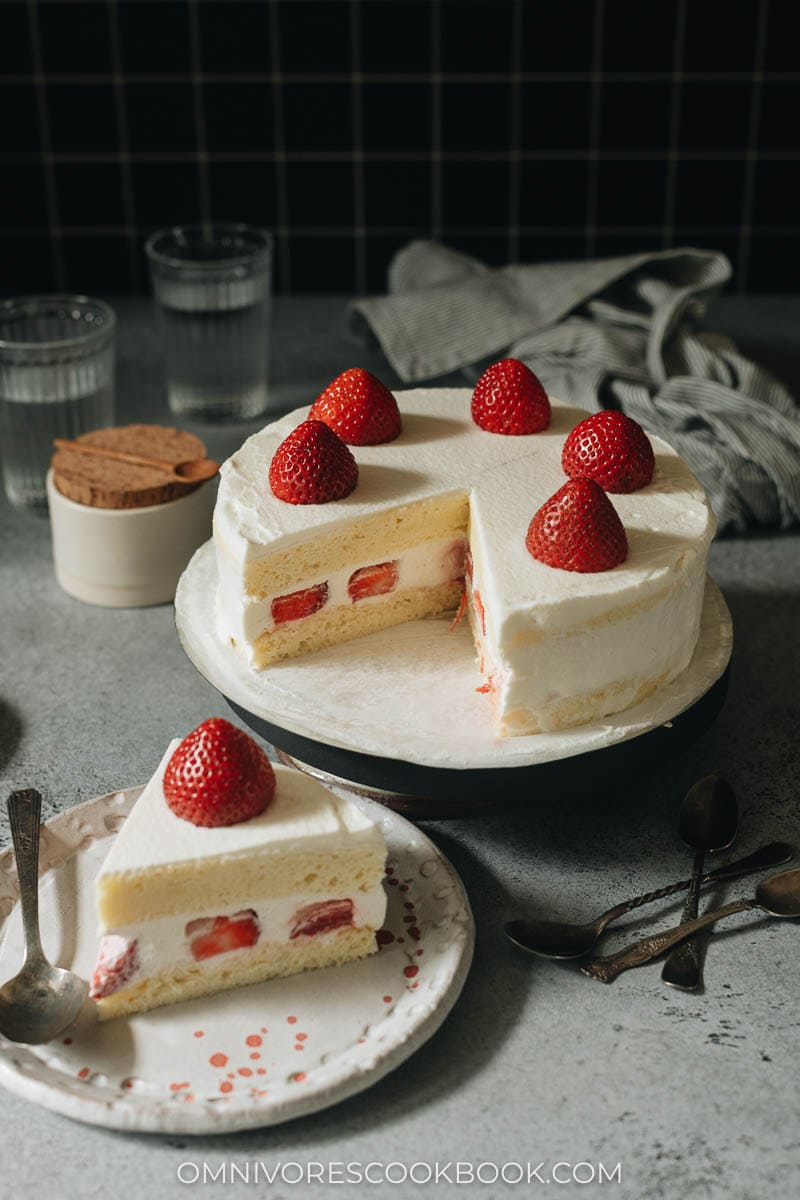
Making the bakery-style Japanese strawberry cake is a bit of a challenge and you will need a little bit of time and patience. But the result is extremely satisfying and rewarding, if you like strawberry cake as much as me. I hope you enjoy it!
Chinese Cooking Made Easy
Are you new to this website? This free email series is a great place to start. I’ll walk you through a few of my most popular recipes and show you how and why they work. You’ll quickly start to cook better Chinese food in your own kitchen.
Japanese Strawberry Cake
Ingredients
Cake
- 80 g (1/3 cup) whole milk
- 50 g (3 1/2 tablespoons) unsalted butter
- 75 g (1/2 cup + 1/2 tablespoon) cake flour
- 4 large egg yolks
- 4 large egg whites
- 70 g (5 1/2 tablespoons) sugar (caster sugar if available)
Strawberries
- 12 oz to 1 lb (340 g to 450 g) strawberries , divided
- 1 1/2 teaspoons sugar
Whipped Cream Frosting
- 280 g (10 oz) heavy whipping cream
- 2 tablespoons confectioners sugar
- 3/4 teaspoon gelatin (Optional)
- 2 tablespoons cold water (Optional)
Cake Syrup
- 2 tablespoon sugar
- 3 tablespoons hot water
Instructions
Prepare the cake
- Cut a piece of parchment paper to fit the bottom of an 8” round cake pan and line the pan with it.
- Preheat the oven to 325°F (160°C).
- Prepare a high-walled pan or baking dish that fits your cake pan to use as a water bath. Boil a small pot of water to use later. The water should be enough to cover 1 inch (2.5 cm of the pan). If using a springform or removable-bottom cake pan, line the outside with a few layers of foil to make sure no water leaks into the cake.
- Combine the milk and butter in a medium-sized heatproof bowl. Microwave until melted. Stir to mix well.
- Sift the cake flour into the mixture. Mix gently with a spatula until smooth.
- Add the egg yolks. Mix again until evenly combined.
- Add the egg whites into the clean mixing bowl of a stand mixer, or a clean bowl using a hand mixer. Beat at medium high speed until the egg whites are frothy. Slowly add the sugar while continuing to beat, until glossy and medium peaks form.
- Scoop 1/4 of the beaten whites out and add it to the yolk mixture, Fold using a spatula until smooth. Pour the mixture back into the egg whites. Continue to fold everything together until just smooth. Don’t overmix but also avoid leaving large pieces of egg white.
- Pour the batter into the lined cake pan. Drop the pan from 5” (12 cm) onto the table twice to release any extra large bubbles.
- Place the cake pan in the water bath pan and add an inch of hot water. Bake for 1 hour 30 minutes, or until a skewer inserted to the center of the cake comes out clean and the cake has pulled away from the sides of the pan. Do not open the oven to check until 1 hour has gone by.
- Run a knife along the edge of the pan to release the cake. Flip it on to a cooling rack. Let it cool completely before cutting and decorating.
Prepare the macerated strawberries
- While the cake cools, slice 8 oz (225 g) of strawberries into 1/4” (1/2 cm) slices and place them into a bowl. Sprinkle with the sugar and toss to coat well. Let them sit for at least an hour, up to 2 hours. Once the strawberries are glossy and sweet, remove them from the bowl and lay them out on a plate. Reserve the liquid left in the bowl.
- Combine the cake syrup ingredients in a small bowl and stir until the sugar is dissolved. (OPTIONAL) Add the reserved strawberry soaking liquid to the syrup; this adds extra strawberry flavor but will color the cake slices slightly pink.
Prepare the cream
- (Optional) IF MAKING STABILIZED CREAM (do not make ahead of time, it will set before decorating): Combine the gelatin and cold water in a small bowl. Let sit for 5 minutes. Once the gelatin is fully expanded, briefly heat in the microwave or a hot water bath, until fully melted.
- Add the heavy cream into the mixing bowl of a stand mixer, or a bowl and use a hand mixer. Sift the confectioners sugar into the cream. Whip at medium speed until very soft peaks begin to form, then stop immediately. Add a large scoop of the whipped cream into the melted gelatin. Stir with a spoon until fully mixed and consistent. Drizzle the gelatin mixture into the mixing bowl with the cream. Continue to whip at medium speed briefly, until soft peaks are formed. DO NOT over-whip, it will begin to separate out the gelatin (which is still usable, but will be a bit blobby and unattractive).
- IF MAKING REGULAR CREAM: Add the heavy cream into the mixing bowl of a stand mixer, or a bowl and use a hand mixer. Sift the confectioners sugar into the cream. Whip at medium speed until firm peaks begin to form.
Assemble the cake
- Once the cake has fully cooled, place it on a cutting board. Measure the height on 4 sides. Use toothpicks to mark evenly where the top should be cut off, and where the cake should be cut in half.
- Use a serrated knife to slice off the top along the top of the toothpicks, and discard the browned top.
- Slice the cake into two thin, even layers along the toothpicks. Move the top layer of cake onto a spinning cake stand (*Footnote), cut side down. Brush the syrup evenly onto the top of the cake.
- Flip the other layer of the cake upside down. Brush the syrup evenly over the top.
- Add a large dollop of the whipped cream onto the cake layer on the cake stand. Spread the cream with an offset spatula into an even thin layer across the top until the cream is just spilling over the edge.
- Arrange as many strawberries as possible evenly on the cream.
- Put another large dollop of cream on top of the strawberries. Spread evenly and thinly until just spilling over.
- Place the top layer of the cake on top and line it up with the bottom cake.
- Add another dollop of cream to the cake and spread again.
- Smooth out the sides of the cake using the cream that spilled over earlier. Add a little extra cream if needed.
- Once the cake is covered with a thin, even layer of cream, add another larger dollop to the cake. Spread a thicker layer of cream on top and then smooth out the sides.
- (Optional) If you have any cream left, add it to a piping bag or ziplock bag with the corner cut off for decorating the top and/or sides if desired.
- Decorate the cake with the remaining strawberries on top.
- If using stabilized cream, place the cake uncovered in the refrigerator for at least 30 minutes to let the cream set. If using unstabilized cream, serve immediately or refrigerate and serve within a few hours.
- To serve, you can slice the cake using a serrated knife once you transfer the cake from the fridge, if using unstabilized cream. If using stabilized cream, you can let the cake come back to room temperature, 1 hour or so, to achieve the best texture.
Notes
- If you do not have a spinning cake stand, you can make one by turning a bowl or the cake pan upside down, then use a flat plate or a removable bottom from a pie pan on top of it.
Nutrition

Did you make this recipe?
I’d love to hear how it turned out for you! Please take a moment to leave a 5-star rating ⭐️ and share your thoughts in the comments further down the page. It really helps others discover the recipe too.
More Classic Asian Desserts
Lilja Walter is a part of the Omnivore’s Cookbook team and worked closely with Maggie to develop and test this recipe.

Jessica Baron
I’ve never made this type of cake but I am hoping to make a larger size cake for a party. Would it be possible to add more layers by doubling the recipe?
Maggie Zhu
I think you can. But make sure to make the stabilized whipped cream so the cake has more structure.