
Table of Contents
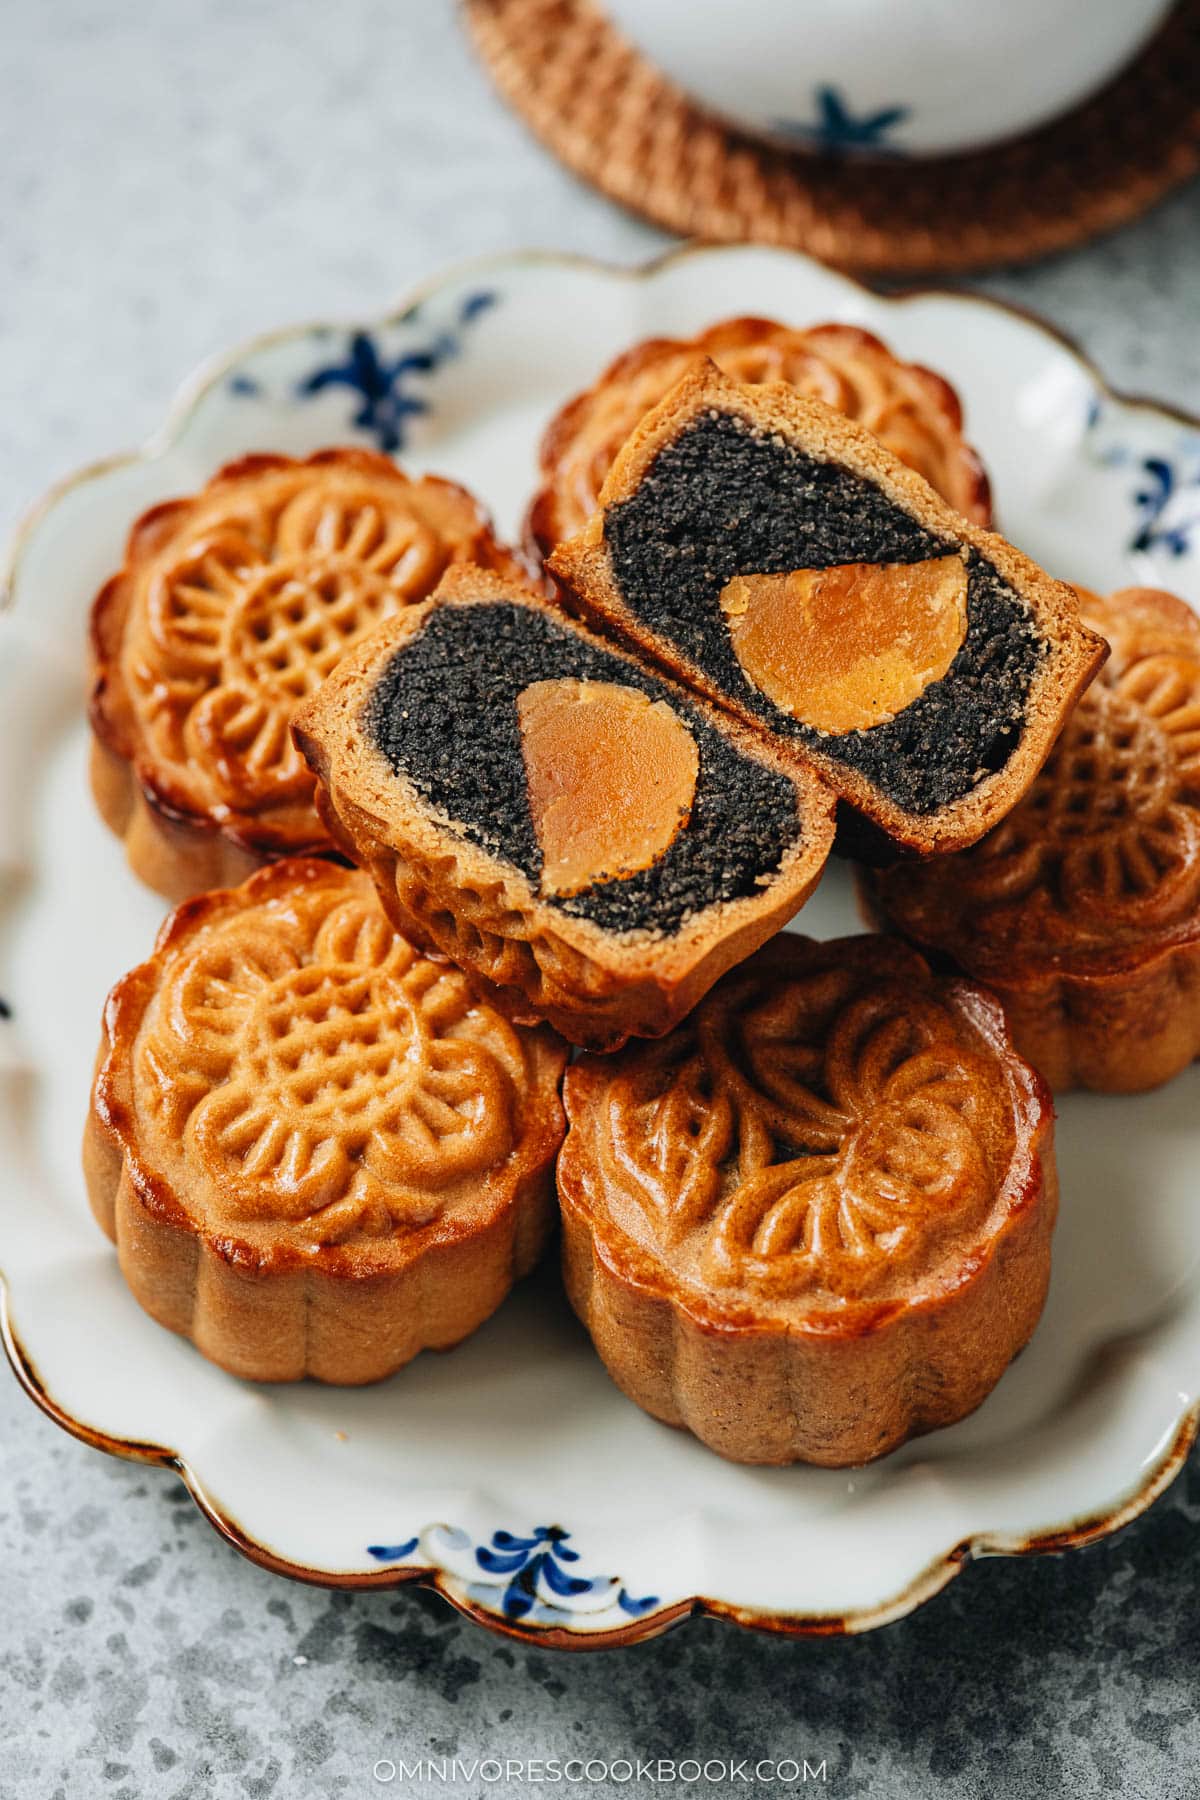
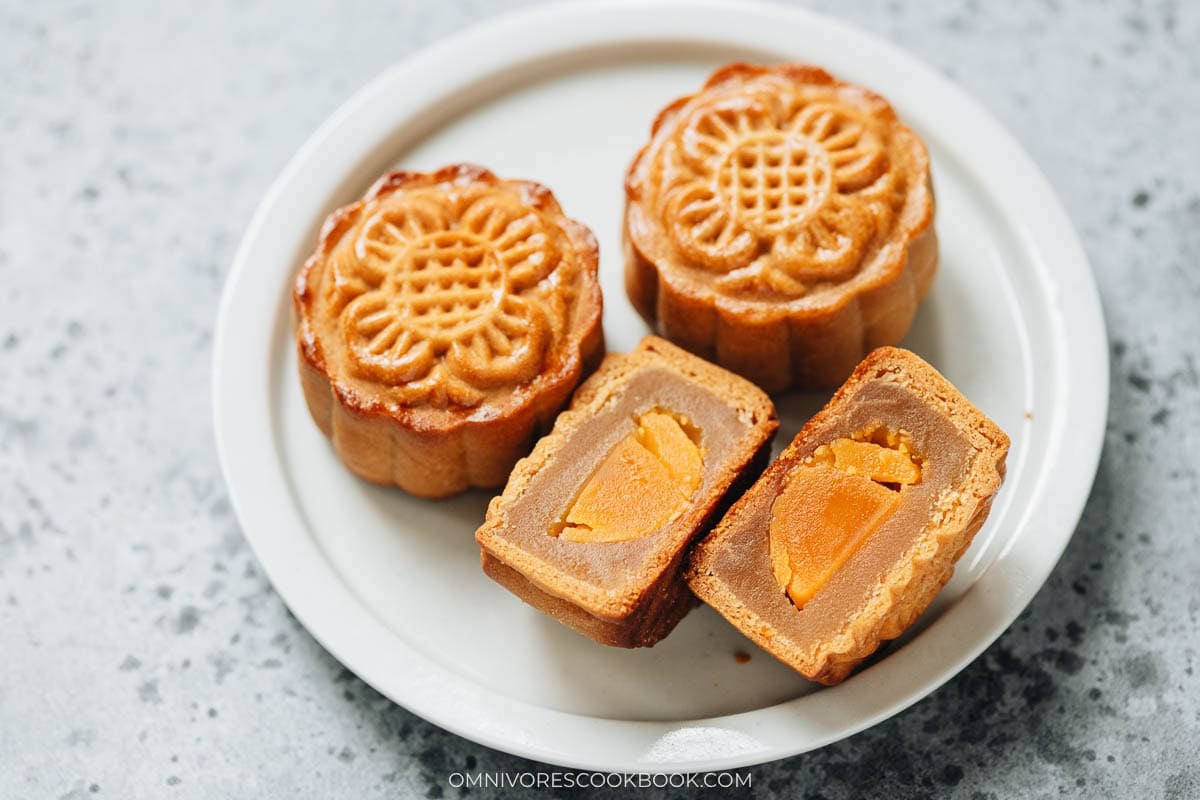
As the Mid-Autumn Festival approaches, traditional Cantonese mooncakes make their annual appearance. Artfully molded pastries filled with a sweet nut or bean based filling, these beautiful pastries are a must-have for gifting to friends and family and creating a festive mood. These days you can fairly easily find mooncakes in Chinatown and at large Asian markets. But nothing beats the homemade type, which tastes way more fragrant and is not super sweet.
The most common mooncake fillings are lotus seed paste filling and red bean paste filling. But in this post, I want to share my favorite mooncake flavor – black sesame filling. Compared to the other fillings, this one is nuttier, softer and more fragrant, without the typical sticky texture the other fillings have. I like to pair it with salted duck yolks, adding a savory note and balancing out the sweetness.
What are traditional mooncakes?
- Dough made with golden syrup (inverted sugar syrup), a little kansui (alkaline water), oil, and cake flour. These ingredients yield a tender but shape-holding pastry.
- Filling with a high oil content (often lard traditionally; butter or vegetable oil in modern days), a sweet bean or seed paste, frequently paired with salted duck egg yolk. The fat not only enriches the flavor but also enables the mooncake to “rest” into its ideal texture.
- Thin skin enveloping a generous filling, often with beautiful mold-pressed designs. The balance between dough and filling is key.
Special tools you need
To make the intricate mooncake patterns, you will need to purchase mooncake molds. There are traditional wooden molds available, but most home cooks prefer the plastic type because they’re easier to use.
Mooncake molds usually come in 50-gram and 100-gram sizes, with the number indicating the weight of the mooncake made by it. Most homemade recipes (including this one) work better with the 50-gram mold. It makes mini sized mooncakes that are very cute in appearance and easier to serve and gift. Larger mooncakes are often cut into quarters or halves when served, because they’re quite rich and sweet.
You can easily find all kinds of mooncake molds on Amazon. Choose your favorite patterns, but make sure you get the hand-press type mold.
Mooncake dough ingredients
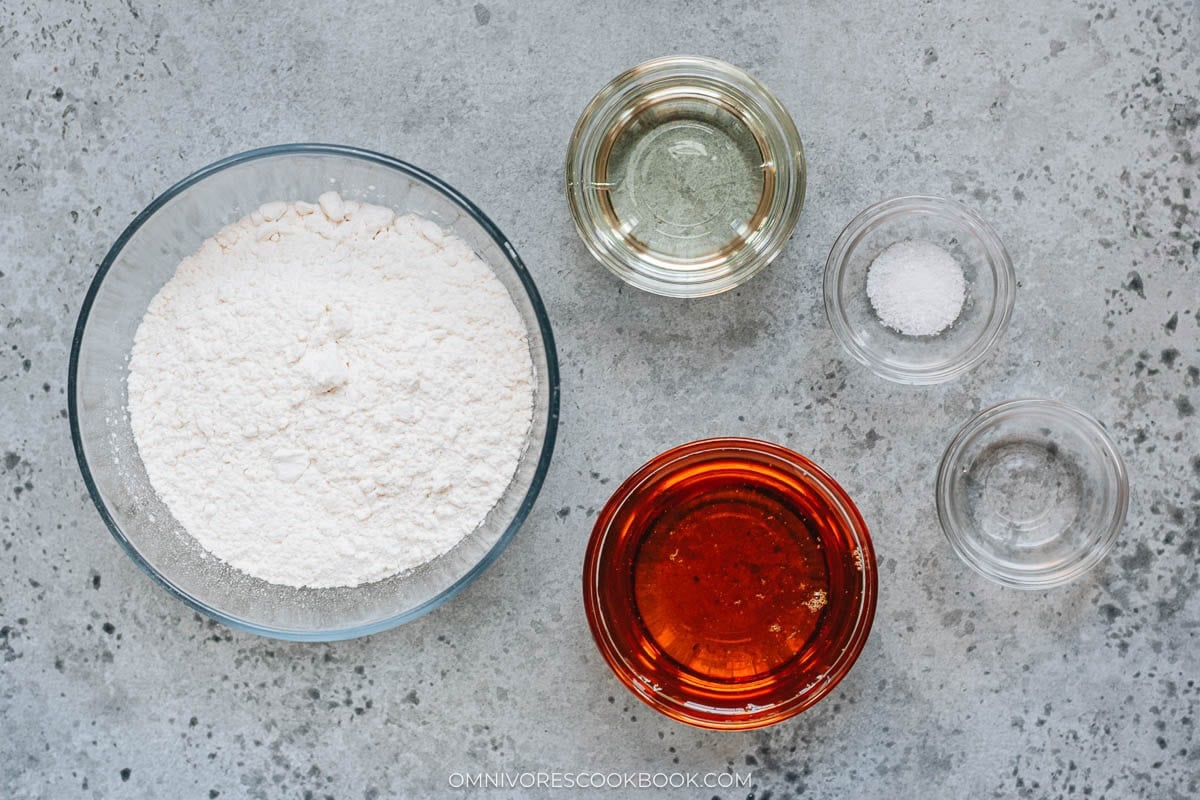
Traditional mooncakes do not require a lot of ingredients, but you will need to purchase a few specialty ingredients. Fortunately, it is getting easier and easier to purchase these specialty ingredients online. And I’ve also included detailed posts on how to make the specialty ingredients at home.
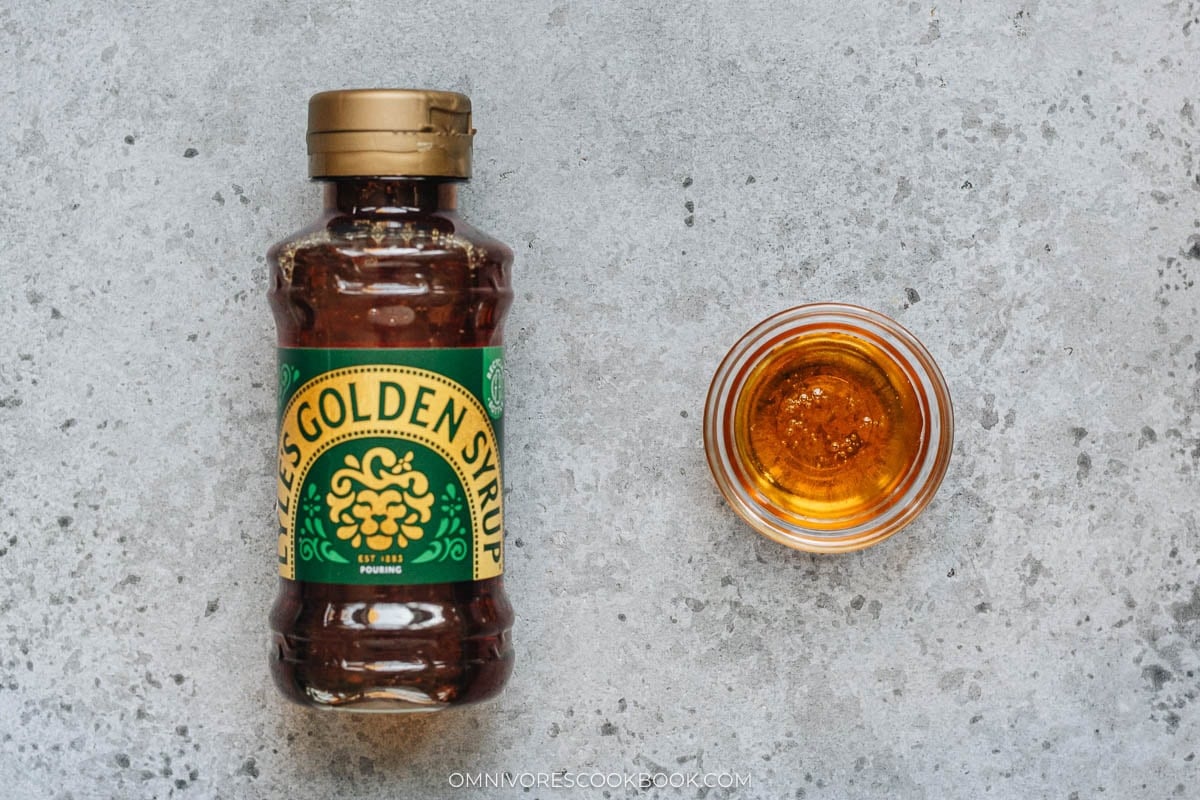
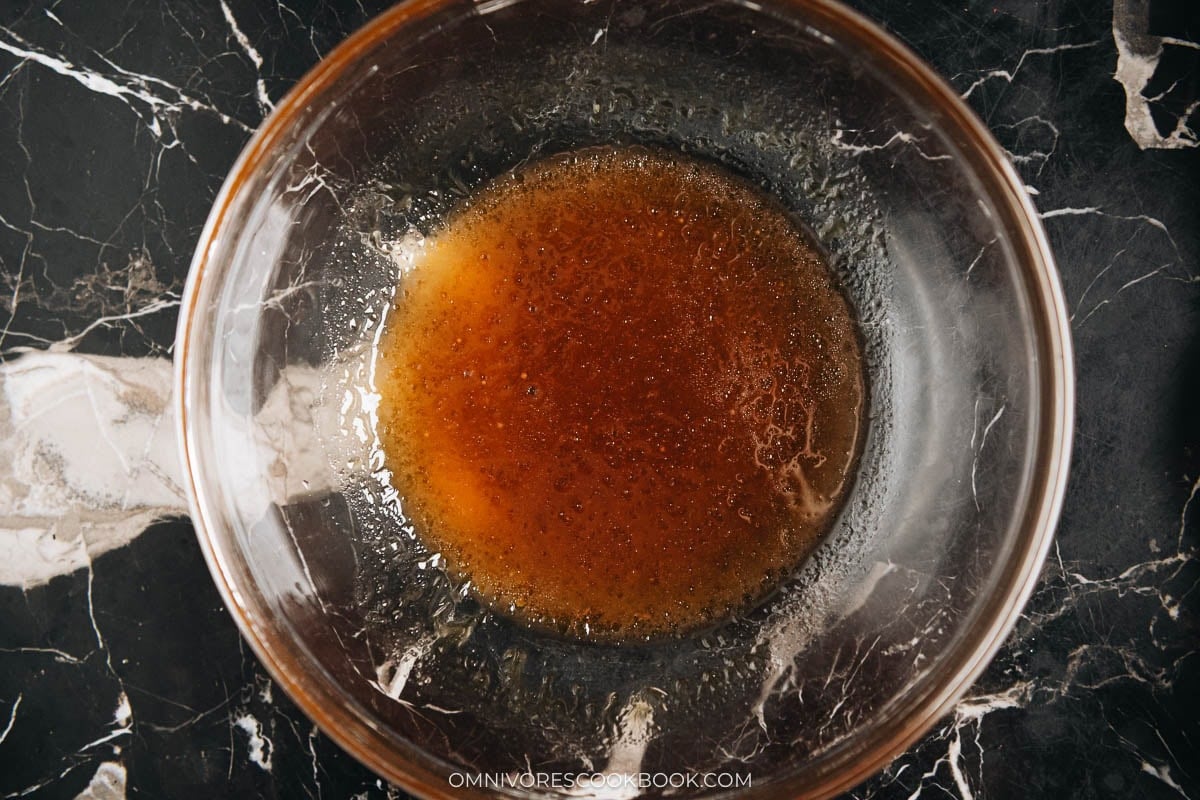
Golden syrup
Also called inverted sugar. It attracts and retains moisture. This keeps the pastry tender, prevents crystallization, and helps the crust stay soft after the “resting” period (回油, hui you). It has a deep, caramel-like taste. It also gives the dough flexibility and just the right stickiness, so it molds cleanly and holds the intricate mooncake patterns after pressing.
In short, golden syrup provides flavor, color, moisture, and workability. They are all crucial for achieving authentic mooncakes.
You can purchase golden syrup on Amazon.
If golden syrup is not available where you live, you can also use my homemade golden syrup recipe to make it at home.
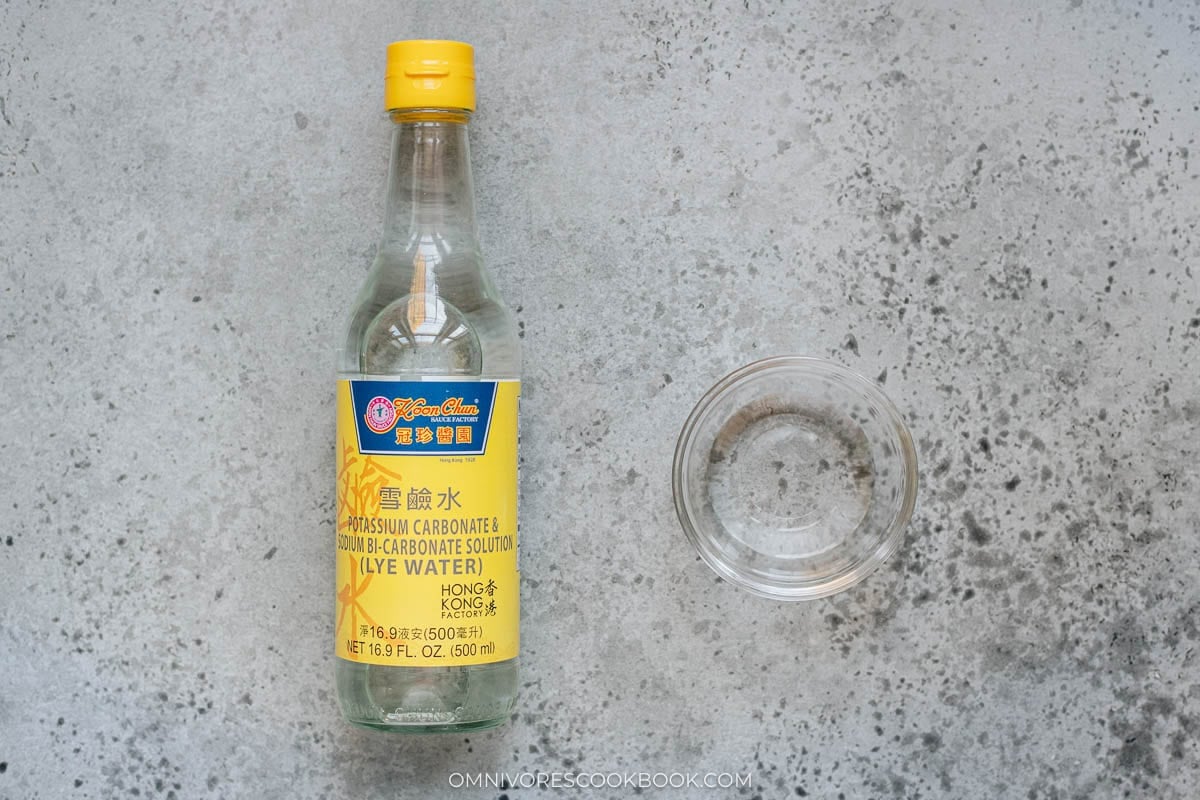
Kasui
Kansui (alkaline water, lye water, 枧水) works hand-in-hand with golden syrup in mooncake dough. Since golden syrup is slightly acidic, a small amount of kansui neutralizes that acidity, preventing the dough from being too sticky or weak. It also strengthens the gluten bonds just enough so the dough is pliable but not tough. This allows the dough to be very thin without cracking. Lastly, it helps the pastry absorb oil from the filling more evenly during the resting period, giving the skin that glossy, tender finish.
You can usually find kansui in Chinese markets, some large Asian markets such as Ranch 99, and at Chinatown shops. You can find it on Amazon as well.
If not available, you can use my homemade kansui guide to make it using baking soda.
Cake flour
Cake flour is another key ingredient to create the tender mooncake dough texture.
Mooncakes in China are usually made with all-purpose flour. Compared to the fortified flour in the US, Chinese flour is milled differently and finer in texture. It is not fortified and has a lower gluten content (about 2%). In the US, the closest type is cake flour. It is essential to create a tender and pliable dough.
If you’re close to a Chinese market or large Asian markets, another great alternative is to buy Chinese all-purpose flour or Korean all-purpose flour. Both yield a slightly better texture than US-made cake flour.
That being said, it is possible to use all-purpose flour. Your dough might come out a little tougher, but I’ve included tips on how to work with tougher dough in the recipe below.
Mooncake filling ingredients
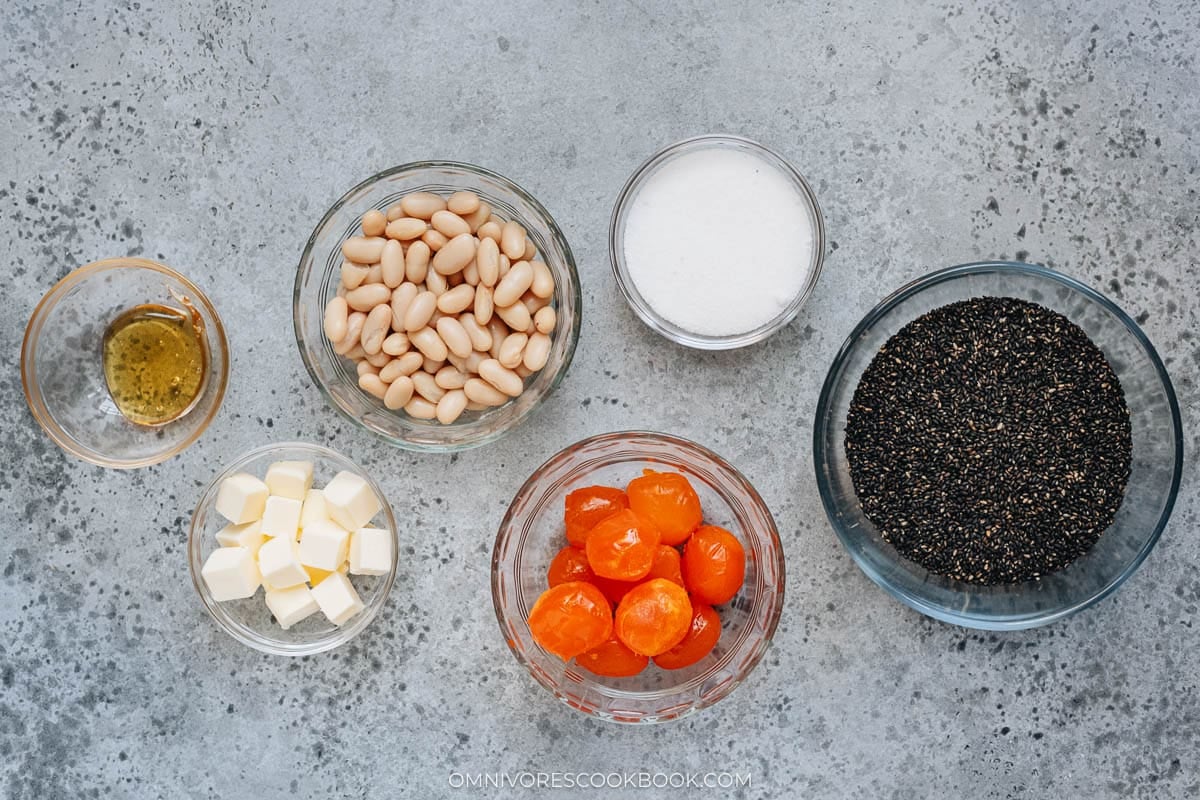
Black sesame paste is my favorite mooncake filling and I spent a lot of time developing the best texture. Here are some of the key ingredients besides black sesame seeds.
White beans
Most black sesame mooncake filling is not made of 100% black sesame seeds. Because 1) black sesame seeds are expensive. 2) Black sesame seeds alone do not yield the signature smooth texture that every mooncake filling should have.
In this recipe, I used white beans due to their very mild flavor and tender texture. They work as a binder so the filling is shapable. Due to their mild taste, the black sesame seeds blend right in and the filling won’t taste beany at all.
Butter
Traditionally, mooncake makers preferred to use lard in their filling, because it solidifies at room temperature and it makes the mooncakes easy to shape. In modern days, most people prefer to use vegetable oil.
In my recipe, I chose butter over vegetable oil because: 1) It adds a richer aroma to the filling and 2) butter solidifies in the fridge, making the filling easier to shape.
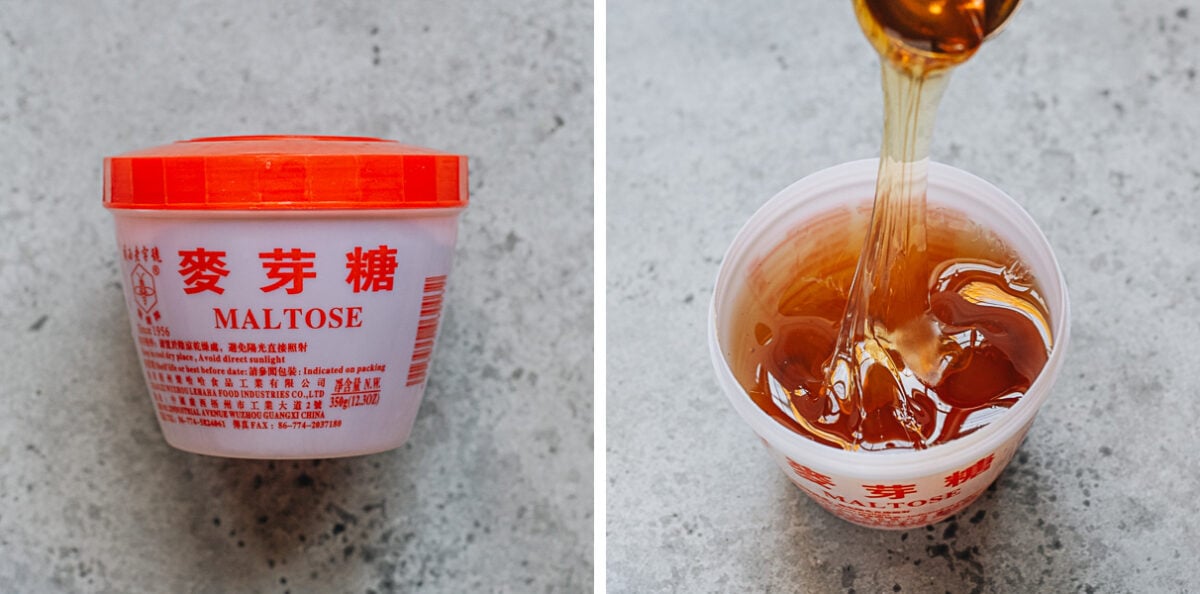
Maltose
Maltose (麦芽糖) is often used in traditional mooncake fillings. It is a very sticky and thick syrup at room temperature. It binds the paste together, making it smooth, glossy, and cohesive rather than crumbly. You can find maltose in Chinese markets and on Amazon.
That being said, I’ve made black sesame filling without maltose and the result was quite nice. If you do not have this ingredient, simply skip it and your mooncakes will turn out nicely.
Salted duck yolk
Salted duck yolk is a classic element in Cantonese mooncakes and it’s my favorite thing about them. The rich, salty yolk balances the sweet, dense filling, making the mooncakes more complex and preventing them from tasting overly sweet. Salted yolks have a sandy, crumbly texture that contrasts beautifully with the smooth filling.
You can usually find frozen cooked duck egg yolks at Chinese markets. It’s also possible to purchase whole salted duck eggs and use only the yolks, but the packaged frozen type is much more convenient.
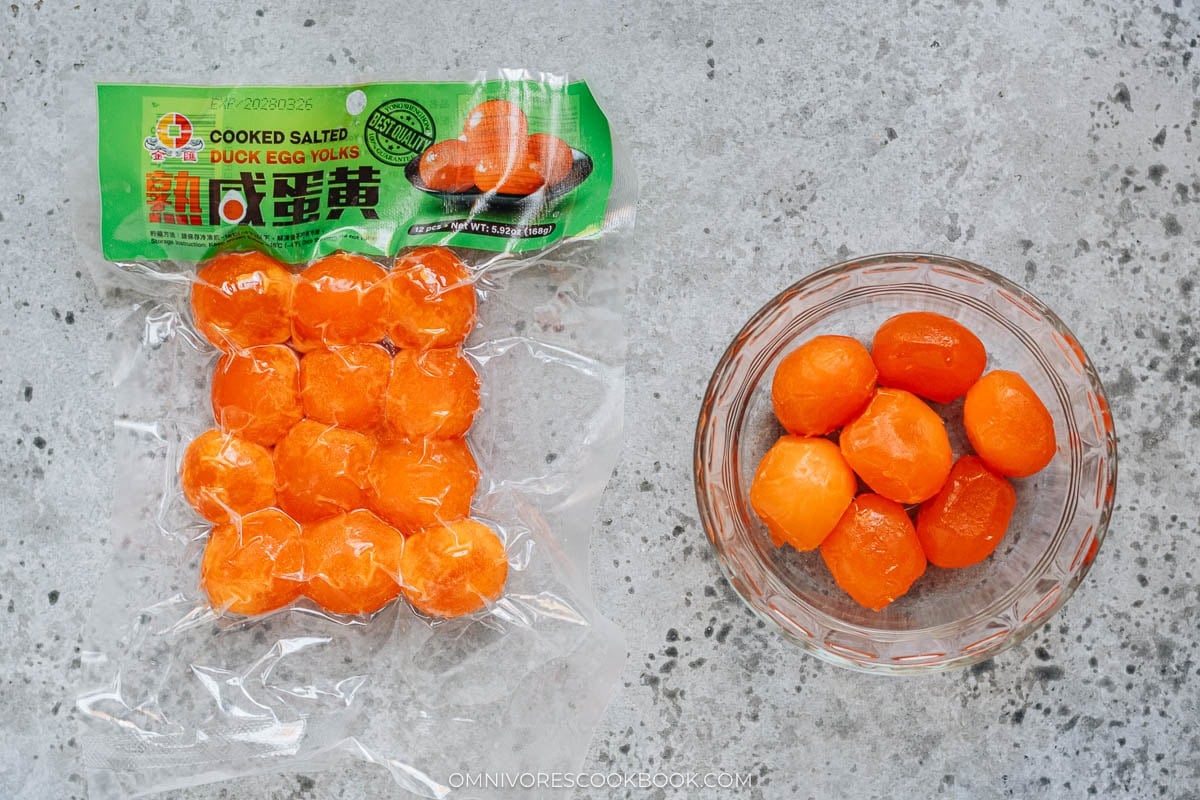
On the other hand, if you do not like this ingredient, it’s totally OK to skip it as well. In this case, you will need to make extra black sesame filling (see more details in the recipe below).
Why cut the duck egg yolk in half?
This recipe makes 50-gram mooncakes, which require 30 grams of filling. A whole duck egg yolk usually weighs around 14g and is very large in size. It’s very difficult to wrap a whole yolk into a small mooncake. It’s only possible to use whole yolks if you happen to find yolks that are smaller than 10g each, which are rare. That’s why I prefer to halve the yolks to make the shaping process easier.
Other filling alternatives
If you do not want to make black sesame paste filling, you have a few other options.
You can use store-bought mooncake filling. And the most common types are red bean paste and lotus seed paste. When shopping for red bean paste, make sure to check the ingredients – it should contain oil and maltose. This is the correct type for making mooncakes. Red bean paste made with water but not oil is not suitable for mooncakes.
If you have extra time, consider making these fillings at home. I have recipes for lotus seed paste filling and red bean paste filling. Compared to the store bought type, homemade paste has a richer taste and is more fragrant. You can also adjust the sweetness level to suit your own taste.
How to make
Traditional mooncakes require some time and effort to make. But if you’re organized and not rushed, it’s a very relaxing and enjoyable process. Make sure you have half a day and put on your favorite music or TV show!
Prepare the mooncake filling
My homemade black sesame filling has a fluffier and softer texture than the store bought type. But it requires a little more chill time so it’s easier to work with.
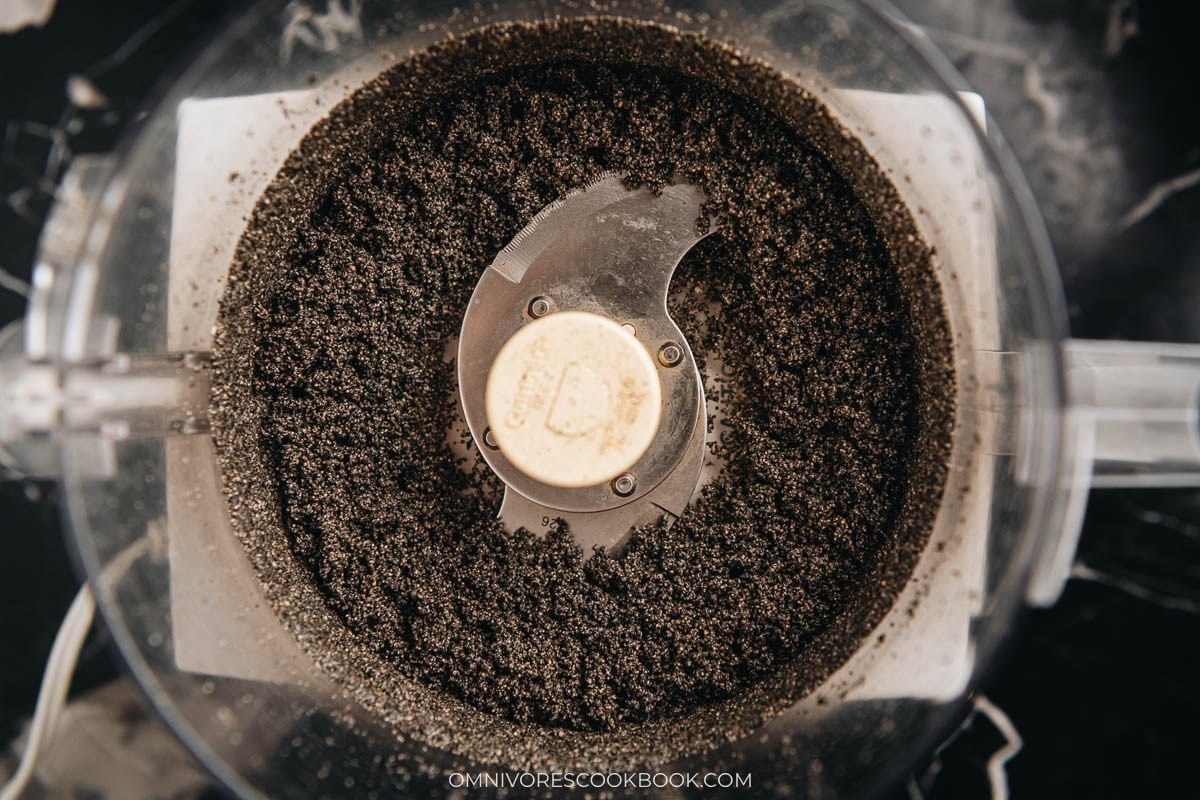
- Blend the black sesame seeds until they start to seep oil. This ensures a smooth filling without tasting gritty. I like to use toasted black sesame seeds because they’re easier to work with and yield a better result. If using raw sesame seeds, you have to roast them until they are cooked through beforehand.
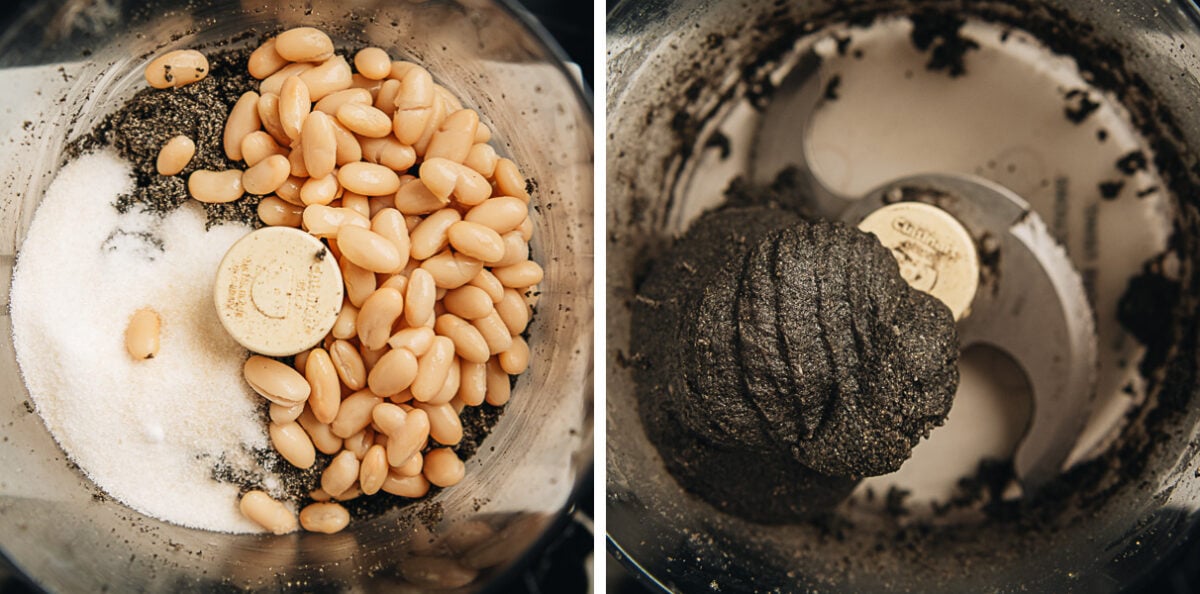
- Add the sugar and white beans and blend until it forms a paste. The paste is quite thick and your food processor might stop before everything is fully blended. You can add a little water in this case. If you add water, you will need to spend more time cooking off the water later, so the paste is dry enough to shape.
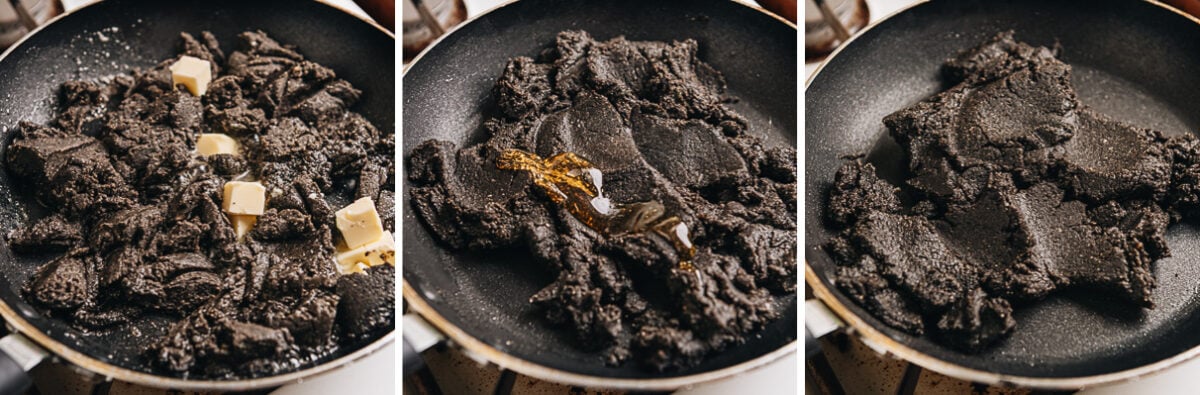
- Melt the butter and cook the butter into the paste. Then fold in the maltose, if using. The paste should look quite dry once cooked. And it will solidify further once cooled off. It is important to cook the paste enough until it’s quite dry. Otherwise the mooncakes will be very difficult to shape.
Prepare the mooncake dough
Mooncake dough is quite easy to put together. The most important thing is to measure out the ingredients in grams, so the dough has the correct texture.
- Mix golden syrup, kansui, oil and salt together. Stir them very well until the mixture emulsifies. This step is crucial. You want the golden syrup and kansui to react, so the dough forms properly.
- Add the flour and shape the dough. Always using a scraping and folding motion, to avoid development of too much gluten. The dough will be quite soft and sticky, but should still hold its own shape.
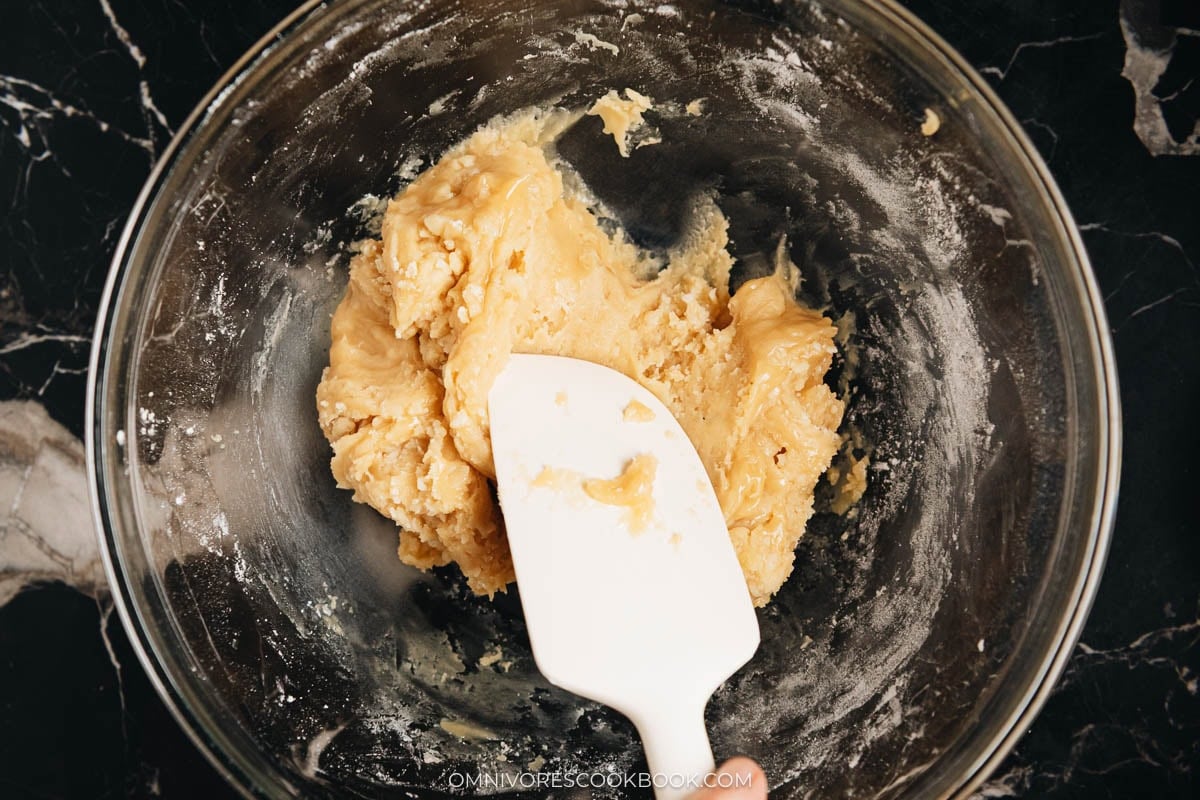
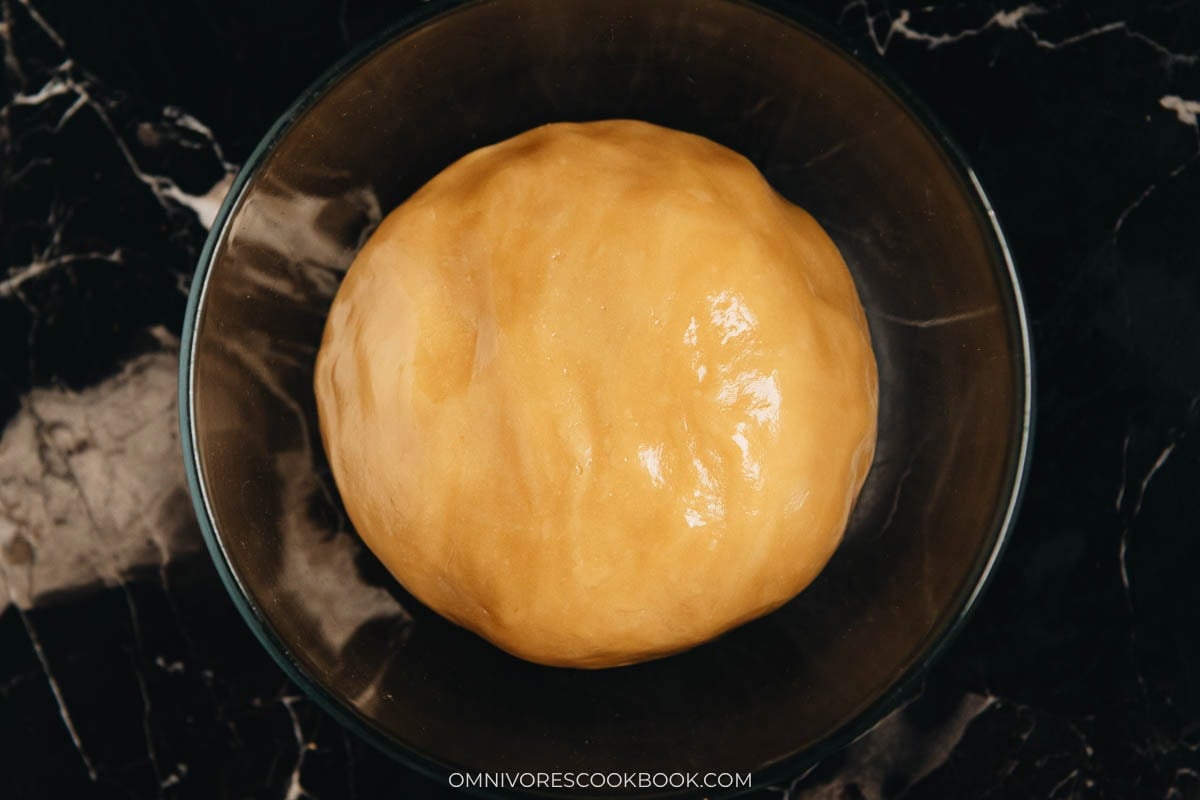
- Once the ingredients are fully incorporated, shape and gently work the dough with your hands until it forms a ball. Rest the dough for at least two hours, up to half a day. Do not refrigerate the dough.
Prepare the mooncake filling
- Measure out 30 grams of filling using a scale. It should be 30 grams in total if using both salted duck egg and black sesame paste. If you do not plan to use duck egg yolks, you should measure 30 grams of black sesame paste.
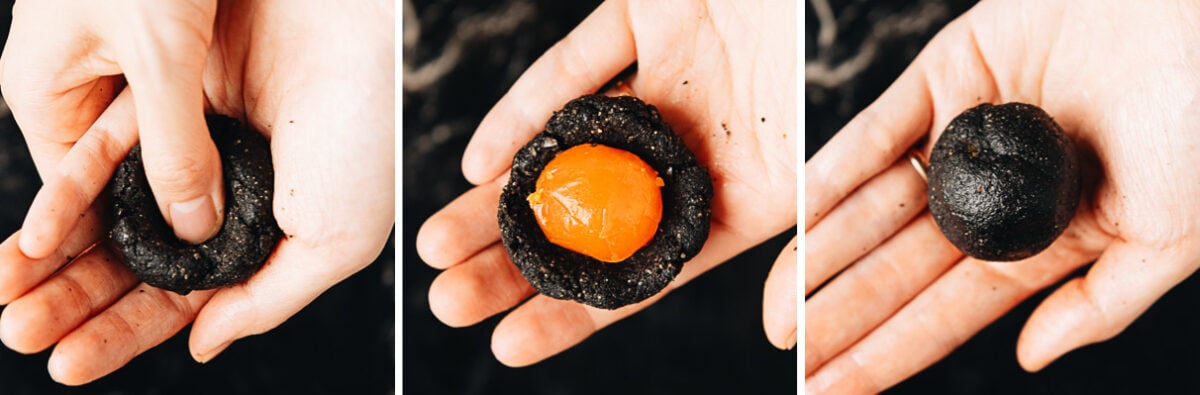
- Shape each filling into a ball. If using the egg yolk, wrap the yolk inside of the sesame paste then shape it into a ball.
- Store the shaped filling in the freezer for 30 minutes while you prepare the mooncake dough. This process further solidifies the filling, making it much easier to work with during shaping.
To assemble the mooncakes
- Once the mooncake dough is rested, divide the dough into 20-gram pieces and shape them into balls.
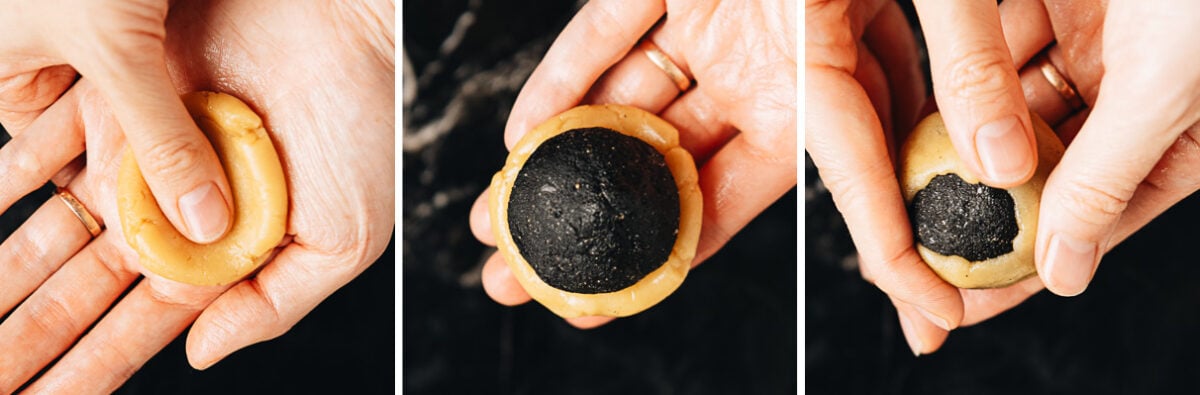
- To wrap a mooncake, press the dough piece in your palm so it’s thin in the center and thicker on the edges. Place the filling in the center. Slowly spread the dough over the filling so it covers the filling entirely. The mooncake dough should be soft and very pliable, with very few cracks during wrapping. If your dough turns out tough and hard to work with your hands, you can also roll out the dough using a rolling pin. In this case, sandwich the dough between two pieces of parchment paper to prevent it from sticking.
- You want to assemble all the mooncakes before moving to the next step. Cover the assembled but not shaped mooncakes with plastic wrap to prevent them from drying out.
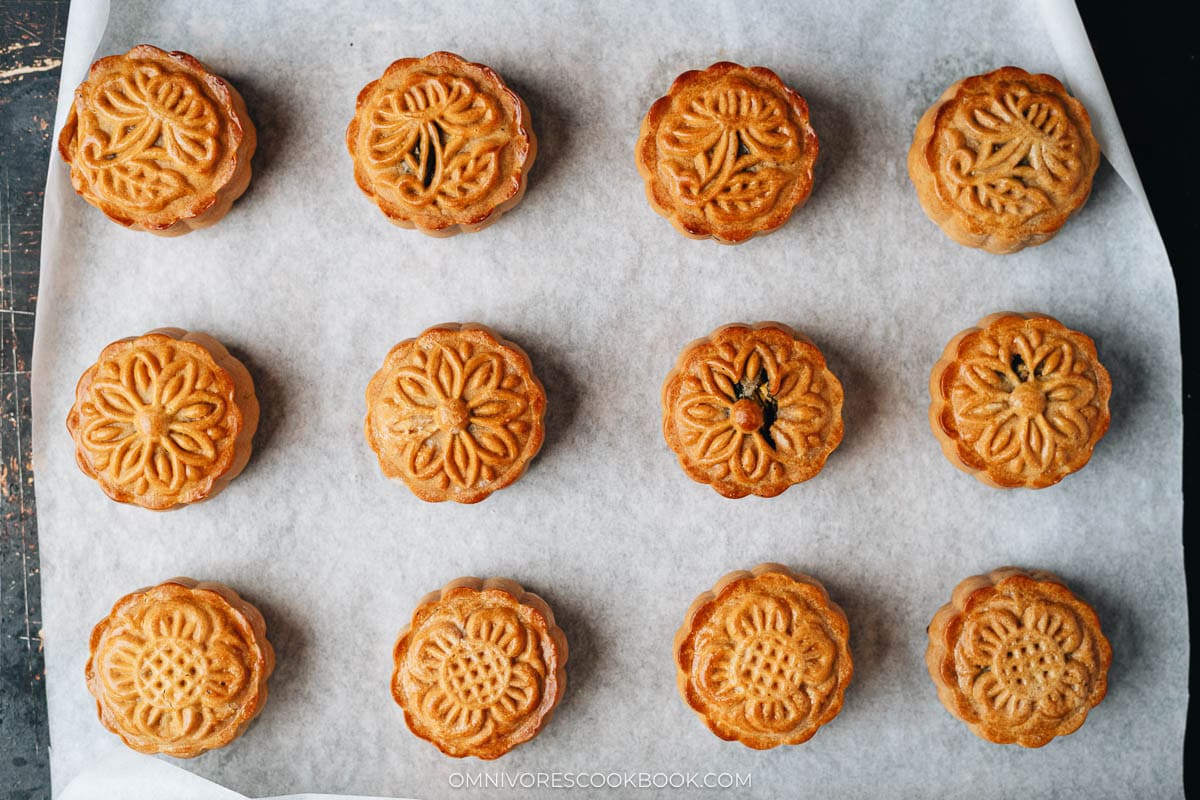
- Once wrapped, dust the dough surface with a thin layer of flour. Place the dough ball into the mooncake mold. Then press the mold to shape the pattern. This step might require a little trial and error. You want to press quite hard, until there’s no room to move. If you notice dough starting to seep out from the mold, you’re pressing too hard. Once you’ve pressed down, you want to hold and press the mold for at least 5 seconds. This is key to ensure the pattern stamps properly and does not bounce back later.
- Place the mooncakes onto a parchment-lined baking sheet. Once the patterns are stamped, you want to bake them as soon as possible to prevent the dough from drying out. If you’re working very slowly, you will need to cover the shaped mooncake with plastic wrap. But be careful not to press the wrap onto the mooncake, which might mess up the pattern.
Bake the mooncakes
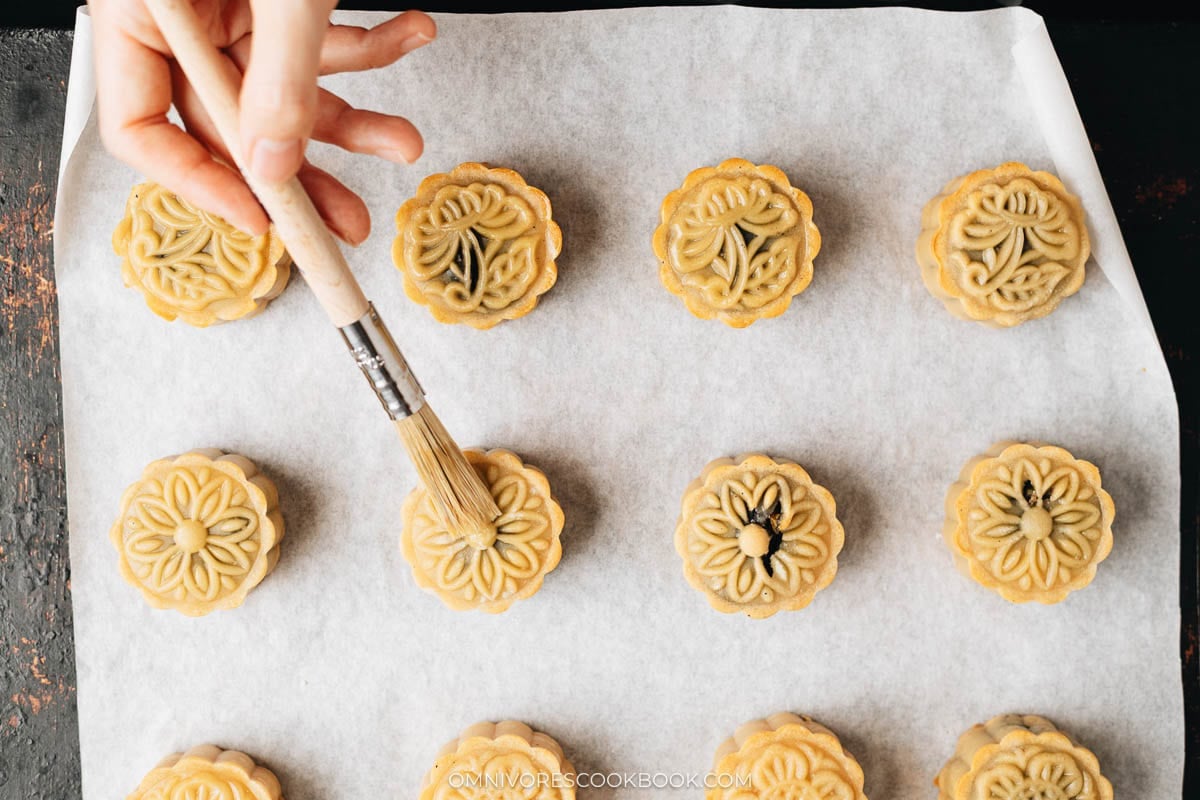
- Bake at 400°F (200°C) for 5 minutes, so the dough is firm enough for the egg wash. Brush a very thin layer of egg wash onto the arched patterns and try to avoid the caved area. So only the arched area will become darker, giving the mooncake a more three-dimensional look.
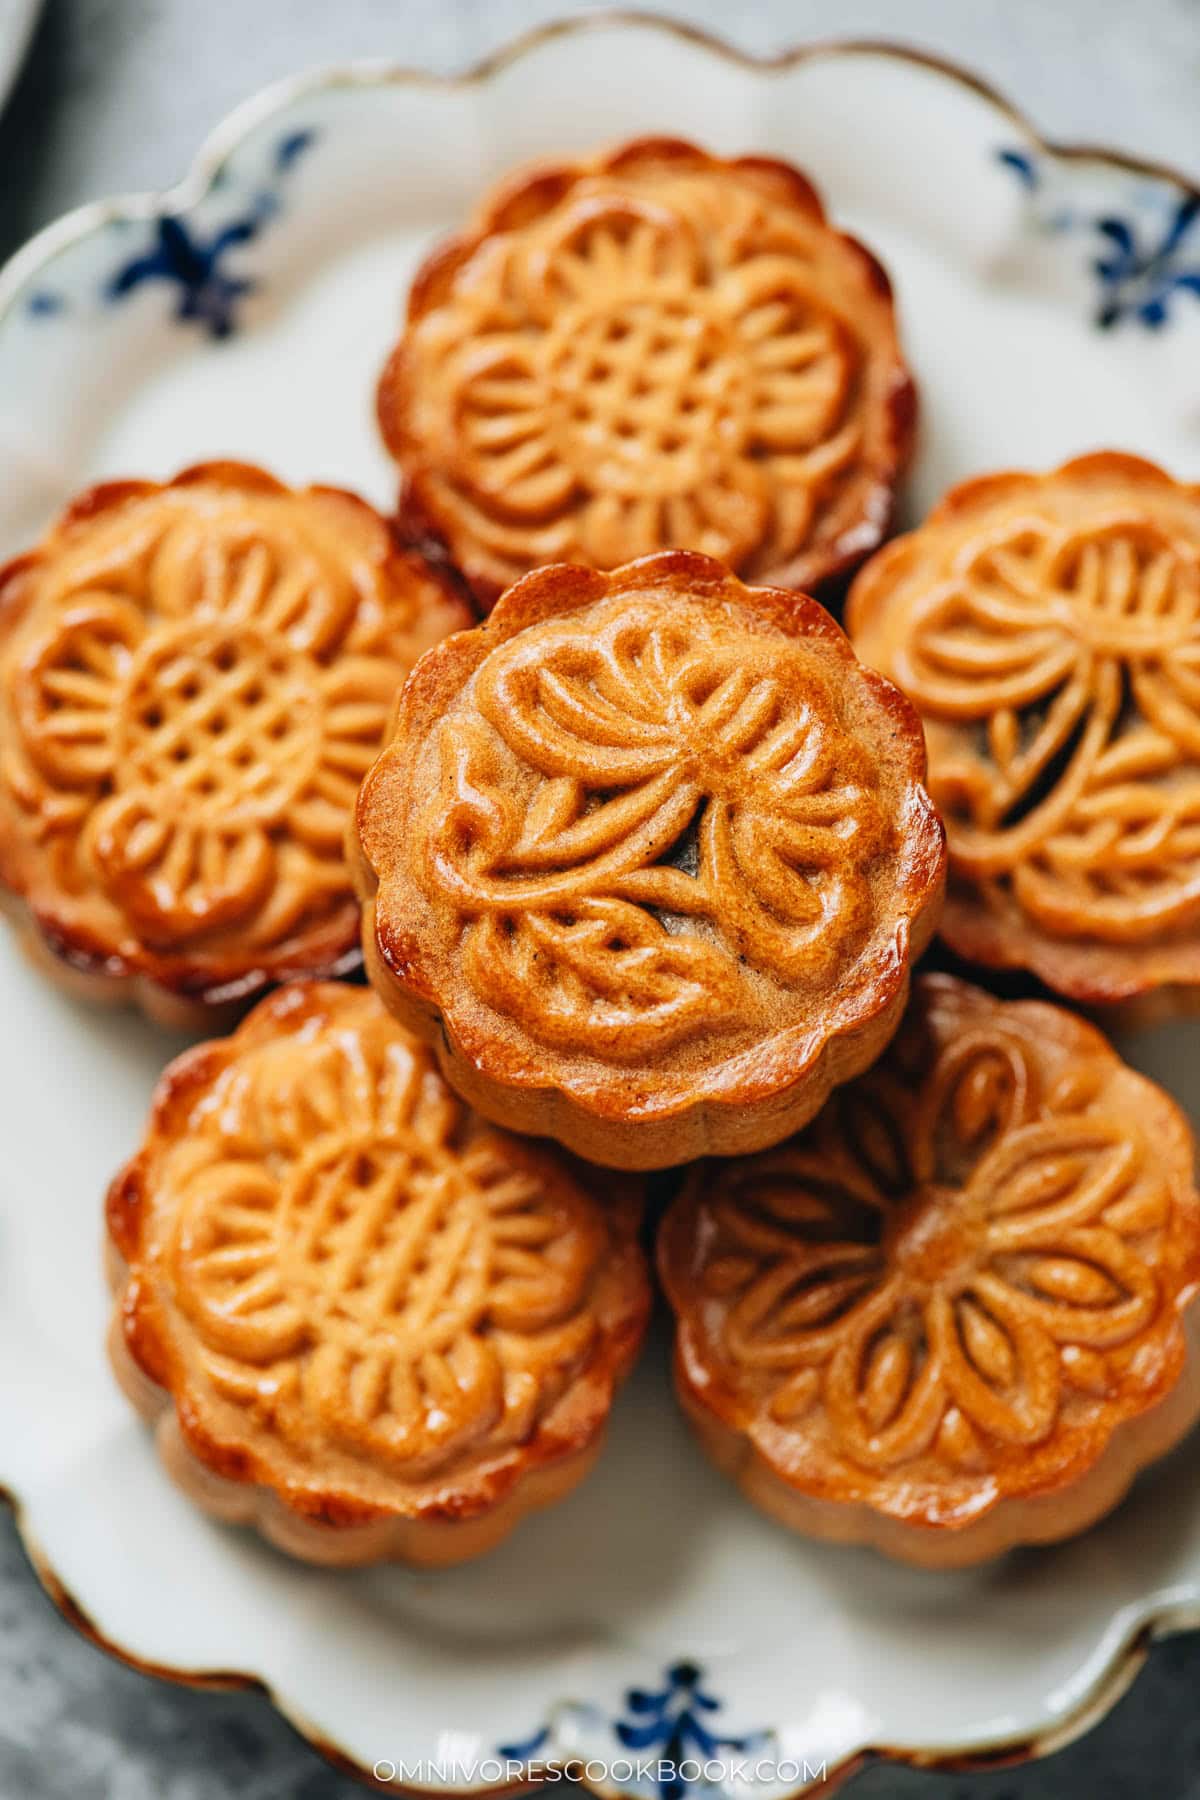
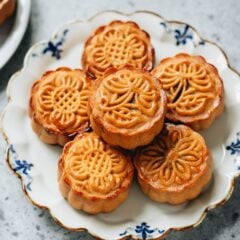
- Lower the oven temperature to 350°F (176°C) and bake for another 12 to 15 minutes, until the mooncakes turn golden brown. Once baked, the mooncakes will look a little dry and the colors uneven. But rest assured, they will look shinier and more even once rested for a day or two.
Why is resting mooncakes important?
Resting mooncakes after baking is one of the most important steps for achieving the right taste and texture. This process is called “回油” (huí yóu, “returning oil”), which means to wait for the oil to come out.
Freshly baked mooncakes have a dry, crumbly, and almost cookie-like crust. Resting allows the oil in the dough to migrate outward and the moisture from the filling to move inward, softening the skin into the signature tender, shiny layer. Over a few days, the skin darkens and becomes more golden and glossy, giving the mooncakes a professional look.
The rest period helps the filling and skin meld together. Sweetness, saltiness (from the salted yolk, if used), and aroma become more harmonious, rather than tasting separate.
Typically, Cantonese mooncakes need 2 to 3 days of resting before they’re ready to enjoy at their best. But they usually start to look and taste much better after resting overnight. I always taste them the next day, because I have no patience to wait two days 🙂
Cooking tips
A scale is the key to success
Making mooncakes requires precision. For the right texture, you will need the correct ratio of flour to golden syrup to kansui. You want to measure the filling quantity so the mooncake has an appropriate proportion of dough to filling. Volumetric measurement and eyeballing simply will not cut it for this recipe.
Be flexible on temperature and baking time
Different ovens will vary in their temperature consistency. I’ve baked mooncakes at 400°F (200°C) and 350°F (176°C), both with good results. I found it best to bake first at a higher temperature for the dough to set, so I can brush the egg wash on easily. Then reduce to a lower temperature to bake evenly and further develop the color. Keep an eye on the mooncakes while baking. If the mooncakes start to develop color too quickly, you might want to reduce the baking time. If the mooncake does not develop color towards the end of cooking, consider raising the temperature back to 400°F (200°C).
Serving and storage
Let the mooncakes rest for 24 to 72 hours after baking. Flavor and texture improve with time.
Store in an airtight container at room temperature if possible, and eat them within a week. Refrigeration can alter their texture.
If freezing, wrap them well and store them in the freezer for up to two months. Thaw them in the fridge slowly, and let the mooncakes return to room temperature before serving.
Frequently asked questions
Do I need to cook the salted egg yolks separately first?
If the salted duck egg yolks you bought are the cooked type, then you don’t need to cook them first. If using raw yolks, you will need to bake them at 350°F (176°C) for 8 to 10 minutes to cook them through before using. Some recipes suggest baking cooked yolks to get rid of the gaminess, but I found that unnecessary.
Can I make the black sesame paste filling in advance and freeze it?
Yes you can! It’s best to freeze the sesame filling after you shape it into balls. So you can directly wrap the mooncakes without thawing the filling. It works beautifully because frozen filling is much easier to work with. If the sesame filling is very frozen (unlike the 30-minute freeze in this recipe), you might want the assembled mooncakes to thaw a little bit before putting them into the mold and shaping them.
Why did my mooncakes crack during baking?
It’s a common practice to spray water onto the mooncakes before baking, to prevent them from cracking. Cracking happens when the dough is not elastic enough. It might happen if you don’t use enough liquid, the flour contains too much gluten, or if the mooncakes are left out too long before baking. Another cause can be because the filling is too wet – especially if you try to make the filling with other ingredients such as sweet potato.
Can I use another type of oil instead of vegetable oil?
Peanut oil works well because it adds nuttiness that works with black sesame filling. Other neutral oil such as sunflower oil will work too.
Can I make mooncakes with chicken eggs?
Yes you can! You can cure chicken egg yolks with salt and sugar. Once cured, the yolks will solidify and can be used in this recipe. Chicken egg yolks are also smaller, so you might be able to fit one yolk into a mooncake instead of halving it, if the yolk is under 10 grams.
Do I have to wait 24 hours to eat these? Or is it possible to eat them straight away?
You can eat them straight away, but you might be disappointed with the texture. The mooncake skin will be rather tough and crumbly, and a little dry. Just so you know, I always taste one straight away because I can’t wait. But the mooncakes start to taste noticeably better on the third day.
Final thoughts
Traditional Cantonese mooncakes are exquisite when done right, not just for their ornate appearance, but also for the harmony of sweet, salty and savory umami. It will take a little practice and patience to make them nicely, but the result is definitely rewarding. Even with boxes of them for sale everywhere this season, homemade mooncakes offer qualities often lost in commercial production. You can taste the freshness of the ingredients and notice a much better depth of flavor. I also like homemade mooncakes because they are less sweet and not as heavy as the commercial type. Lastly, an edible gift made with your own hands is always more special.
If you’re interested in learning about other types of mooncakes, check out my Snow Skin Mooncake with Custard Filling and Pastry Mooncake with Salty Egg Yolk.
Happy Mid-Autumn Festival and I hope you enjoy these homemade mooncakes!
Chinese Cooking Made Easy
Are you new to this website? This free email series is a great place to start. I’ll walk you through a few of my most popular recipes and show you how and why they work. You’ll quickly start to cook better Chinese food in your own kitchen.
Watch video
Traditional Mooncake (传统广式月饼)
Ingredients
Mooncake filling
- 140 g (1 1/3 cups) black sesame seeds , toasted
- 80 g (2/3 cup) fine white sugar
- 60 g (4 tablespoons) butter
- 150 g (1 cup) white beans , well drained
- 1 tablespoon maltose (Optional)
- 9 salted duck egg yolks , halved (*footnote 1)
Mooncake dough
- 140 g golden syrup
- 4 g (3/8 teaspoon) kansui
- 50 g vegetable oil
- 1/8 teaspoon salt
- 200 g cake flour
Egg wash
- 1 egg yolk
- 1 teaspoons milk (or water)
Equipment
- 50g mooncake mold
- Scale (*Footnote 2)
- Pastry brush
Instructions
To make mooncake filling
- Add the black sesame seeds into a food processor. Blend until the sesame seeds start to seep oil and thicken, about 2 minutes. Use a spatula to thoroughly scrape the paste from the walls and bottom of the food processor. Blend again until it forms a fine paste, 1 to 2 minutes. Scrape the paste from the walls and bottom.
- Add sugar and white beans. Blend again until everything is fully mixed. If the paste is too thick to blend, you can add a very small amount of water. Transfer the paste to a bowl.
- Heat half of the butter in a medium-sized skillet over medium heat until melted. Add the bean paste. Cook and stir until the butter is fully absorbed. Add the rest of the butter and cook until fully absorbed. Add the maltose if using. Cook and stir until the paste becomes quite dry and able to hold its own shape, 3 to 4 minutes. Transfer the sesame paste to a plate and spread it out. Let cool completely. You can store the sesame paste in the fridge to make it easier to handle later.
To make mooncake dough
- Combine golden syrup, kansui, vegetable oil and salt in a large bowl. Mix with a spatula until emulsified.
- Add cake flour into the bowl. Gently fold the dough with a motion of scraping from bottom to top, like you are folding a cake dough. Do not stir the dough in a circular motion. It will toughen the dough.
- When the flour is fully combined, shape the dough into a ball with your hands. The dough should be soft and a bit sticky but still hold its shape. Seal with plastic wrap. Let rest for 2 hours.
Measure the mooncake filling and dough
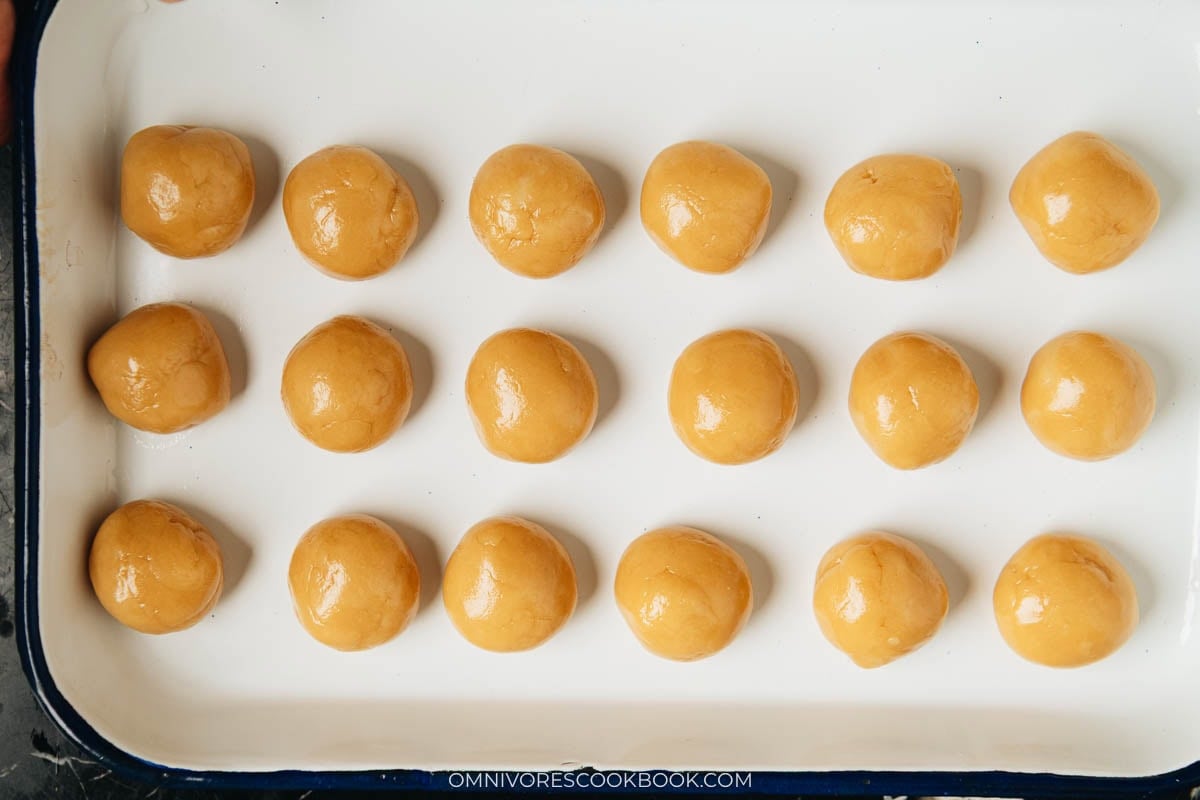
- Once it has cooled off, divide the sesame paste into 30-gram portions if not using duck egg yolks. Or add half a duck egg yolk and some sesame paste onto a scale, so that it weighs 30 grams in total. Shape the sesame paste into a ball, then press the center to form a disk. Place the egg yolk in the center. Wrap the sesame paste around the yolk until fully covered, then shape it into a small ball. Place it onto a tray,
- Once you have shaped all the mooncake fillings, cover them with plastic wrap and place them in the freezer. Wait until the balls harden so they’re easier to handle, 30 minutes or so. (*Footnote 3)
- Once the mooncake dough is rested, scoop and measure 20g dough pieces. Shape each dough piece into a ball using your hands. Then place them onto a large tray. Cover the tray with plastic wrap to prevent the dough from drying out.
To assemble mooncakes
- Preheat oven to 400°F (200°C). Line a baking sheet with parchment.
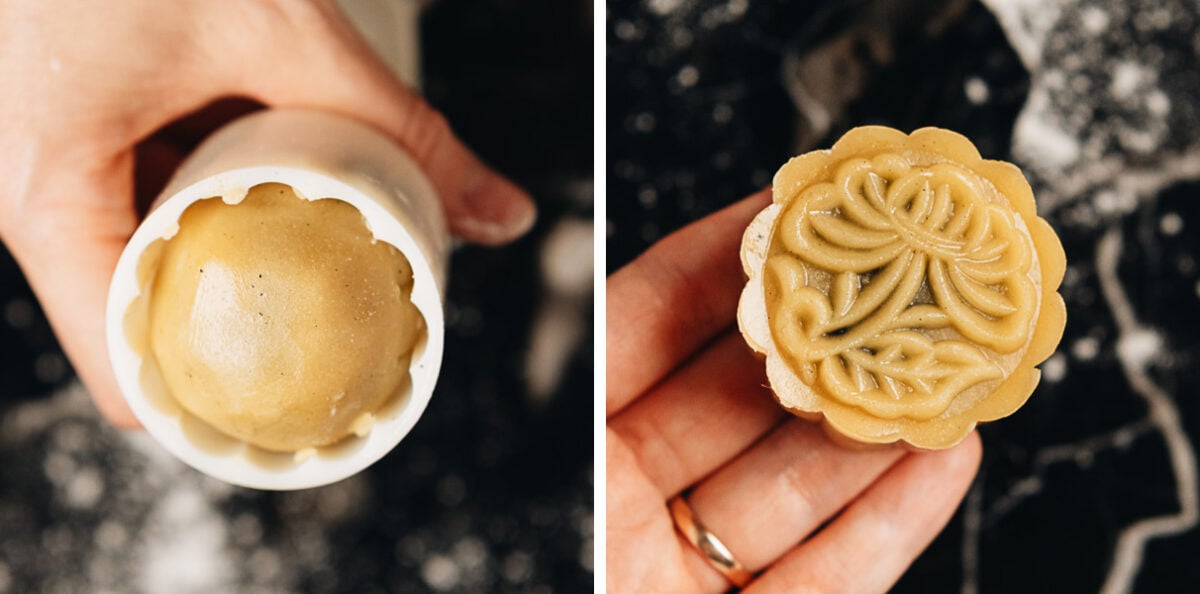
- Place a dough piece onto your palm and use your thumb to flatten the dough from the center, until it forms a round disk that is thinner in the center and thicker on the outside. Place the black sesame filling in the center. Carefully wrap the dough around the filling. Spread the dough until it seals the filling in completely. The dough should be very soft but not sticky, and easy to shape, like soft clay. (*Footnote 4) If you find the dough too thick in some spots, pull off the dough and smooth the surface. It doesn’t matter if the dough is so thin that it reveals the color of the filling. Roll the dough between your hands until the dough forms a smooth ball.
- Slide the plastic pattern disc into the mooncake mold, pattern side down. Twist the handle to lock the pattern disc so it’s secure.
- Dust both hands and the mooncake dough with a bit of cake flour, so it’s easy to release from the mold. Carefully place the mooncake into the mold.
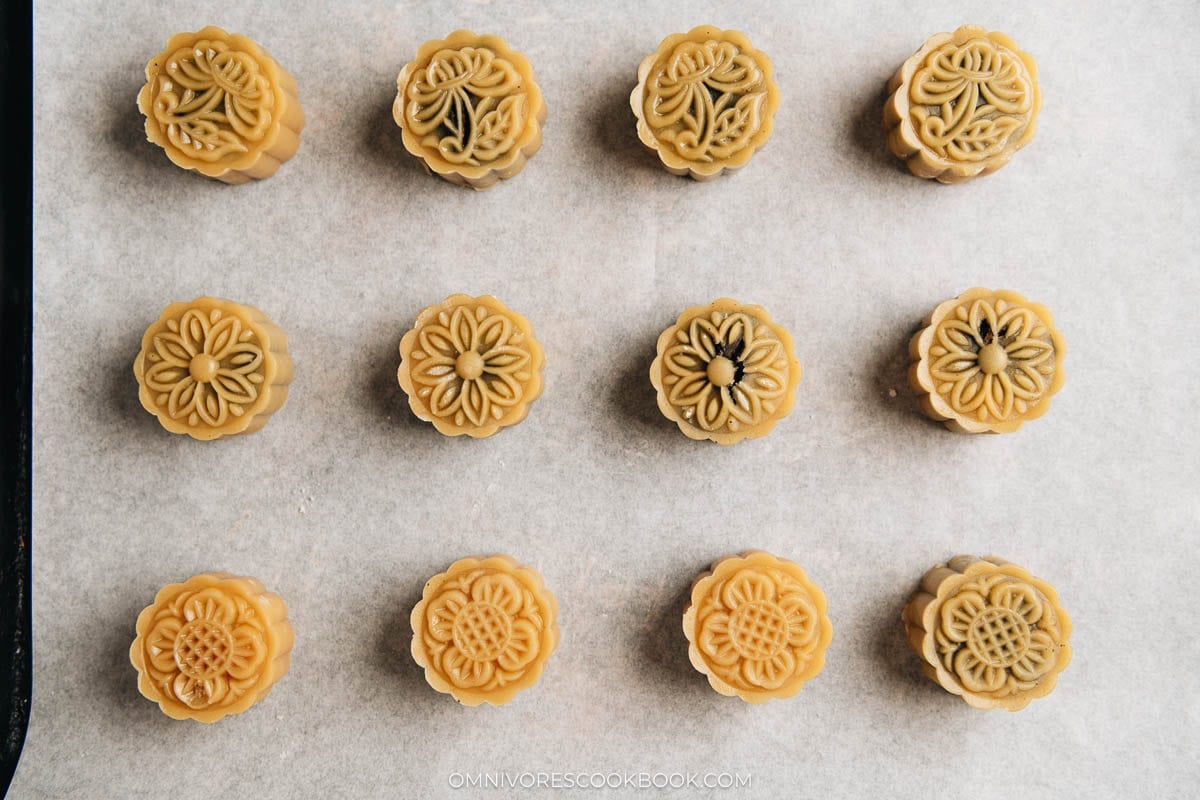
- Place the mold on a clean working surface and firmly press the handle until you cannot move it any further. Hold the handle down for at least 5 seconds so the pattern sticks. Then release the mold from the table and push the handle to release the mooncake onto the lined baking sheet. Work on the rest of the mooncakes and place them onto the tray, about 1” (1.5 cm) apart. Spray a very small amount of water onto the mooncakes to prevent the dough from cracking. Bake for 5 minutes until the patterns are set. The edges of the mooncakes should turn pale golden.
- Meanwhile, make the egg wash by beating the egg yolk with milk (or water) in a small bowl.
- Remove the mooncakes from the oven. Brush a thin layer of egg wash onto the surface of the mooncakes. Only brush the top surfaces, not the vertical (side) surfaces. Try to only brush it onto the arched pattern, and not the recessed concave area. If you accidentally brush too much egg wash and it fills in the pattern, use a small brush to clean the gaps and remove the excess egg wash.
- Place the mooncakes back in the oven and lower the oven temperature to 350°F (176°C). Continue baking until the egg wash turns golden brown, 12 to 15 minutes.
- Let mooncakes cool on the tray for 20 minutes before removing (*footnote 5). Then transfer to a plate to cool completely.
- Once cooled completely, store the mooncakes in an airtight container. The mooncakes can be served after 24 hours, and they will look and taste better after 2 days. (Footnote 6)
Store
- Store the mooncakes in an airtight container in a cool dark area for up to 1 week, or in the fridge for 2 to 3 weeks, or in the freezer for up to 2 months. If stored in the fridge, let the mooncakes return to room temperature before serving. Thaw frozen mooncakes in the fridge overnight before serving.
Notes
- To make black sesame mooncakes without egg yolk, double the black sesame filling and you will be able to make 18 mini mooncakes.
- Mooncake making requires precision and you have to use a food scale to measure the ingredients. Using volumetric measurement won’t be accurate enough and your mooncakes might not come out nicely if you go by volume.
- Sesame filling is not as sticky as other mooncake fillings, such as lotus seed and red bean paste. That’s why I prefer to chill the filling in the freezer before wrapping, so the filling hardens up.
- If your dough turns out too tough to shape with your hands (usually happens if you use all-purpose flour, which contains more gluten and makes a tougher dough), you can do this instead: Place the dough between two pieces of parchment. Press it into a flat disc. Roll it into a small round sheet. It should be fairly easy to wrap the dough using the dough sheet. If the dough sheet breaks off, you can easily patch it onto the filling until the filling is fully covered.
- The mooncakes will be flaky and soft when hot. If you remove them right after baking, the cakes will crush easily.
- The process is called 回油 (Hui You), a process whereby the oil from the filling releases into the dough, making the mooncake dough softer. The mooncake will look a little dry immediately after baking, but will look moist and tender after a day or two. The patterns will also have a rounder, nicer look.
Nutrition

Did you make this recipe?
I’d love to hear how it turned out for you! Please take a moment to leave a 5-star rating ⭐️ and share your thoughts in the comments further down the page. It really helps others discover the recipe too.
This recipe was originally published in September 2015 and was updated in September 2025 (wow it has been 10 years!). In the updated version, I did a few things differently:
- I used commercial golden syrup and kansui instead of the homemade type. Compared to 10 years ago, both ingredients are more available and it’s easy to purchase them online. I recommend using the commercial type instead of homemade, if possible. Because the acid level in the syrup and alkaline level in the lye water are not precise when you make them at home. Using the homemade versions might result in cracked mooncake dough.
- Instead of using glutinous rice flour, I used white beans in the filling as a binder. The beans improve the mooncake texture and make it smoother.
- The new recipe has a slightly improved dough texture that is easier to work with.
- I updated the shaping method and baking temperature, so the mooncakes look better.
Kim
Hi Maggie,
I love your mooncake recipe and have used it for the past few years. I’m wondering if the filling amount you make in this updated recipe is the same amount as before? I forget what size mooncake molds I have but do know that when I followed your recipe exactly before, the gram measurement you had of filling per mooncake was perfect for me.
Also was wondering if you could provide an estimate for how big the filling balls are in terms of cups? I’m trying to make a red bean version but not sure how big to make them.
Thank you!!! This is the best recipe.
Maggie Zhu
Hi Kim, this updated version makes more mooncakes: my old recipe makes 10, and this one makes 18.
I’m afraid I don’t have a cup measurement for the filling. But I do have a red bean paste recipe for your reference:
https://omnivorescookbook.com/how-to-make-red-bean-paste/
If you scroll down, you will find the mooncake filling version in the note (the one uses maltose and oil).
It creates 400 grams filling. You will only need 30 grams filling if using my old recipe (makes 10 mooncakes).
But I think you might get a general idea of how much you need to make.
Attaching the old mooncake filling recipe here in case you need it:
1 cup (140 grams) raw black sesame seeds
1/3 cup (45 grams) confectioners sugar
1/4 cup (55 grams) unsalted butter
1/4 cup (40 grams) glutinous rice flour
5 salty duck egg yolks, about 14 grams per yolk, halved
Spread black sesame seeds in a large skillet and turn to medium heat. When the skillet gets hot, turn to medium low heat. Stir every 3 to 4 minutes. Cook until you smell a very strong nutty aroma and hear the sesame seeds sizzling. Transfer to a plate to cool.
When the black sesame seeds cool off, transfer to a food processor. Blend until the sesame seeds start to seep oil and thicken, about 2 minutes. Use a spatula to thoroughly scrape the paste from the the walls and bottom of the food processor. Blend again until it forms a fine paste, about 1 minute. Scrape the paste from the walls and bottom.
Add confectioners sugar and butter. Blend again until everything is fully mixed. Transfer to a bowl.
Add glutinous rice flour. Fold with spatula until the flour is fully blended and the paste forms a dough. If the dough can’t be lifted by hand and is still a bit runny, blend in more rice flour.
Divide the sesame paste into 10 parts, about 1.5 tablespoons (20 to 30 grams) per portion. Shape each portion into a small ball.
To shape the mooncake filling, flatten one black sesame ball with the hands. Place half a duck egg yolk in the middle. Wrap the sesame paste until it fully covers the egg yolk. Roll with hands to shape a ball. If you hold the filling ball up to a mooncake mold, the ball should be slightly smaller than the opening of the mold.
Place mooncake filling in the fridge to cool. Wait until the balls harden.
Kim
Thank you!! I ended up using extra dough to try out your new black sesame filling recipe. The texture is definitely better! But I completely lost the black sesame flavor. Any suggestions? I’d used cannellini beans.
Maggie Zhu
I do think the bean would mask the sesame seeds flavor a bit, but you should still be able to taste it. Did you try toasting the black sesame seeds before grinding? That will bring out the flavor a lot. I would also make sure the black sesame is fresh. Once opened, sesame seeds lose its fragrance gradually and will taste flat. I think cannellini beans are mild enough and should be OK.
Mary Martin
I love this recipe. I love how you cover everything as this is an undertaking. I used your recipe 5 years ago then a gain last year,and now I’m making them right now. They are wonderful 😊
Christine Brown
Someone please let me know if melted butter is ok as a substitute for oil in the dough.
Maggie Zhu
I’ve never tested it. I think it’s possible to use butter in the dough, but it might change the dough texture. Butter contains water. Plus, because it solidify at room temperature, the dough might be a little more crumbly and it might affect the molding process. If you decided to try it out, please let me know the mooncake turns out 🙂
Stephannie
Hi Maggie,
I & my son plan to make this mooncake. Based on the latest update, you suggested to use commercial Golden syrup & kansui considering the acid level of the homemade one. May I know what info/parameter should I pay attention when I buy the commercial ones?
I found homemade golden syrup also now sold commercially on market place, should I avoid this one?
Thank you
Maggie Zhu
Hi Stephannie, I used Lyle’s golden syrup in this recipe, which is the most commonly found type and I think it’s one of the most frequently used one.
I have a homemade golden syrup recipe: https://omnivorescookbook.com/homemade-golden-syrup/ It uses lemon juice as the acid. I think commercial product uses a different process.
I wouldn’t say avoid the homemade type entirely, because I’ve used the homemade one to make mooncake in the past and had good result. But you might get a slightly different result (texture of the dough etc), but it’s not a deal breaker.
Ruth
I miss the old recipe for black sesame filling without beans. I’m sure this one is also delicious, but I feel like the total lack of liquid in the original makes it a bit more fool proof (no fear of steam busting them open) and my colleagues are already addicted to that recipe. Any chance you could respond with the original ingredient list?
Maggie Zhu
No problem!
The original filling ingredients:
1 cup black sesame seeds
1/3 cup (45 grams) confectioners sugar
1/4 cup (55 grams) unsalted butter
1/4 cup (40 grams) glutinous rice flour
5 salty duck egg yolks about 14 grams per yolk
My original recipe was smaller, only making half of the batch of this recipe. If you’re making the full batch, you should double the filling (using two cups black sesame instead of one cup).
Ruth
THANK YOU!!!
Amnos
Thank you so much for sharing the recipe. It is the only one that has worked for me and i have been doing these for the past 3 years.
For me it is the best mooncake skin recipe!
Maggie Zhu
I’m so happy to hear you tried the recipe and liked the result! Mooncake is pretty hard to make and it took me so many tries to find out a good ratio. Thank you for leaving a positive review 🙂
Anon
A quick note on the 回油 process: I made half my batch with the sesame filling and half with traditional lotus paste. Same dough. The sesame ones are still have a hard skin after ~12 hours, while the skins on lotus paste ones are already softening up. So the 回油 process is dependent on the filling too, not just the golden syrup/kaisui content in the dough.
Josh
I started making these in the first year after I met my (now) wife, and since them doing it every year with your recipe. It gives her some comfort of home and therefore she loves them! Thanks Maggie for sharing this!
MJ
Hi there, if I were to make these mooncakes in 125g moulds would I have to adjust the bake time? Do I need to cook the salted egg yolk seperately first then? Thank you so much. I’ve never come across black sesame filling mooncake before- this looks delicious!
m
i’ve made this recipe before and will be doing so again this year 🙂 love it sooo much the results are amazing!! it was the first mooncake recipe i ever tried and still my absolute favorite, thanks for all your hard work
Linda
Omg thank you SO much for this detailed explanation on mooncakes. I have been exploring and experimenting for YEARS and then thrown my hands up in the air but this has answered all my questions explicitly and nw it all makes more sense. I can’t wait to pull my (wooden and plastic) molds out again and give it another shot
Stephannie
Hi Maggie,
I & my son plan to make this mooncake. Based on the latest update, you suggested to use commercial Golden syrup & kansui considering the acid level of the homemade one. May I know what info/parameter should I pay attention when I buy the commercial ones?
I found homemade golden syrup also now sold commercially on market place, should I avoid this one?
Thank you
Maggie Zhu
Hi Stephannie, I used Lyle’s golden syrup in this recipe, which is the most commonly found type and I think it’s one of the most frequently used one.
I have a homemade golden syrup recipe: https://omnivorescookbook.com/homemade-golden-syrup/ It uses lemon juice as the acid. I think commercial product uses a different process.
I wouldn’t say avoid the homemade type entirely, because I’ve used the homemade one to make mooncake in the past and had good result. But you might get a slightly different result (texture of the dough etc), but it’s not a deal breaker.
Meredith Chen
Thanks for the recipe, Maggie. Did you get 回油 when using coconut oil? I used the recipe twice and tried to follow every step with the exception of the oil, but couldn’t get 回油.
eleanor
Thanks for putting so much effort into the recipe! I’ve made this recipe 3 times (twice with the lotus seed paste recipe you’ve posted separate) and Ive noticed that when I use the black sesame fillling, the pastry does not soften into the typical moon cake pastry. It’s still quite “hard’ after three days. Do you have any tips?
Ami
After several tries with different recipes using American AP flour, I finally came across your site—and your explanation about using Chinese or Korean flour versus American AP flour really makes sense! I’m now trying your mooncake dough recipe with Korean AP flour (Gompyo brand).
My question is, using your measurements with KAP, my dough still feels quite soft and isn’t holding its shape well (I scaled everything carefully). Should I add a bit more KAP flour to adjust the consistency?
Thank you so much for sharing your knowledge—it’s been really helpful!
Thanks!
Ami
Maggie Zhu
Hi Ami, the dough should be quite soft when you make it. If you shape it into a ball with both of your hands, it will flatten out a little after putting it down. But it’s not so soft that it sticks to your hands. If your dough is too soft, you can add a little more flour. When shaping the mooncake, the dough need to be soft enough so you can smooth it out with your hands. That being said, if you added some flour and made a slightly tougher dough, it’s also possible to roll out the dough using a rolling pin. I’ve made dough that’s not soft enough and I just used roll the dough between two pieces of parchment paper. It didn’t cause too much an issue. When the dough is tougher, make sure to spray water before baking, so the dough won’t break.
Mrs N
It’s interesting to read the journey of self-discovery for a cultural tradition. When I first married my husband I told him that my mama never taught me how to cook and he’d have to show me what it was that he would enjoy. So, I learned a lot about Japanese cooking, and along the way, something about the history of Korean and Chinese cooking. We were living in Married Student Housing MSH of a western university in the USA. There weren’t too many Japanese students, so my husband was the president of the Japan-America Student Society and we often invited the few Japanese students over to learn new ideas, and for bit of relief of homesickness. When Japanese food items showed up in the local grocery store, the grocer had a few things to learn, too. (Fresh tofu in the produce aisle next to the pineapples!)
There were quite a few international students living in MSH, and sometimes there was potluck! The math doctoral student from Yemen relayed a story about selling the aroma of herb-crusted lamb kebabs to passersby.
Elly
Awesome! Making it for the first time. I read all the rabbit holes for the mooncake recipe many times. How fascinating! You mentioned the mooncakes have to rest 1 to 3 days before being served. Do you store them in the fridge or just leave them in room temperature in am airtight container?
Maggie Zhu
You should leave the mooncakes in room temperature in an air tight container. Hope you enjoy them 🙂