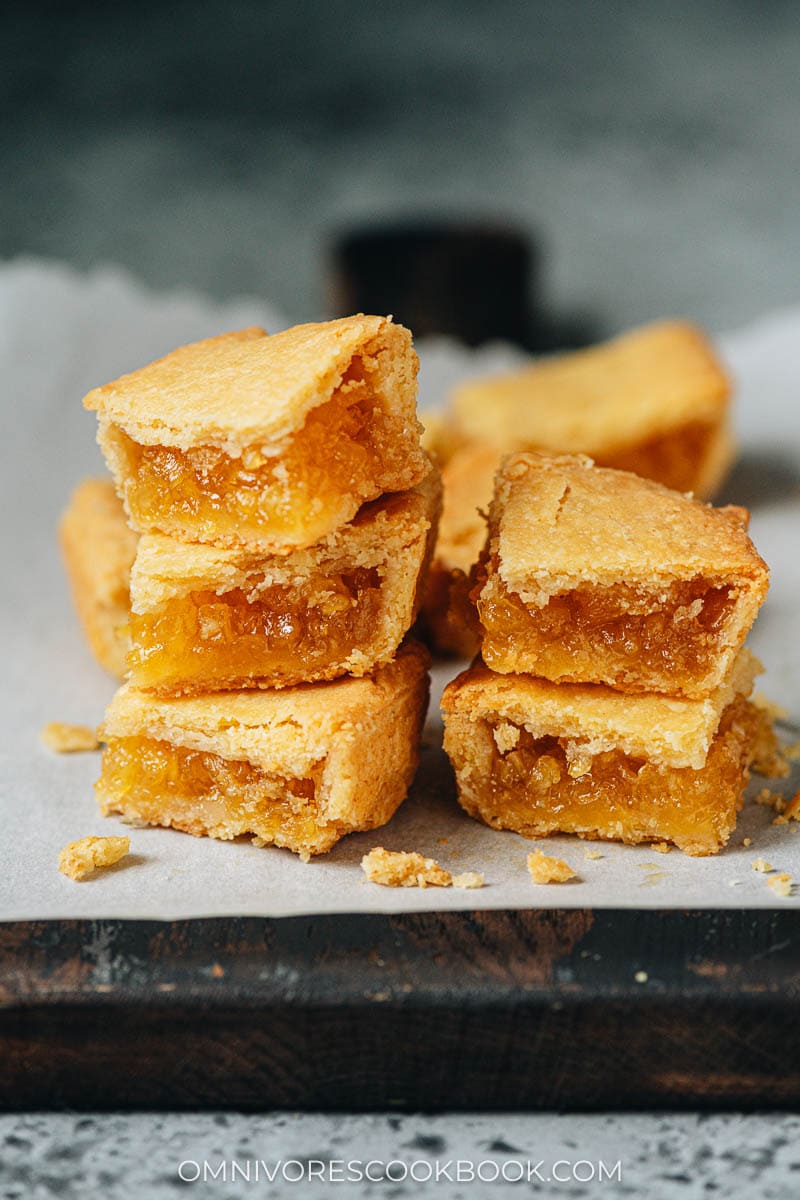
Taiwanese pineapple cake was one of my favorite childhood desserts and it brings back fond memories. Growing up in China in the early 90s, we didn’t have many snacks or desserts available. But whenever we celebrated Lunar New Year and other Chinese holidays, my mom would always buy desserts like pineapple cake for us to share.
What is pineapple cake
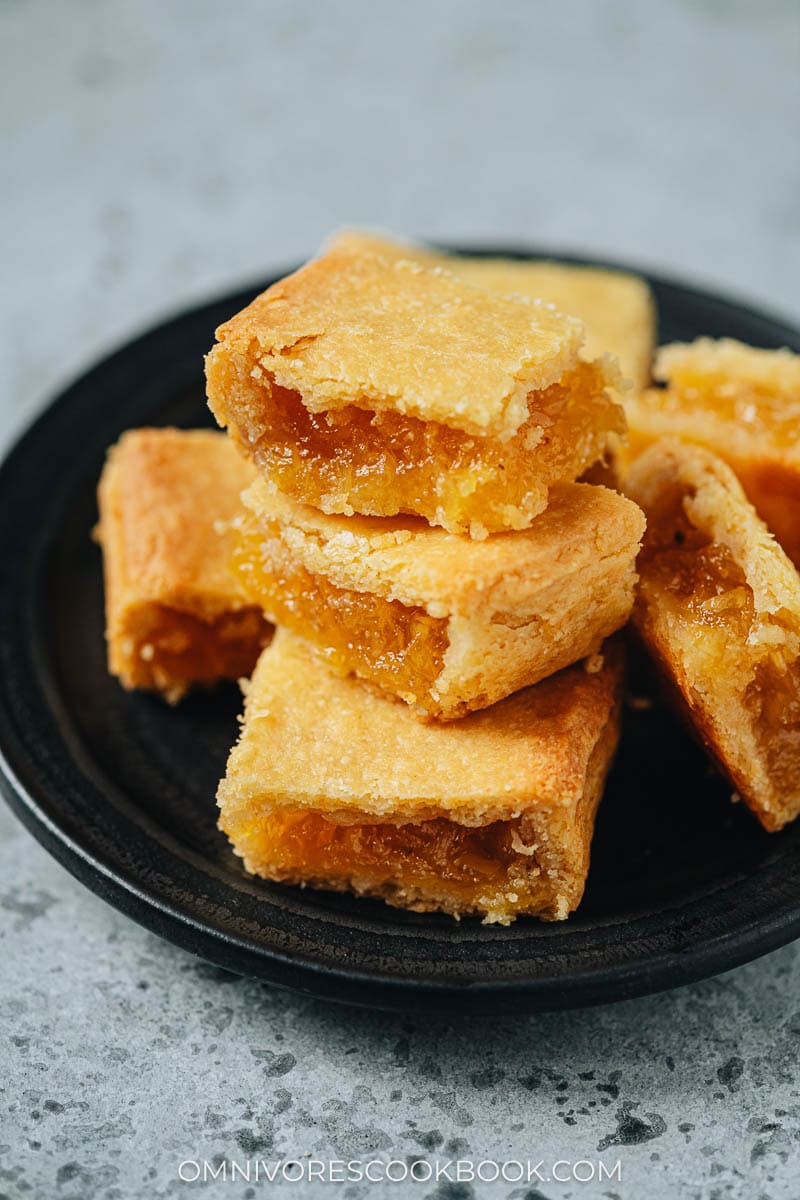
I always think “cake” is a bit misleading, since these fun sweet bites are closer to a butter cookie filled with jam.
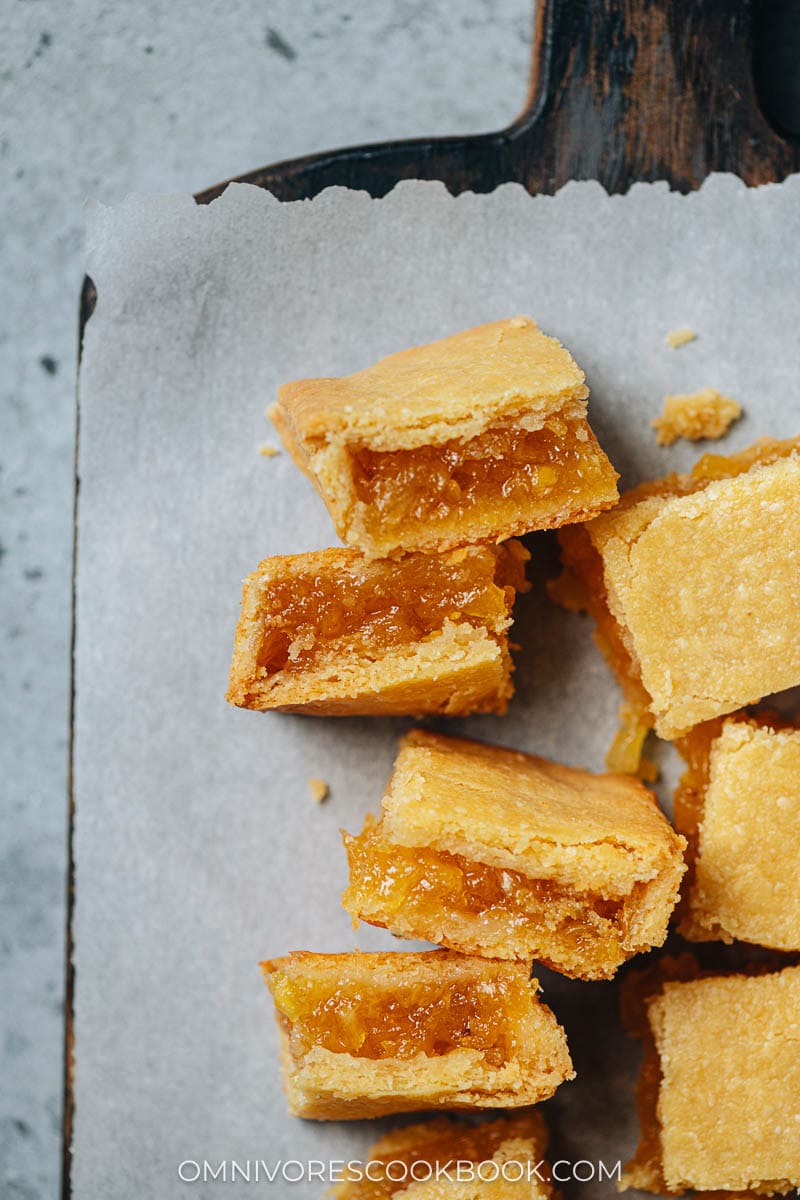
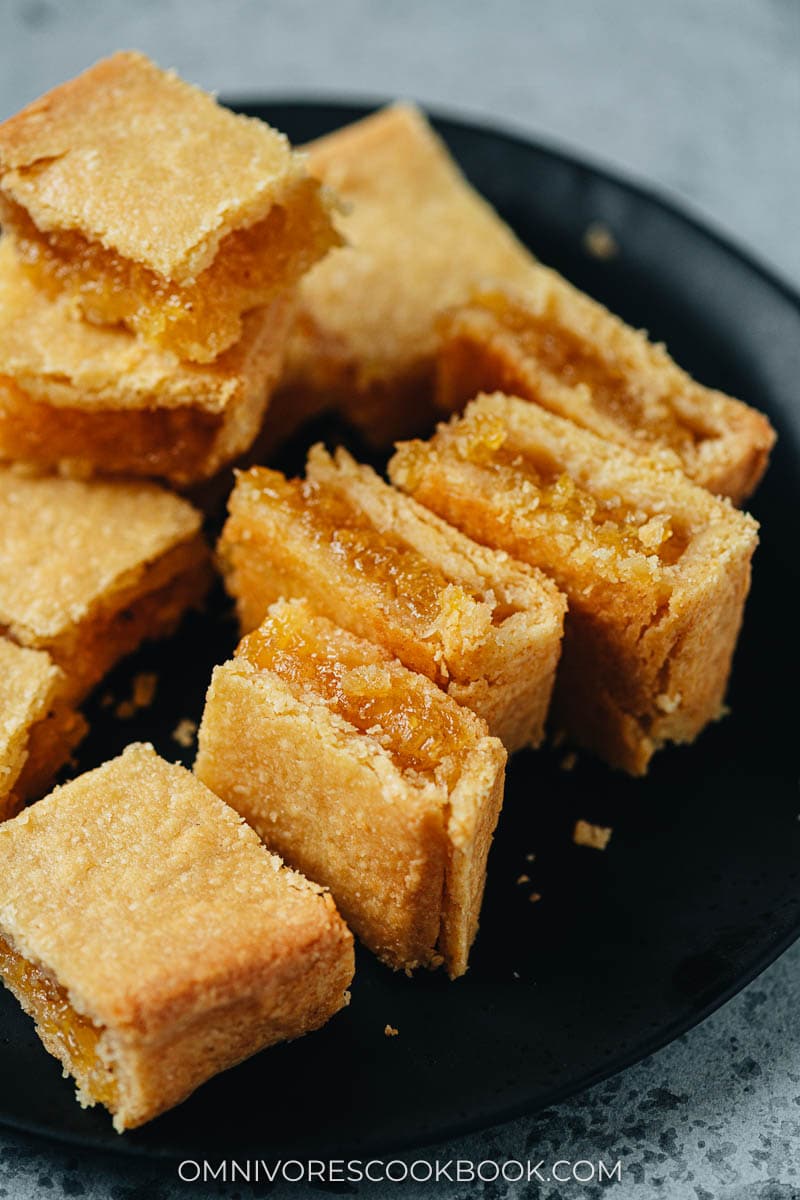
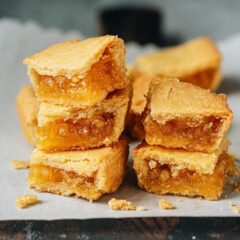
Pineapple cakes are square-shaped pastries with a buttery crumbly outside that is somewhat similar to pie crust. The inside is filled with a chewy tangy pineapple jam that is made from fresh pineapple. Taiwanese pineapple cakes are commonly enjoyed as a snack or dessert, especially on holidays and special occasions.
Why this recipe
My pastry chef Emily and I did some research and made many test batches of pineapple cookies to nail down a recipe.
We tried using the traditional method multiple times and found that the pastry dough was quite hard to handle using the square-shaped mold. It can easily break apart while you’re shaping it, and it is hard to create a very smooth surface like the packaged ones have.
After some trial and error, we decided to use a new approach. Instead of using the square metal mold, we made a large format pineapple cake using a homemade foil pan and then cut it into smaller pieces. The benefits of this approach are:
- You do not need to purchase a special tool that you might only use once
- The shaping process is 10 times easier
- You can stuff in more filling and the result is much tastier
- The cooking is more forgiving and it’s less likely to mess up
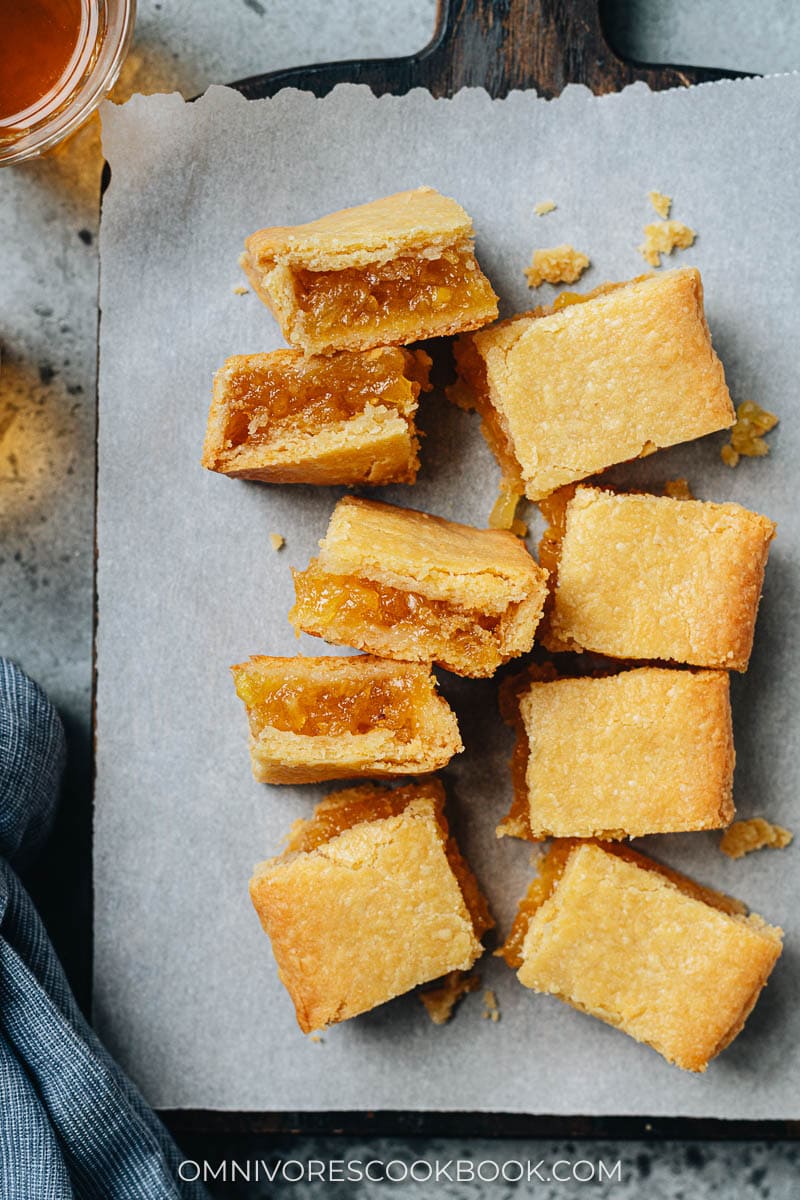
- You will get a very beautifully baked pineapple cake that looks quite similar to the traditional one
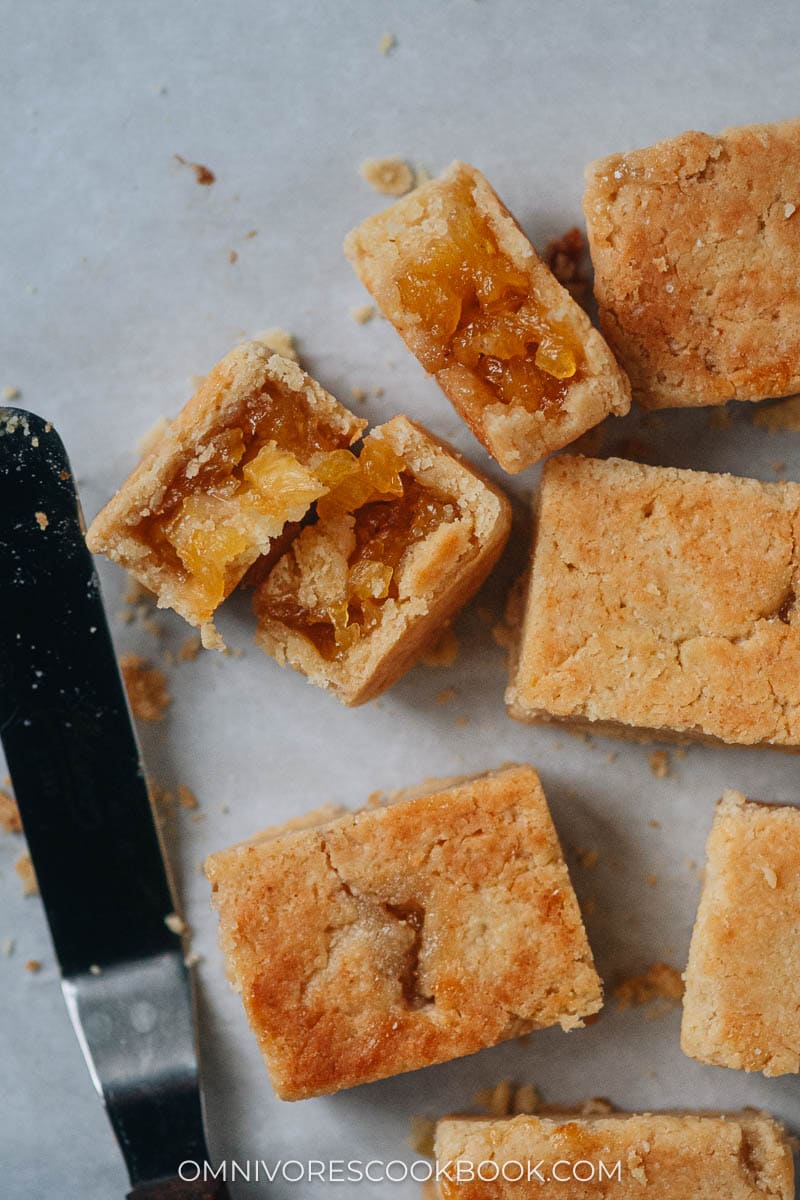
You can see the comparison in the images below. The pineapple cake on the left was made the traditional way using the mold. And the right one shows the same recipe using a different shaping method. The improved method generates a much more even surface with more filling inside. And it tastes better too!
Pineapple cake ingredients
The filling
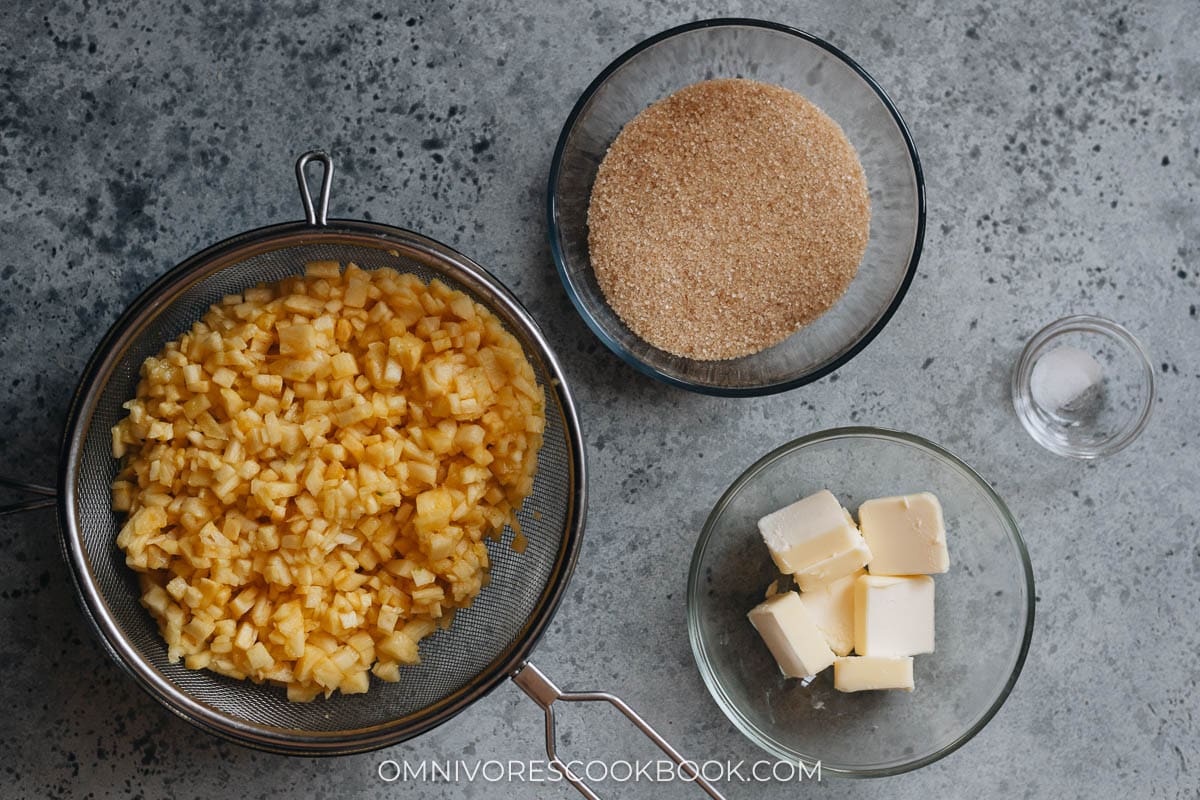
Making pineapple cake filling only requires 4 simple ingredients:
- Fresh pineapple
- Sugar
- Butter
- Salt
NOTE: it is important to cut the pineapple instead of making it into a paste with a blender. The cut pineapple will yield a nice chewy texture once made into jam.
The dough
The pineapple cake dough is made with simple ingredients that you might be able to find in your pantry:
- All-purpose flour
- Sugar
- Powdered milk
- Baking powder
- Butter (cold)
- Eggs
The dough is a bit similar to pie dough, but the texture is a bit finer and it crumbles into smaller flakes.
How to make pineapple cake
Make the filling
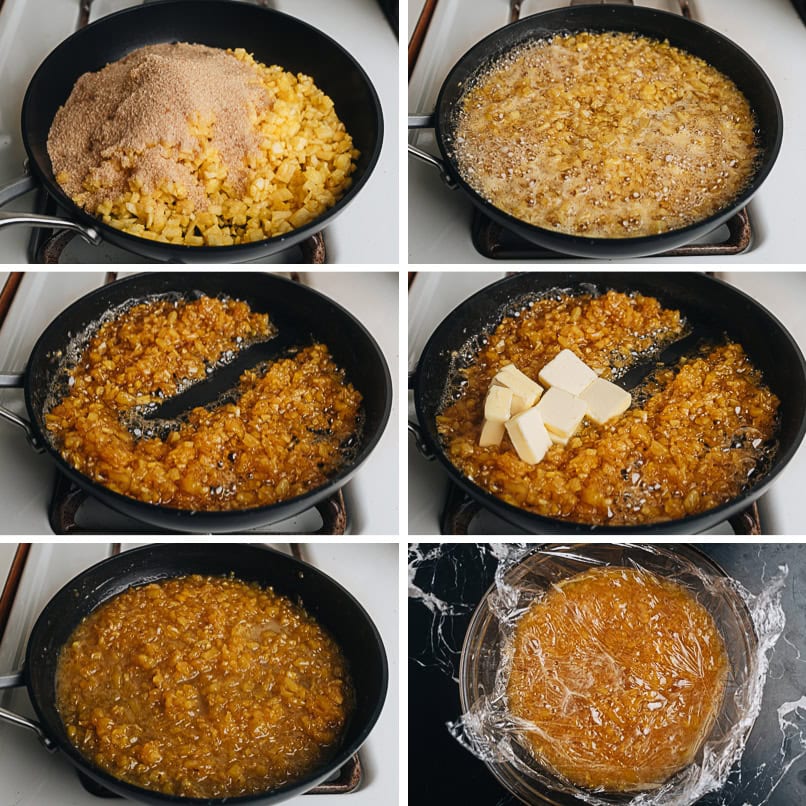
- Cook the pineapple with sugar and salt
- The pineapple will release a lot of liquid at first
- Cook the liquid down until it gets thick
- Add the butter
- Cook until the butter melts
- Cover with plastic wrap and chill completely
Make the dough
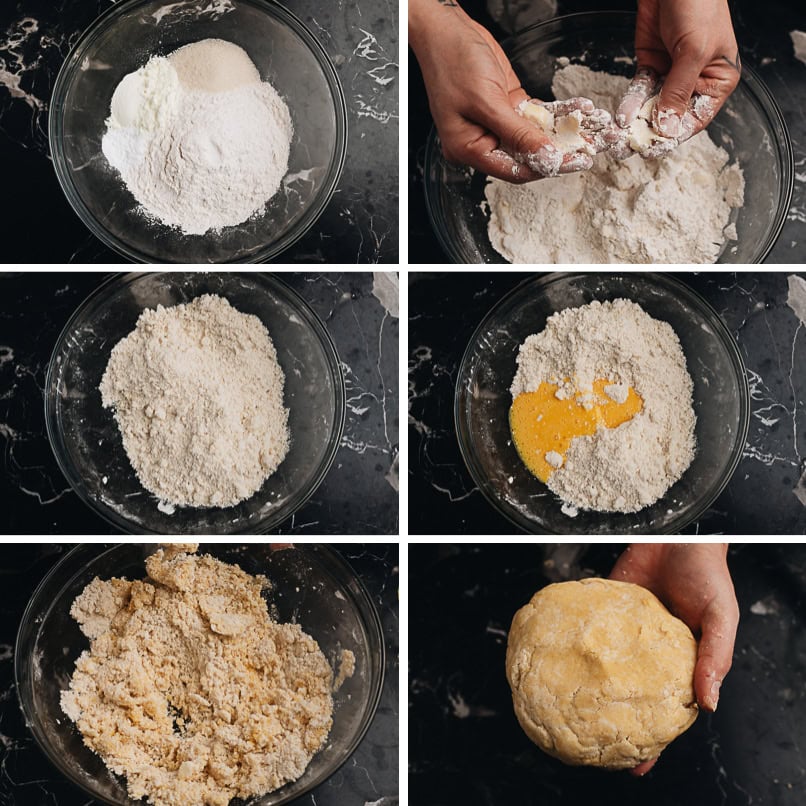
- Combine the dry ingredients
- Work in the cold butter
- Mix until the flour is crumbly
- Add the egg
- Mix in the egg
- Form the dough
Make the foil pan
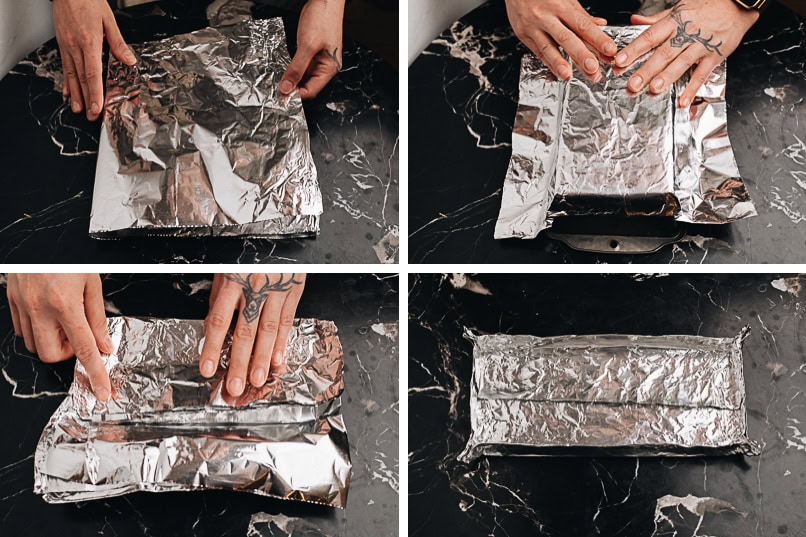
This recipe makes a large foil pan so you’ll bake a large pineapple cake, then cut it into smaller pieces. So you don’t need to buy a special mold.
- Fold a large piece of foil twice so the pan will be sturdy
- Shape the foil pan using a loaf pan placed upside down
- Fold the four edges of the foil pan
- Make two foil pans so you can bake both pineapple cakes at the same time
Assemble the pineapple cake
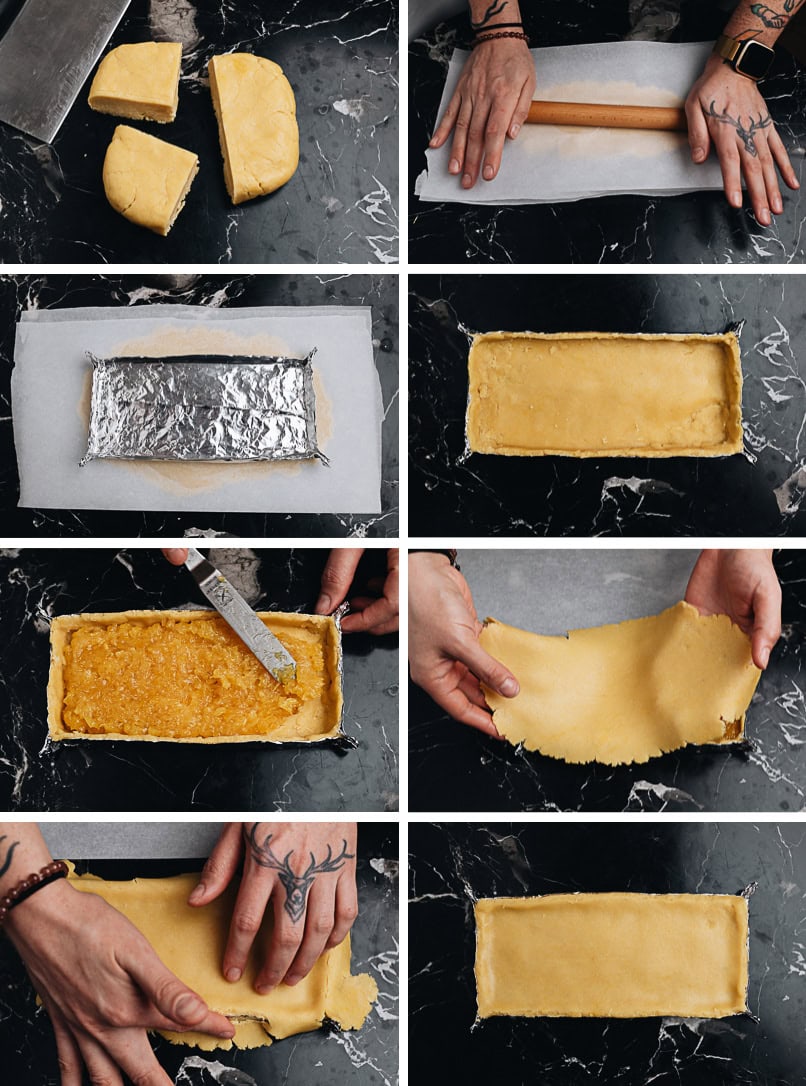
- Cut the dough into 4 pieces
- Roll the out each dough piece
- Make sure the dough is slightly bigger than the foil pan
- Transfer the dough into the pan and press well
- Add the pineapple filling
- Cover the filling with another dough sheet
- Pinch off the extra dough
- Carefully press to seal
Bake and cut the pineapple cake
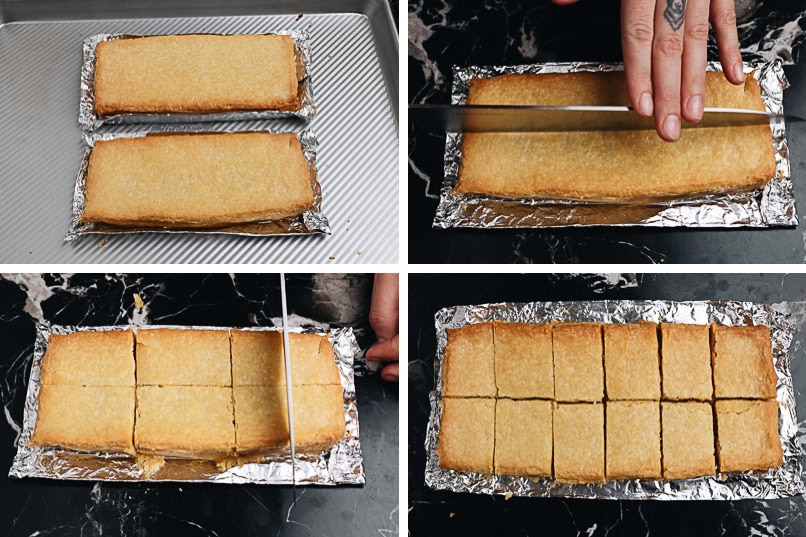
- Bake the shaped pineapple cake until golden, then let it cool completely before cutting
- Slice the cake down in the middle
- Further slice the cake into thirds, then halve the thirds
- So you get a total of 12 pieces of pineapple cake per loaf
How to store and serve
Pineapple cake is perfect for afternoon tea and it makes a great edible gift. You can store it at room temperature for 2 to 3 days in an airtight container. You can also fridge it for about a week. For longer storage, store it in the freezer for up to 3 months. If you refrigerate or freeze the pineapple cake, it is nice to slightly warm it up in the oven before serving.
Afterthoughts
Making pineapple cake definitely requires some time and effort, so reserve a weekend day for this big project. Compared to the store-bought ones, though, these homemade pineapple cakes taste much much better. The crust is more crumbly and buttery, and the filling very fragrant and complex. It also has a nice chewy texture without the gummy filling that some of the packaged cakes have. No matter whether you’ll be enjoying these at home or gifting them on a special occasion, it is totally worth the effort to make them in your own kitchen.
More delicious bakery recipes
- Taro Bread
- Black Sesame Babka
- Chinese Coconut Buns (Cocktail Buns)
- Hong Kong Egg Tart (港式蛋挞)
- Pineapple Buns (Bolo Bao)
Chinese Cooking Made Easy
Are you new to this website? This free email series is a great place to start. I’ll walk you through a few of my most popular recipes and show you how and why they work. You’ll quickly start to cook better Chinese food in your own kitchen.
Pineapple Cake (凤梨酥), A Simplified Version
Ingredients
Pineapple Filling
- 1 large fresh ripe pineapple , peeled and cored (700g / 24 oz once cut)
- 200 g (1 cup) sugar
- 1/4 teaspoon salt
- 80 g (1/3 cup) butter
Pastry
- 230 g (2 1/2 cups + 2 tablespoons) all-purpose flour
- 40 g (1/4 cup) sugar
- 25 g (3 tablespoons) powdered milk
- 1 teaspoon baking powder
- 100 g (1 stick minus 2 teaspoons) butter , cubed and chilled
- 1 egg , plus 1 egg yolk
Instructions
To make the filling
- Dice pineapple into fine pieces. Place it in a large strainer over a large bowl for 10 to 15 mins. Let sit until most of the residual liquid is released. Drain and discard the liquid, and transfer the pineapple into a large saute pan. Add sugar and salt. Cook over medium heat. The pineapple will release a lot of liquid at first. Continue to simmer, stirring occasionally to avoid sticking, until all liquid evaporates completely and the pineapple pieces start to feel sticky. Add butter and stir to melt. Transfer everything to a medium-sized bowl. Let cool slightly. Then cover the top of the pineapple with plastic wrap. Let cool in the fridge completely before using.
For pastry
- In a food processor (ideally) or by hand, add the flour, sugar, powdered milk and baking powder. Stir to combine.
- Add the butter. Pulse or cut by hand until crumbly.
- Add the egg and yolk. Mix until the dough just starts to come together. Transfer the dough onto a clean work surface. Form it into a rough square shape. Wrap in plastic and chill at least 30 mins, or up to overnight.
Shape the tin foil pan
- Cut a large sheet of aluminum foil, about 2.5 feet (76 cm) in length. Fold in half 2 times, to form a thicker sheet that has 4 layers (so the pan will be sturdy enough to hold the pineapple cake). Place an actual loaf pan upside down (*Footnote 1). Press the folded foil over the bottom of the loaf pan to crease, shaping the foil like the loaf pan. Then remove the foil and fold at the creases, to create 4 sides that are about 1/2” (5 cm) high.
- You can repeat this to create 2 foil pans so you can bake both pineapple cakes at the same time (highly recommended). Or you can bake one cake at a time by only using one pan (this will take a lot longer because each pineapple cake needs time to cool off before removing the foil).
Shape the dough
- Once the dough is fully chilled, cut the dough into 4 equal pieces.
- Place the dough between two large pieces of parchment paper. Roll out the dough until very thin and slightly larger than the foil pan, aiming to keep the shape of a rectangle.
- Lift the top piece of parchment to release the dough. Carefully flip the dough sheet over, and remove the parchment paper from the other side. Carefully transfer rolled dough to the foil pan. Press the dough to fit the pan. The dough should come up on all sides. Trim the edge of the dough by pressing off any overhang with your fingers. You can patch up any tears with excess dough.
- Fill the fitted dough sheet with half of the cooled pineapple filling. The filling should go almost all the way up to the top edge of the pan, with a little space left for the other dough sheet. Press lightly to smooth out the filling and form an even layer.
- Repeat the rolling process with the next piece of dough using the same method from step 2. Place the rolled dough over top to seal in pineapple filling, trimming off any excess dough. Gently press the dough edges to seal the filling completely.
- Preheat the oven to 325°F (163°C). Transfer the pineapple cake foil pans onto a sheet pan. Bake on the middle level for 20 to 25 minutes, until the top turns light golden. Let the pineapple cakes cool off completely. Then you can fold down the edges of the foil pans and place the pineapple cake on a cutting board. To cut the pineapple cake, slice lengthwise down the center. Then slice into thirds crosswise, then slice each third in half to make 12 pieces in total.
Notes
- It is much easier to use a loaf pan as a guide to create the tin foil pan. If you do not have a loaf pan, you can still create a tin foil pan that is about 8.5” (21 cm) long and 4.5” (11 cm) wide.
Nutrition

Did you make this recipe?
I’d love to hear how it turned out for you! Please take a moment to leave a 5-star rating ⭐️ and share your thoughts in the comments further down the page. It really helps others discover the recipe too.

Rose
This looks delicious! I have a milk protein allergy, so I always assumed pineapple cake would be something I just cannot have but now I would like to try to make this without the powdered milk. I plan to substitute ghee for the butter but do you have any suggestions for substitutions for the powdered milk in the dough? Thank you in advance!
Maggie Zhu
I think the most straightforward method is to use a dairy free milk powder, such as coconut milk powder or soy milk powder. Coconut milk powder is nicer for flavor.
If you don’t have dairy free milk powder, you can skip this ingredient. The dough might come out a little softer but shouldn’t be a big issue, since this shaping method is not that tricky.
Regina C
I made the pineapple cake using the tart mold as McKenzie mentioned and it turned out so delicious using this recipe. The pineapple cake tasted even more delicious after 1 day. Will be using this recipe going forward. The toughest part for me was the rolling out the dough and patching it as it was time consuming. But I would think after a few more times, I should gain efficiency. Thank you!
Maggie Zhu
I’m so glad to hear you tried the recipe and enjoyed the dish! I do think it’s a lot of work and effort to use the mold, that’s why I ended up posting the “easy” version.
But I do think they taste better than the ones I bought. Thank you so much for leaving a positive review 🙂
Regina
I made the pineapple cake using the tart mold as McKenzie mentioned and it turned out so delicious using this recipe. The pineapple cake tasted even more delicious after 1 day. Will be using this recipe going forward. The toughest part for me was the rolling out the dough and patching it as it was time consuming. But I would think after a few more times, I should gain efficiency. Thank you!
McKenzie Ross
This is a great-looking recipe! I made the pineapple filling tonight (so far, so good) and will complete the cake tomorrow. I’ll follow your method this first time around, but is there any reason I couldn’t bake it in a rectangular, steel tart pan with a removable bottom? The pastry seems similar to a shortcrust or pâte sucrée, so I’m curious how you think it might perform. Thanks!
Maggie Zhu
I think a rectangular steel tart pan with a removable bottom is totally fine. The only reason I made the foil pan is because I want the cake to be rectangular with straight sides, which is closer to the traditional pineapple cake. Also rectangular tart pan is a little more special than the round type, so I was reluctant to ask people to purchase it just for this recipe. I think with the removable bottle, it is probably easier to work with than the foil pan.
If you baked it in your tart pan, please do let me know how it turns out 🙂
McKenzie Ross
Thanks so much for the quick reply, Maggie! Following your encouragement, I used my rectangular tart pan and it came out splendidly! The quantity of pastry and filling ended up being exactly right to fill the pan, which is 13.75” long x 4.5” wide x 1” deep (35 x 11 x 2.5 cm). Since it was all in one pan, instead of two, I naturally had to adjust the baking time: I left it in for about 35 min total to achieve the same level of browning you show here in your photos. It made a fantastic dessert after a tasty meal of xiao long bao, cucumber salad, and fried rice. Thanks so much for the great recipe and guidance! I’ll definitely bake this again.
Judy B
Just returned from trip to Taiwan where we discovered this delicious “cake”.
I plan to make this recipe so want to confirm the following: what type of sugar is used, picture looks like brown, or unbleached?
What type of powdered milk is used? High fat?
Is there a reason you could not use the inside of a loaf pan vs. making a foil pan?
Maggie Zhu
The sugar should be regular granulated sugar. The one I used was an organic granulated cane sugar. It looks dark because it’s unbleached. But for this recipe, regular white sugar works well.
The powdered milk is a high fat one.
The foil pan is highly recommended because the pastry is extremely delicate and easy to fall apart. So it will be very difficult to work in a loaf pan (the top pastry will probably break apart when you lower it into the loaf pan). Once baked, you can also easily release the cake by pulling away the foil. If you try to place the loaf pan upside down to release the cake, it will probably break the cake.
I hope you have a chance to make this one, and please let me know what you think. The freshly made pineapple filling tastes so good!
Nanajee travels
This simplified Taiwanese pineapple cake sounds like a real treat! The buttery, crumbly dough with that fragrant, tangy pineapple filling must be such a delightful combination. I love that it’s easier to make without a special mold—perfect for creating a delicious tea-time snack or a thoughtful homemade gift. Thanks for sharing such an approachable version of this classic!