
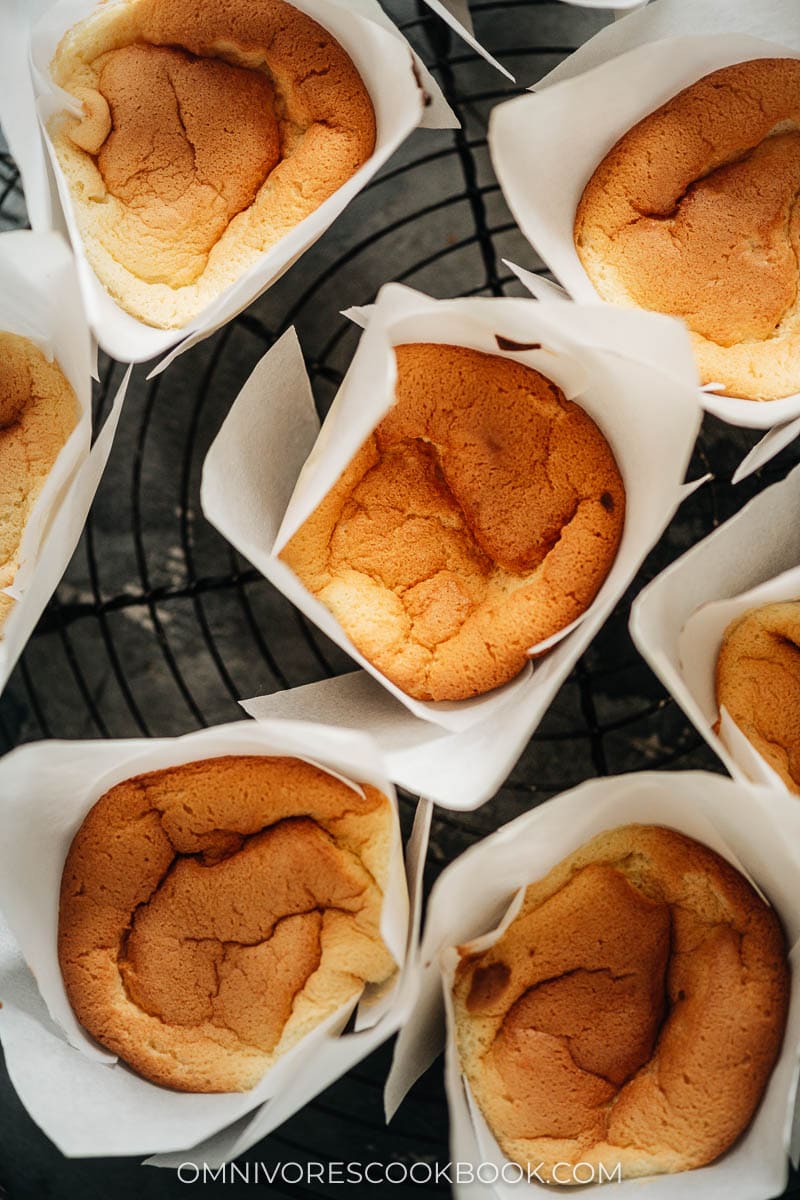
Chinese egg cake (鸡蛋糕) is an authentic traditional Chinese bakery snack, not Western Chinese cuisine, that dates back decades as a simple everyday treat sold fresh in markets and bakeries. It is known for its light sponge texture created primarily from whipped eggs rather than chemical leaveners (like baking powder), giving it a mildly sweet flavor, airy crumb, and a natural deflation after baking that defines its classic look.
I created this recipe because it brings me back to childhood trips to the market with my grandma, and I wanted to preserve that memory in a way home cooks can recreate with confidence, which is why I rely only on eggs for lift and keep the ingredient list true to tradition. I make this cake in under 1 hour by whipping eggs, gently folding the batter, and baking until golden, using simple ingredients like eggs, sugar, cake flour, and milk, and I walk through every detail in my Chinese Egg Cake recipe.
After more than a decade of testing Chinese recipes and teaching technique through experience, I keep coming back to this cake and love sharing it with my family and friends. Chinese egg cake may look simple, but it shows how eggs create lift, how gentle folding preserves volume, and how timing shapes the final texture. Now let me show you exactly how to make it.
Ingredients
I keep the Chinese egg cake ingredient list short on purpose. Each ingredient plays a clear role in creating the light texture and classic flavor.
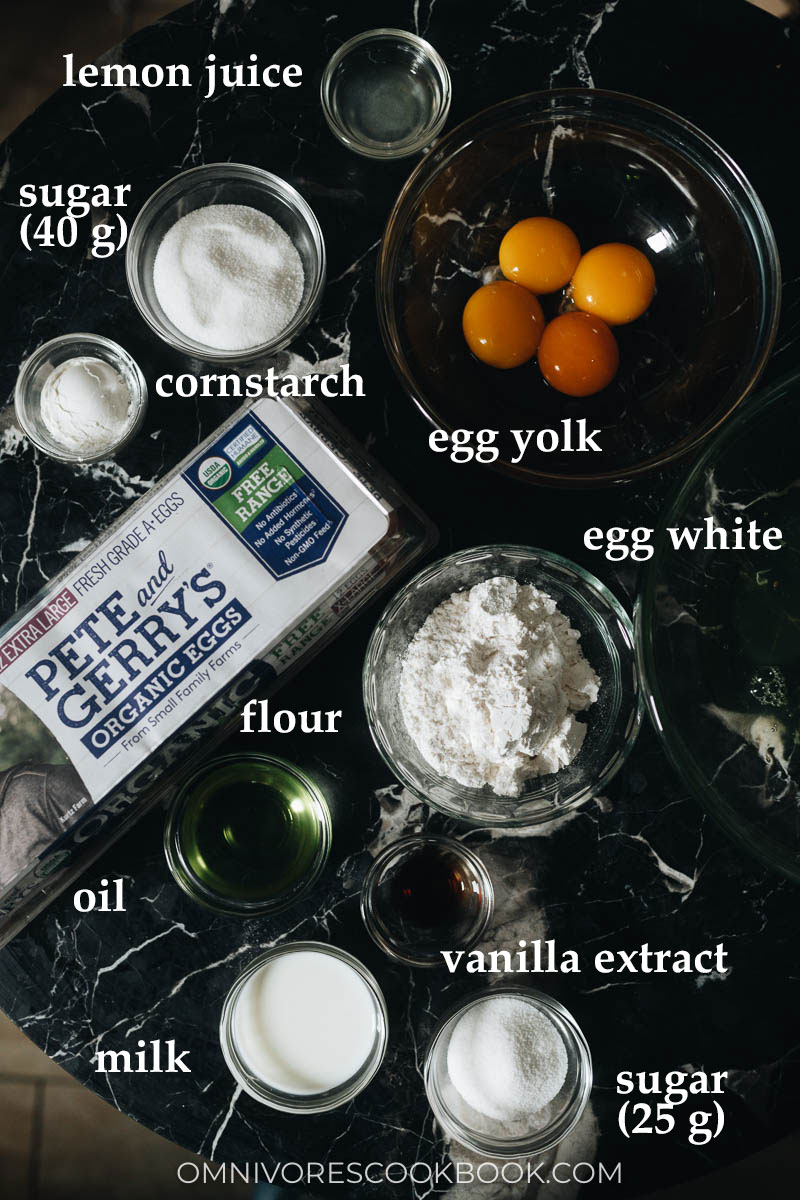
- Eggs: I use cold eggs because they whip into a stable foam and help the cake rise.
- Fine granulated sugar separated: I divide the sugar so it sweetens the batter while also supporting the egg whites.
- Milk: I add milk to soften the crumb and keep the cake moist.
- Vegetable oil or other neutral oil: Neutral oil is what I like using to create tenderness without adding extra flavor.
- Vanilla: This is key to balance the egg forward taste.
- Cake flour: I use cake flour to keep the texture light and delicate.
- Cornstarch: I include cornstarch to further refine the crumb and enhance airiness.
- Lemon juice or cream of tartar (optional): I use this to help the egg whites whip up glossy and stable.
How to make
Prepare the parchment paper
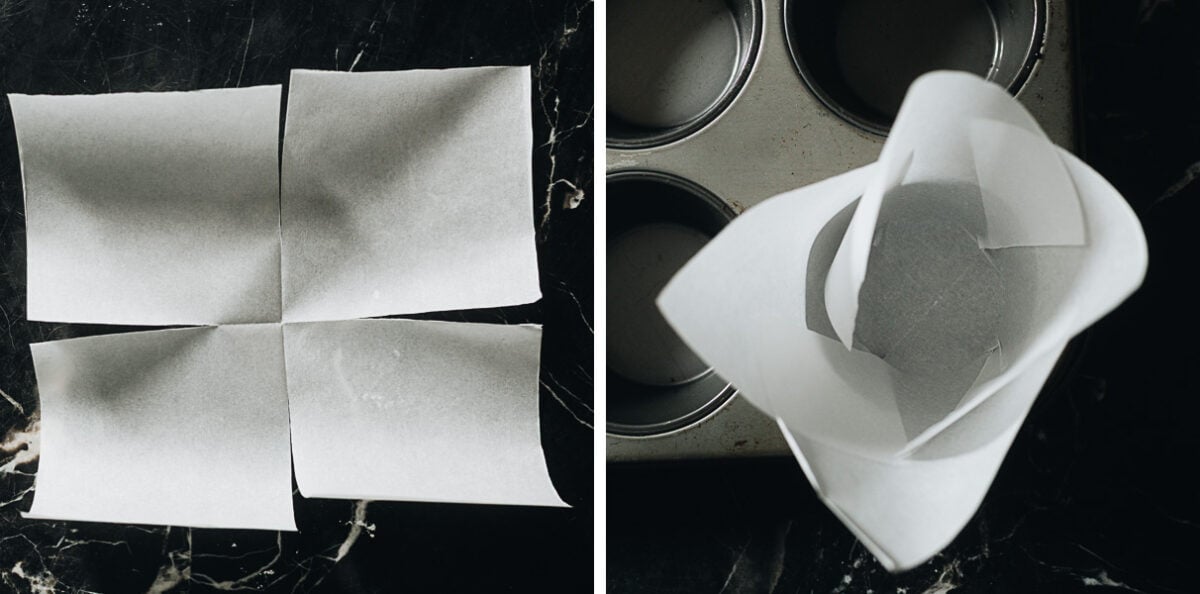
It is important to use parchment paper because these egg cakes rise very tall and need extra support due to their delicate texture. Here is how I prepare it:
First, I cut the paper into 6×6” (15cmx15cm) squares, then I fold twice to create cross lines in the center. Finally, I cut 2.5” (6.5 cm) slits along the center lines so it can easily be folded into the muffin tin.
Make the egg yolk mixture
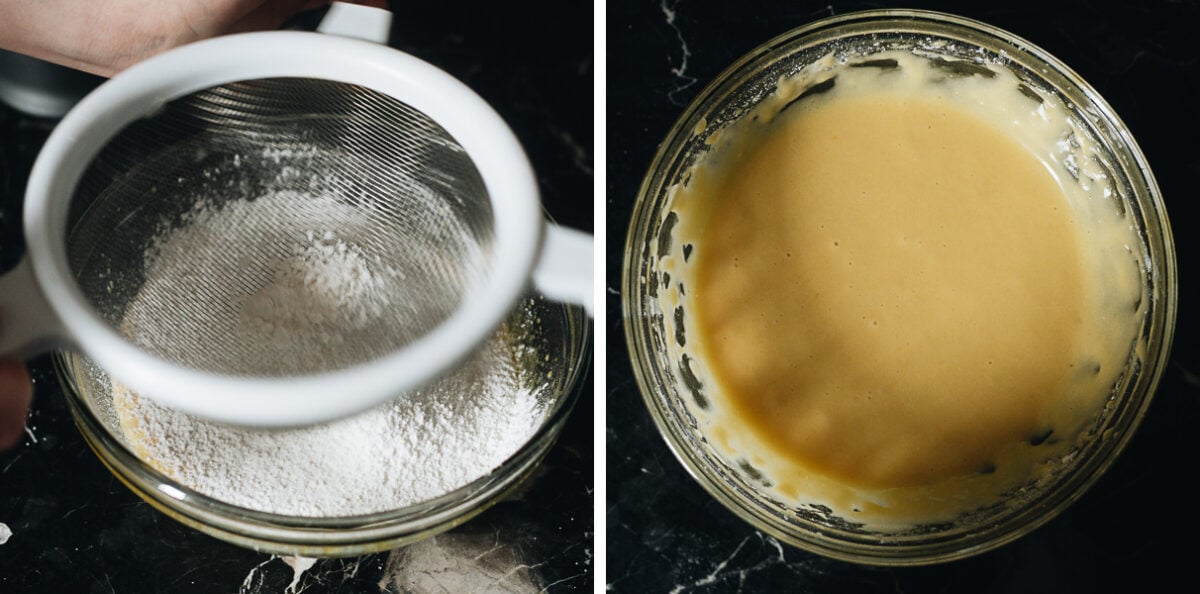
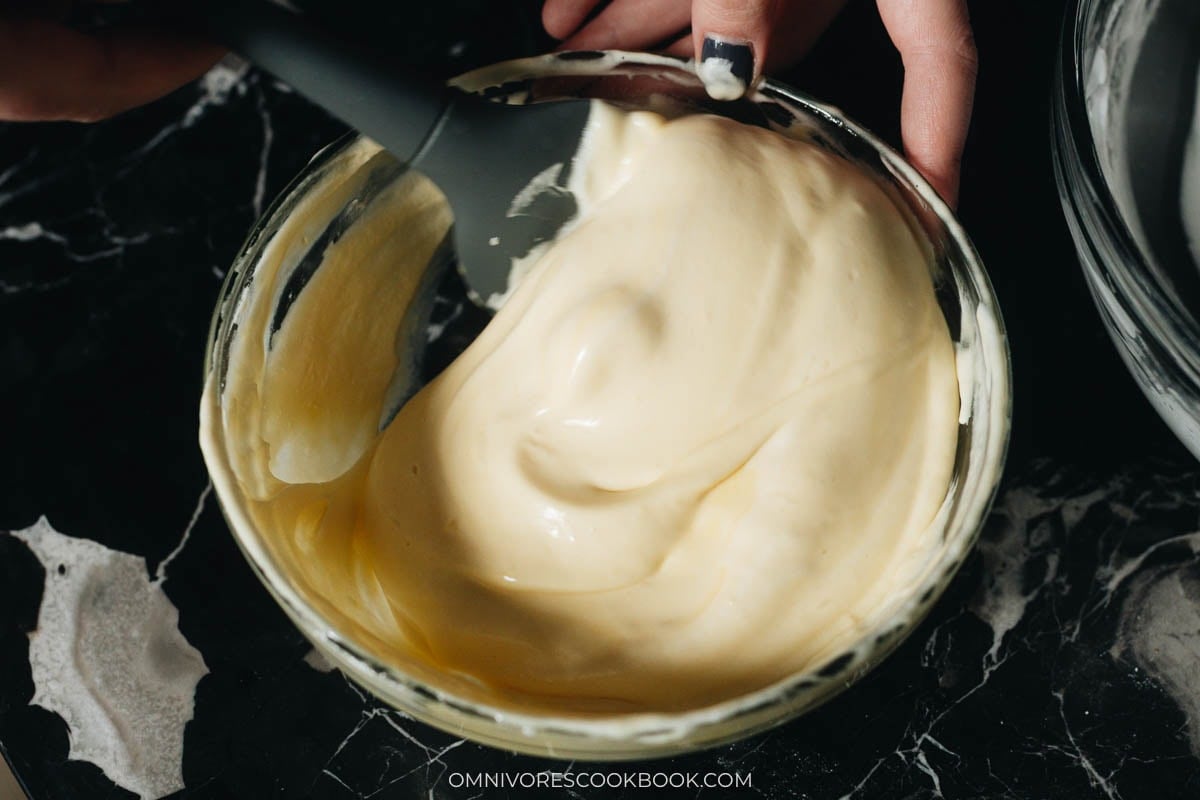
Whisk the egg yolks: The egg yolks are whisked with sugar until the mixture becomes silky and light in color, which signals that the sugar has fully dissolved and the base is ready.

Add the liquid ingredients: Add the milk, oil, and vanilla to the egg yolk mixture, then mix again until the batter turns paler and smooth with an even texture.

Add the dry ingredients: Sift the flour and cornstarch into the egg yolk mixture, then mix again until everything is fully combined.
Make the egg white mixture
Important note: Keep the egg whites cold to support the whipping process by starting with chilled eggs. I also place the bowl of separated egg whites in the fridge until I am ready to whip them.
Whip the egg whites: Beat the egg whites with lemon juice until they begin to foam and increase in volume.
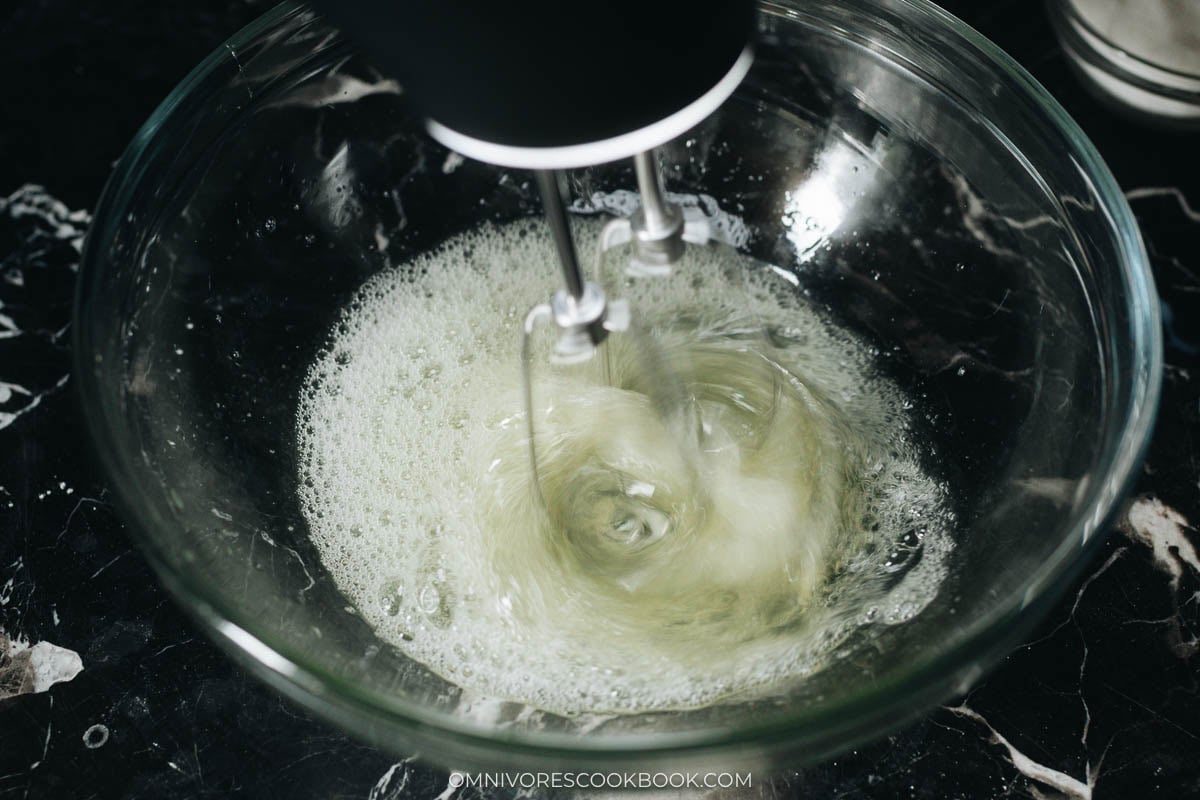
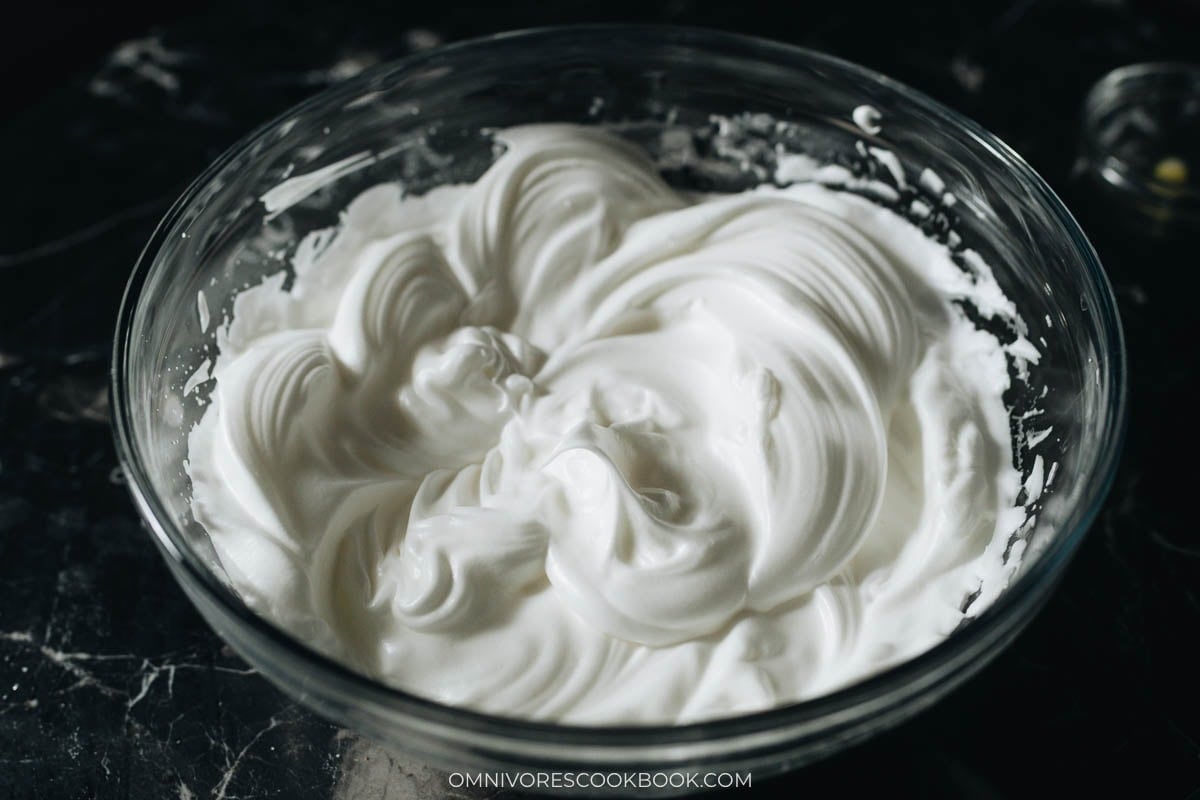
Add the sugar: Slowly add the sugar while continuing to whip until the egg whites become glossy and hold their structure.
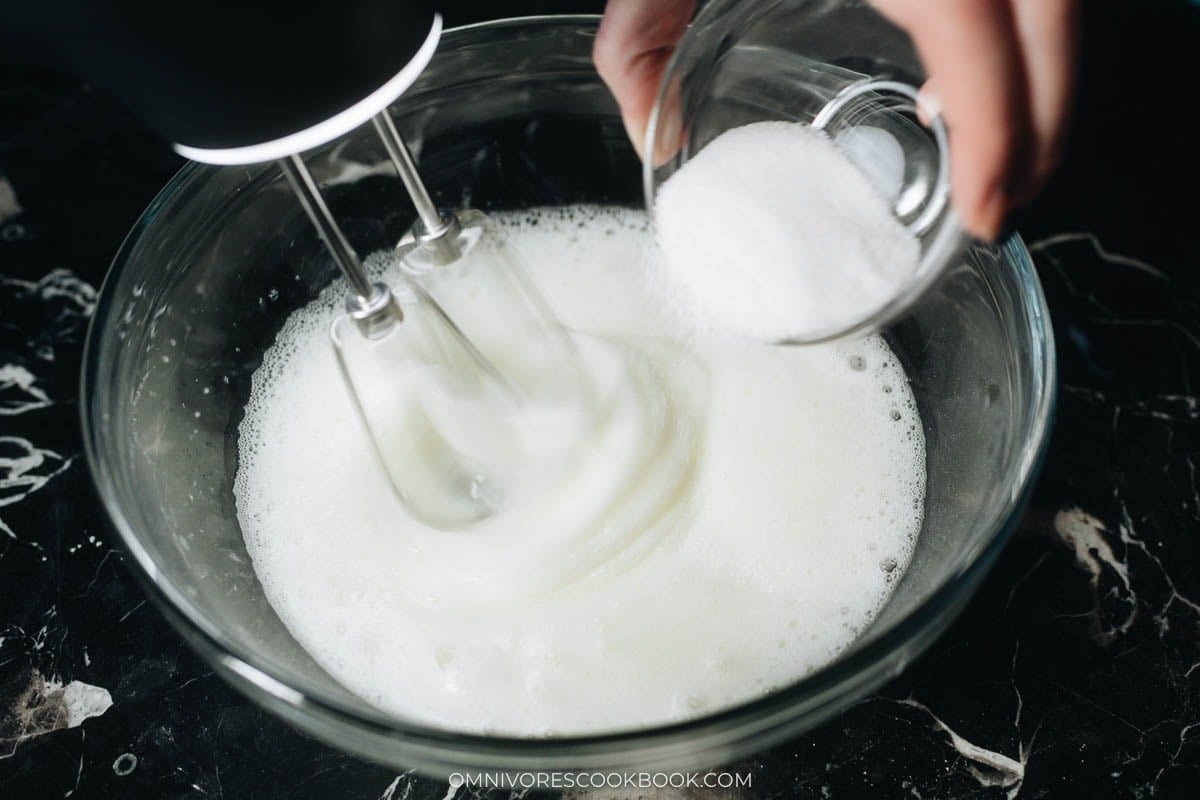
Check the peaks: The egg whites are ready when they form stiff peaks that stand upright as the mixer is lifted.
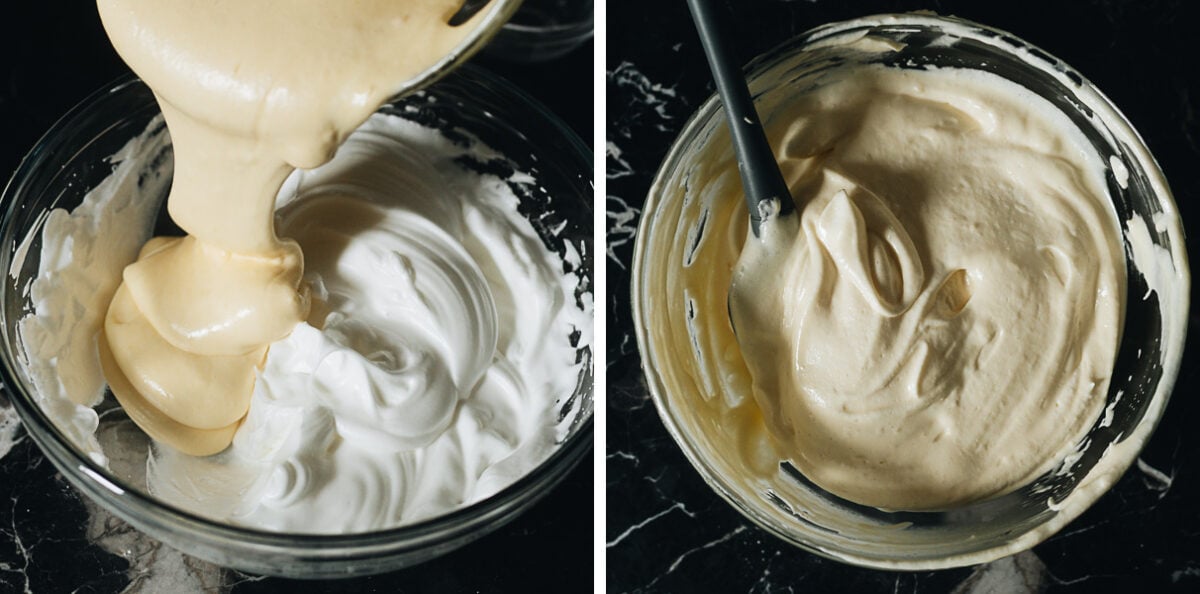
Fold the egg whites: Gently fold 1/3 of the egg white mixture into the egg yolk mixture to loosen the batter.
Combine the batters: Add the loosened yolk mixture back into the bowl with the remaining egg whites, then fold until just combined.
Assemble and bake
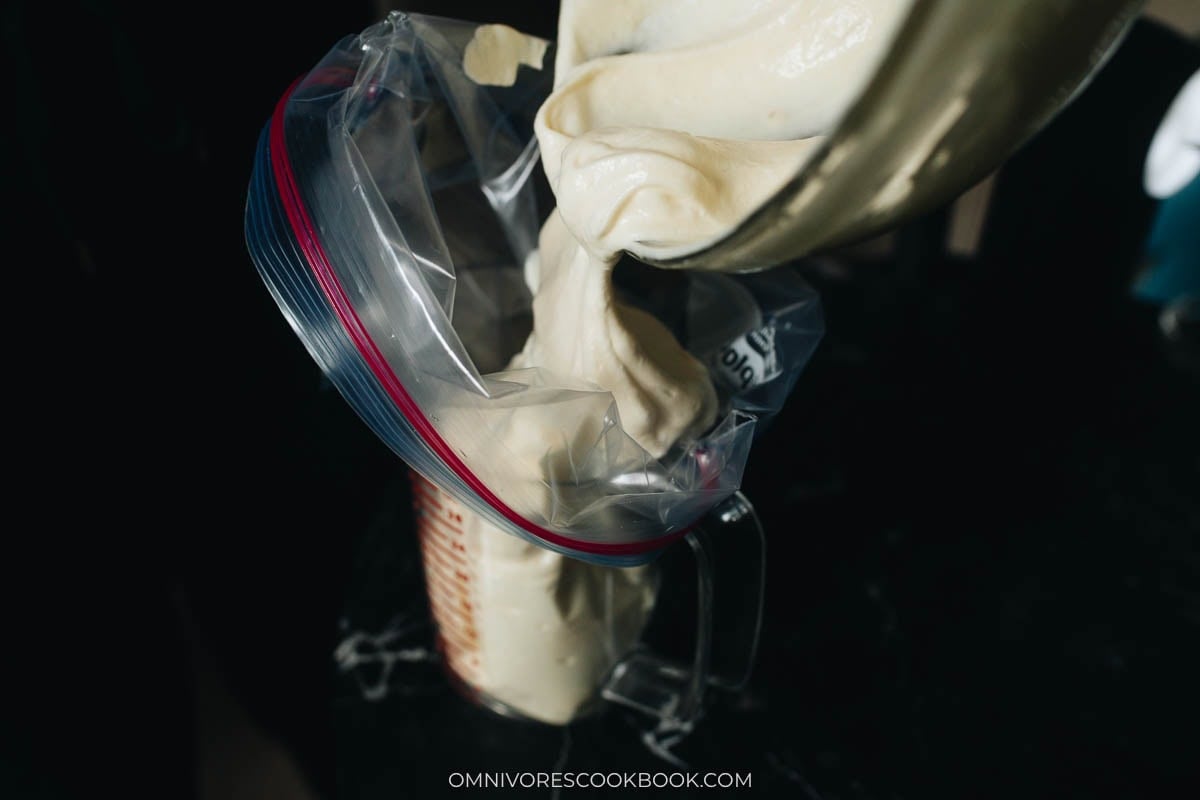
Prepare for piping: Line a ziplock bag over a measuring cup and pour in the egg cake mixture. Cut a small tip off the bag when ready to pipe the batter into the prepared pan.
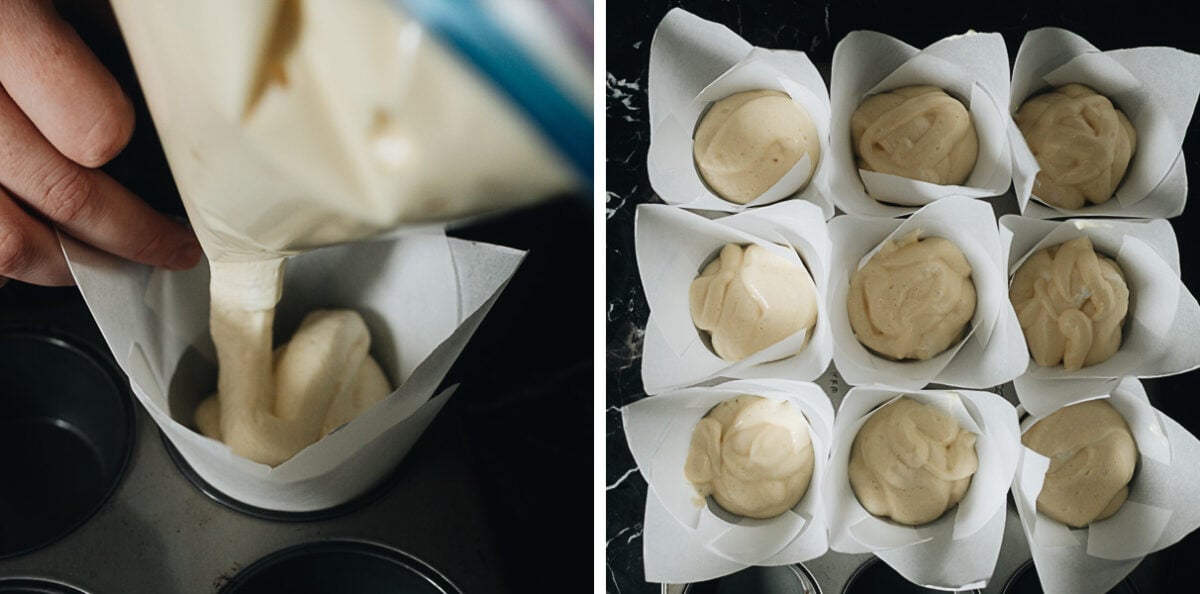
Fill the pan: Press the prepared parchment paper into the muffin tin, then pipe the egg cake mixture into each liner.
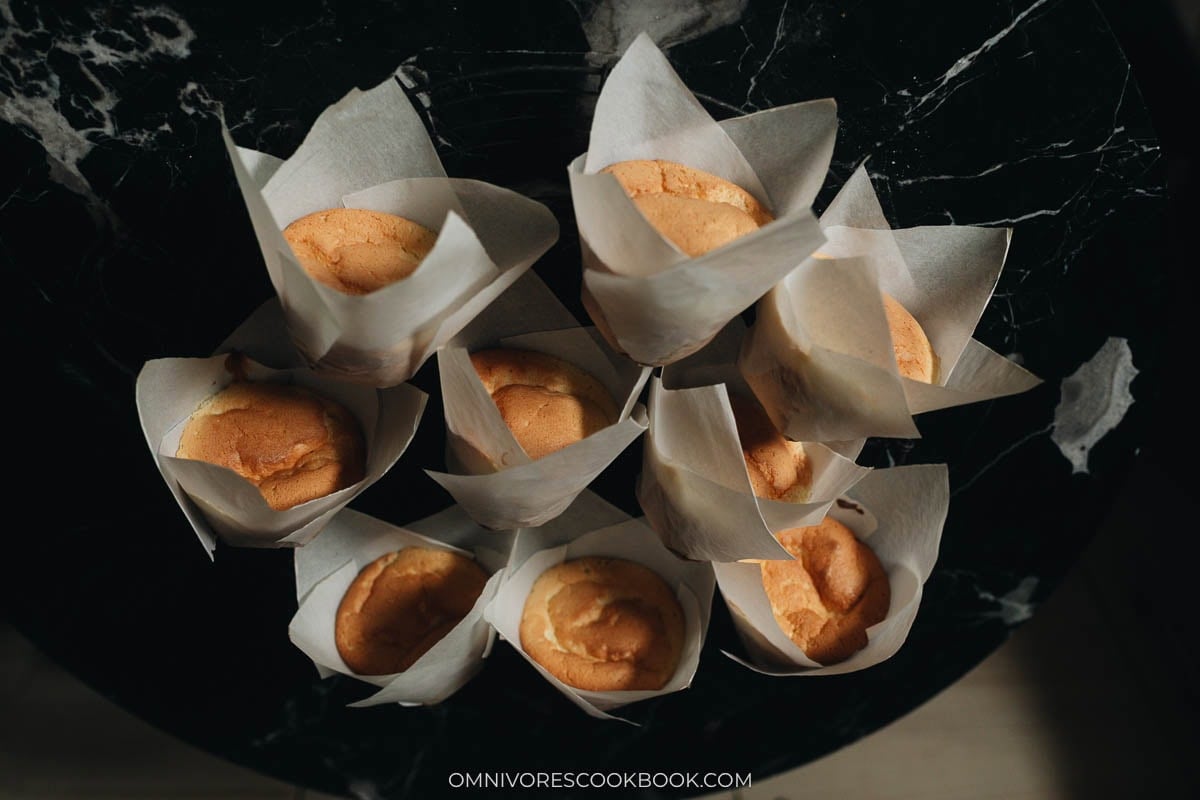
Bake and cool: Depending on the size and shape of the muffin tin, this recipe yields 9 to 12 egg cakes. Bake until the tops turn golden brown and the centers are fully cooked, about 18 to 20 minutes, then lay the cakes on their sides on a cooling rack to cool.
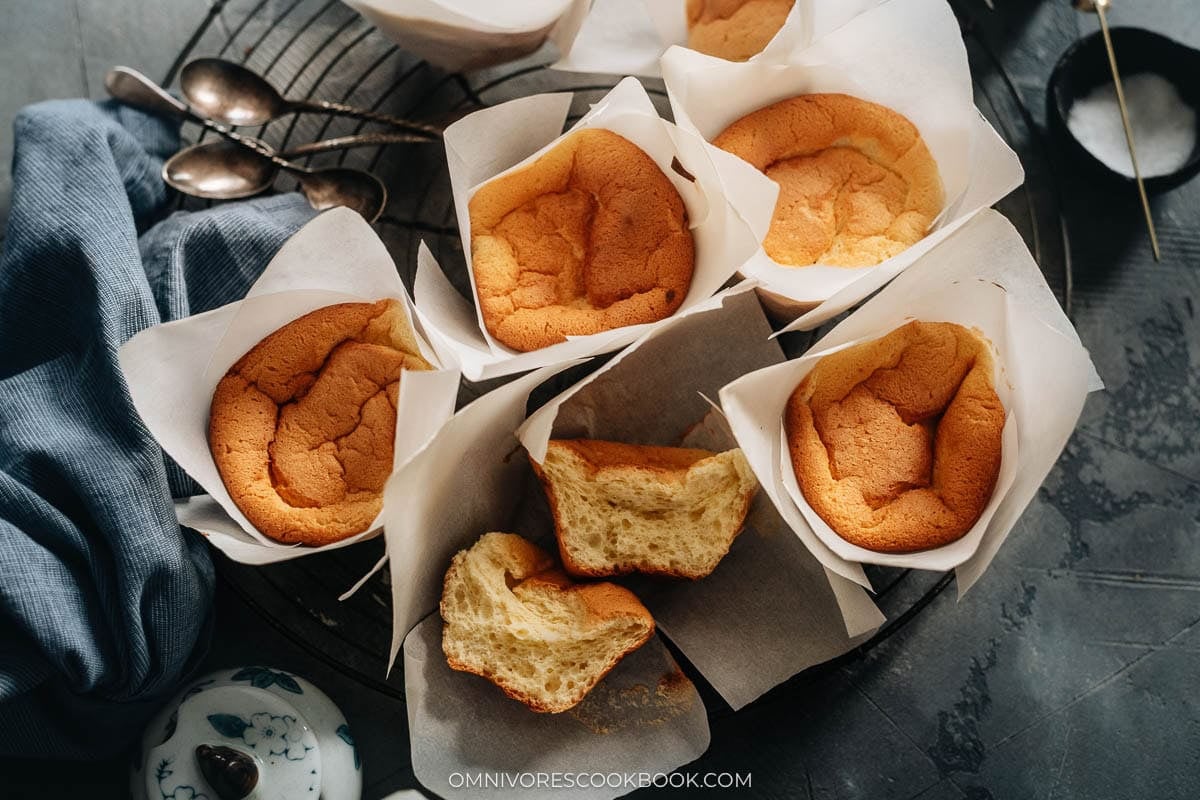
Quick note: These egg cakes are very fluffy and moist, so a slight deflation as they cool is expected. Laying them on their sides helps keep their shape more intact.
Storage directions
Refrigerating: I store these egg cakes in the fridge for up to 2 to 3 days, where they keep their moisture and soft texture best. They taste the nicest within the first 1 to 2 days before slowly drying out.
Freezing: I do not recommend freezing these egg cakes because freezing changes their delicate texture.
Reheating: I usually let the egg cakes come to room temperature before eating since reheating can dry them out. If needed, a very short warm up works, but fresh is always better.
Serving suggestions
I like serving these Chinese egg cakes the most traditional way, slightly warm or fully cooled, alongside a simple cup of hot tea. For breakfast, I often pair it with tea eggs for a savory contrast or enjoy it after a light meal like my chicken congee, which keeps the experience close to how it is enjoyed in Chinese households.
If you want to make it your own, this egg cake adapts easily to different tastes and occasions. I sometimes serve it with fresh fruit and whipped cream for a Western style dessert, or alongside a cup of Matcha Boba Tea for a bakery inspired pairing.
Frequently asked questions
Why is my egg cake dense instead of fluffy?
When the cake turns out dense, it usually means the egg whites did not trap enough air or too much air was lost during mixing. I focus on whipping the whites until glossy stiff peaks form and folding them carefully into the batter so the volume stays intact.
Why did my Chinese egg cake deflate after baking?
I expect a small amount of deflation with Chinese egg cake because the structure comes almost entirely from whipped eggs. As the cakes cool, steam escapes from the soft interior and the surface settles naturally, which is part of the traditional bakery appearance.
Do I need cake flour for Chinese egg cake?
I recommend using cake flour because it creates a lighter and softer crumb that matches the classic texture. All purpose flour adds more structure, which makes the cake firmer than what you usually find in Chinese bakeries.
Chinese Cooking Made Easy
Are you new to this website? This free email series is a great place to start. I’ll walk you through a few of my most popular recipes and show you how and why they work. You’ll quickly start to cook better Chinese food in your own kitchen.
Chinese Egg Cake (鸡蛋糕)
Ingredients
- 4 large eggs , cold
- 65 g (1/4 cup + 2 tablespoons) fine granulated sugar , separated to 25 g and 40 g
- 40 g (3 tablespoons) milk
- 30 g (3 tablespoons) vegetable oil (or other type of neutral oil)
- 1/4 teaspoon vanilla
- 65 g (1/2 cup + 1 teaspoon) cake flour
- 9 g (1 tablespoon) cornstarch
- 1 teaspoon lemon juice or 1/4 teaspoon cream of tartar (Optional) (*Footnote 1)
Equipment
- 6 ” (15 cm) Parchment paper (*Footnote 2)
- Electric Mixer
Instructions
Prepare the parchment paper
- Prepare the parchment paper by cutting it into 6×6” (15cmx15cm) squares. Fold the square in half, fold again, and then unfold it, so it shows a cross in the center. Cut four 2.5” (6.5 cm) slits along the fold lines. This will help the parchment paper easily fit into the muffin tin to form a tall cup.
Prepare the egg yolk mixture
- Preheat the oven to 325°F (163°C).
- Prepare one large bowl and one medium sized bowl. Separate the eggs, placing the egg yolks into the medium bowl and the whites into the large bowl. Store the bowl with the egg whites in the fridge while preparing the rest of the ingredients.
- Measure out the sugar and transfer 3 tablespoons of it into a separate small bowl. If you’re using a scale, measure out 25 g and 40 g sugar separately.
- Beat the egg yolks with an electric mixer, and slowly add the 25 g (3 tablespoons) sugar. Mix until silky and lighter in color.
- Add the milk, oil, and vanilla. Mix again until it’s evenly incorporated.
- Set a mesh colander over the bowl. Sift the cake flour and cornstarch into the egg yolk mixture. Beat until just combined. Set aside.
Prepare the egg white mixture
- Transfer the bowl with the egg whites to your working station. Add the lemon juice. Beat with the electric mixer, starting at low speed and gradually turning to high. Slowly add the sugar and whip until it forms stiff peaks when you pull out the mixer.
- Add 1/3 of the whipped egg whites to the yolk mixture. Gently fold them in with a spatula. Once fully combined (it’s OK to have a few lumps), add the folded mixture back to the big bowl with the egg whites. Fold them in using the spatula.
Assemble the cake and bake
- For ease of process, you can add the mixture to a piping bag. To do this, line a 1-gallon ziplock over a tall bowl or large measuring cup. Pour the egg cake mixture into the bag. Carefully cut off the tip of the bag when you’re ready to pour the mixture.
- One at a time, place a parchment square in a muffin tin and press it down to fill the muffin cup. Pour in the batter until it just reaches the top of the muffin tin. Repeat with the remaining papers and batter.
- Bake for 18 to 20 minutes, until the tops are golden brown. To test doneness, insert a toothpick to the center of the cake and it should come out clean.
- Once done baking, carefully remove the cakes from the muffin tin and lay them on the side on a wire rack. This step will help the cakes cool without deflating too much. (*Footnote 3)
- The cakes will weep, but to avoid full sinkage it is recommended that you take them out of the muffin tin and lay them on their side to cool.
- Enjoy the cakes once cooled.
Storage
- To store the leftovers, wait until the cakes cool completely, then transfer them to an airtight container. Store them in the fridge for up to 3 days. The cakes taste best freshly baked, but they will retain a very good texture for the first 1 to 2 days in the fridge, then they will gradually lose moisture.
Notes
- The lemon juice (or cream of tartar) acts as a stabilizer and adds a very mild zing to the egg cakes. It’s OK if you skip it but it’s highly recommended.
- It’s important to use parchment paper instead of muffin cups, because the egg cakes will rise until very tall and regular muffin cups won’t be able to hold the cakes.
- Depending on the size and shape of your muffin tin, the recipe will yield 9 to 12 cakes.
Nutrition

Did you make this recipe?
I’d love to hear how it turned out for you! Please take a moment to leave a 5-star rating ⭐️ and share your thoughts in the comments further down the page. It really helps others discover the recipe too.
João Félix
Interesting. Here in Northeast Brazil, there is a savory version of this recipe that uses fine cassava flour instead of wheat flour. Some people even add dried shrimp or a saltier protein to enhance the flavor.
What a small world, hahaha.
Saskia W.
Hi Maggie, how might I adapt this recipe to make it in a single baking dish / cake / loaf pan, instead of as individual muffins? Hope to hear from you. Thank you!
Maggie Zhu
I haven’t tried it but I’m worried the cake texture is too soft to support itself. If you use a large pan, the outside part might cook too fast and the the middle part undercooked. Also because the structure of these cakes are so loose, they will collapse a bit once baked. When using a larger pan it’s just gonna deflate too much to have a good texture. You can still try it, but I would use a larger baking dish or cake pan so the batter won’t raise too high. The baking time should remain similar but it’s the best to observe the cake and test the doneness using the toothpick method.
Kinny
Hi Maggie,
Thank you for this recipe! I’m so happy to have stumbled across this recipe! The cakes came out fluffy, spongy, eggy, and just absolutely divine. I followed every step to the T except for the vanilla part. I love vanilla flavor so I just added a full teaspoon of vanilla extract. One thing I was disappointed about was the color of the cakes. It came out a very pale yellow even though I baked it for the full 20 minutes. Anyways, I love how clear the instructions and pictures were and the instructions were written for people that don’t own a kitchen scale haha much appreciated! I made these for my mom. She felt like she was at a Chinese bakery. Especially with the cool paper cups. Can’t wait to make these again 🙂 Best regards
Maggie Zhu
Hi Kinny, I’m happy to hear you like the recipe! As for the color, my previous gas oven runs pretty hot and often finicky, so my cakes turned out darker. If you’re making it again, maybe you can bump up the temperature for a bit (like 25 F). I wouldn’t bake it for longer just for the color, because it might risk the cake to dry out.
Jo
Fantastic recipe! Everyone was very impressed and were raving about the texture. I will definitely keep this recipe, thank you!
Rosalie Jiang
I made these the other day and they were so easy and yummy! The taste was very eggy and not too sweet, and they really reminded me of the freshly baked egg cakes we used to get on the streets of China. My cakes did sink a lot as they cooled, resulting in a denser texture, but they were still very delicious.
Jo
Fantastic, thank you for this recipe! Such a light and fluffy texture with a neutral but delicious taste. I couldn’t get my egg whites to stiff peaks, but the cakes worked wonderfully. If anyone is curious, I used Silk unsweetened coconut milk and it was fine. Everyone said this was a keeper recipe, thanks so much!
Colin
Absolutely deliciously the real thing. Spouse was over the moon! The paper thing was a bit tricky at first, but got the knack of it now.
Julie
Hi! Tried making this today and thought it was a great recipe – my mom loved it. Was wondering why mine was a little on the denser side – it wasn’t porous like yours. Do you know if I need to beat the egg whites longer? Thanks.
Arnold D. Veenhoff
I made these cakes today, although with some minor alterations. Instead of using the baking paper, I coated the muffin tin with butter and some ‘paneermeel’ (the Dutch word for a very fine variety of Panko). The cakes came out of the tin pretty easy. I didn’t have any neutral oil at hand, so I used melted unsalted butter instead. Finally, as I didn’t have cake flour, I used all-purpose flour and added half a teaspoon of baking soda and half a teaspoon of baking powder. My cakes tasted very good but appear to be slightly less fluffy and hence, less high than yours. Could that be the result of the different flour? But, anyway, thanks for the recipe, I never made such cakes before and will certainly make them again.
McKlem
I saw this on the IG feed this week and had to make them. We get bigger and sweeter versions of this sponge cake at Chinese bakeries all the time. This is better–not as sweet (but definitely a dessert/snack) and the texture is so much finer and lighter. My very picky teenager loved them.
I made two changes to the recipe. After measuring out the ingredients, I beat my egg whites first. I have one set of beaters, and I didn’t want to have to worry about scrubbing them after mixing the yolks, etc. because one speck of leftover batter can doom your egg whites. Second, I skipped the piping bag/ziplock and poured the batter from a large measuring cup. I only made a half a batch so it was very doable. In terms of ingredients, I used half-and-half because that’s what i had and cream of tartar. SO GOOD!
Emma
Hello! I was looking at the recipe to make sure I had all the ingredients, but I didn’t see how much cornstarch is needed. What is the measurement for that?
Thank you!
Maggie
Sorry about that! Just updated the recipe with the cornstarch amount. It’s 9 g (1 tablespoon).
Marijke
My mom used to make this, but made it more like a pancake. We lived in Indonesia for many years when I was little and I wonder if it was a take on your recipe, since there was a large Chinese influence in the Indonesian dishes. These look absolutely scrumptious and I will have to make these, soon.
Claudette de Jonge
Hi Maggie,
It doesn’t say when, where and how much cornstarch is needed in this recipe!
Hope to hear from you soon.
Best regards,
Claudette
Maggie
Sorry about that! Somehow it got lost when I did the copy paste.
Just updated the recipe and now it’s correct. The cornstarch amount is 9 g (1 tablespoon).