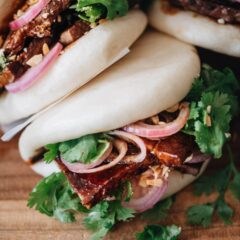
Gua Bao (Taiwanese Pork Belly Buns, 割包)
Gua Bao is a dim sum classic featuring delicious braised pork belly stuffed into fluffy bao buns for a tasty traditional treat! {Gluten-Free Adaptable}This recipe makes 10 appetizer-sized buns or 5 bigger, meatier buns.To make the dish gluten free, use dry sherry instead of Shaoxing wine. And use tamari to replace the soy sauce. Note, the finished pork will have a lighter color if you use tamari.
Ingredients
Pork
- 1 lb pork belly (*Footnote 1)
- 1 tablespoon peanut oil (or vegetable oil)
- 4 cloves garlic , smashed
- 2 green onions , knotted
- 3 slices ginger
- 1 star anise
- 1 cinnamon sticks
- 6 dried Chinese chili peppers
- 3 tablespoons Shaoxing wine (or dry sherry)
- 2 tablespoons light soy sauce (or soy sauce)
- 1 tablespoon dark soy sauce (or soy sauce)
- 1 tablespoon brown sugar (or regular sugar)
- 1/2 teaspoon white pepper
- 3 cups water
Buns
- 5 to 10 homemade steamed bao buns (or store-bought buns) (*Footnote 5)
- Homemade pickled shallots (or Chinese pickled mustard greens) (*Footnote 6)
- 1/4 cup peanuts , crushed
- 1/4 cup cilantro , chopped
Instructions
- (Optional) If you’re making my Gua Bao Bun recipe, cook the pork during the first rise of the dough. Shape the steamed buns while the pork is cooking. Then steam the buns after the pork belly is cooked.
- Heat a large skillet (*Footnote 2) over medium-high heat and add the oil. Once the oil is hot add the pork belly. Cook on both sides until the edges just turn golden, then transfer to a plate.
- Add the garlic, green onions, and ginger to the same skillet. Stir to release the fragrance, about 1 minute. Add the star anise, cinnamon, and chilis. Stir and cook for another 30 seconds.
- Pour in the shaoxing wine, scraping the bottom of the pan with a wooden spatula to release the brown bits. Then add the light soy sauce, dark soy sauce, and sugar. Stir to mix well.
- Add the browned pork back back to the pan, flipping once to coat the pork with the seasonings. Add the white pepper and water. Bring to a boil, then reduce to a simmer. Braise, covered, for 1 to 1.5 hours, flipping occasionally, until the pork turns tender but not to a degree that it falls apart.
- Once the pork is done, remove the pork from the pan and place it onto a big plate. Cover with plastic wrap to prevent from drying out.
- Add a mesh strainer over a tall cup (or an oil separator), strain the braising liquid and discard all the solid spices. Use a ladle or big spoon to skim the fat off the top and discard (*Footnote 3). Once you’ve removed most of the oil, return the liquid to the pan. Cook over medium-high heat and let the broth reduce until thickened, 10 minutes or so. (*Footnote 4)
- Slice the pork belly into 2.5” (6 cm) pieces and add it to the reduced sauce. Flip a few times to coat the pork, then transfer the pork to a serving plate with the remaining sauce on the side in a small bowl.
Assemble
- Take a bun and add 2 to 3 slices of pork, some pickled shallots, a sprinkle of crushed peanuts, and a few sprigs of cilantro. Drizzle some extra sauce over the filling.
Notes
- I used thinly sliced slabs, similar to bacon, and braised it for 1 hour. Alternatively you can use a bigger cut and braise it for 1.5 hours or until tender, slice it into bite-size pieces after braising, then coat it with the reduced braising liquid. (see the cooking video for more details on how to use a regular cut of pork belly)
- I prefer to use my 11” frying pan for this recipe, so all the pork belly pieces can be submerged in the braising liquid. If you use a different cut of pork belly, you might need to use a smaller pan or a dutch oven so the braising liquid can cover most of the pork.
- Do not pour the discarded oil (mostly pork fat) down your drain. It will solidify in cold water and clog your drain. Pour the oil into a small bowl and let it cool in the fridge until solidified, then throw it into the garbage.
- Keep an eye on the sauce while reducing it and avoid overcooking. The sauce will thicken further once cooled, so it’s ready once it’s thick enough to coat the back of a spoon.
- This recipe yields enough filling for 10 gua bao if you stuff 2 pieces of pork in one bun. You should double this recipe if you prefer a slightly meatier result and intend to use 3 pieces of pork per bun and still make 10 buns.
- Although Chinese pickled mustard greens are commonly used in traditional gua bao recipes, I highly recommend the homemade pickled shallots. They add a more refreshing taste and texture that pair very well with the fatty pork.
- The nutrition facts are calculated based on 1 of the 6 servings created by this recipe without including the steamed buns. You can refer to my homemade bao bun recipe for that nutrition information.
Nutrition
Serving: 1serving, Calories: 257kcal, Carbohydrates: 7.4g, Protein: 16.2g, Fat: 18.2g, Saturated Fat: 5.6g, Cholesterol: 54mg, Sodium: 409mg, Potassium: 277mg, Fiber: 0.7g, Sugar: 3.9g, Calcium: 30mg, Iron: 1mg