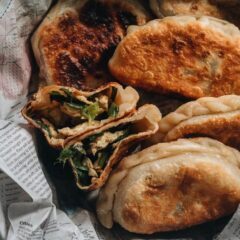
Chinese Chive Pockets (韭菜盒子, Chinese Chive Dumplings)
These Chinese Chive Pockets make a perfect snack. The super crispy and thin dough is stuffed with a hearty, savory filling made with Chinese chives and scrambled eggs. They’re easier to make than potstickers and have all the goodness that dumplings have, only more satisfying!
Ingredients
- 3 to 4 tablespoons peanut oil (or vegetable oil, to fry the pockets)
Dough
- 2 cups (300 g) all-purpose flour
- 1 teaspoon salt
- 1/2 teaspoon sugar
- 3/4 cup (180 ml) water
- 2 teaspoon peanut oil (or vegetable oil)
Filling
- 4 large eggs
- 2 teaspoons Shaoxing wine (or dry sherry, or chicken stock)
- 1 teaspoon salt , divided
- 1/4 cup papery dried shrimp (Optional)
- 2 tablespoons peanut oil , seperated (or vegetable oil)
- 1/2 lb (225 g) chinese chives , cut into 1/4” (0.6 cm) pieces
- 2 tablespoons oyster sauce
- 2 teaspoons sesame oil
Instructions
Dough
- In a large bowl combine the all-purpose flour, salt, and sugar. Stir with a fork to mix well.
- Microwave the water to approximately 180 degrees F (80 C). It should be too hot to touch but not boiling.
- Slowly add the hot water into the flour mixture, stirring with a fork to mix the water into the flour.
- Once all the water is added, work the water into the flour until it forms large doughy flakes without any dry flour left. Feel the flakes with your hand. It should be quite firm and not too soft. If there’s still a lot of dry flour left, add 1 more tablespoon of water.
- Add the oil. Mix and knead with your hand until it forms a dough ball.
- Transfer the dough ball onto a clean working surface. Knead by hand for 5 to 8 minutes, until the dough becomes firm. It is OK if the surface is not smooth.
- Return the dough to the bowl and cover with plastic wrap. Let rest for 30 minutes.
Filling
- Prepare the filling while the dough rests. Combine the eggs, Shaoxing wine, and salt in a medium-sized bowl. Whisk until evenly mixed.
- Heat 1 tablespoon of oil in a medium-sized pan over medium heat until hot.
- (Optional) Add the dry shrimp. Cook and stir until it turns golden brown, 1 minute or less.
- Add the egg mixture. Stir with a spatula to scramble the eggs and cut them into smaller pieces. Cook until the eggs just begin to firm up. Transfer to a plate to cool.
- Add the chives into a large bowl. Add the remaining 1 tablespoon of peanut oil. Mix with a spatula until the chives are evenly coated with a thin layer of oil.
- Once the eggs are cooled, add them into the bowl with the chives. Add the oyster sauce and sesame oil. If you aren’t using the papery dried shrimp, add 1/2 teaspoon salt into the mixture.
Assemble
- Once the dough has rested, the surface should become smoother and the texture softened. Divide the dough into two even pieces using a knife of dough cutter. Work on the dough one piece at a time. Place one piece back into the bowl and cover with plastic wrap.
- Roll the dough on the working surface until it forms a ball. Cut the dough in half. Roll each piece into a long log, then divide it into 3 even pieces.
- Add a small spoon of oil onto your working surface and use your hand to grease the surface. It prevents the dough from sticking to the surface.
- Work on the dough one piece at a time. Roll the dough with both of your hands until it forms a ball.
- Press the dough with your hand, then roll it out into a 6” (15 cm) disk.
- Use a measuring cup to scoop 1/4 cup of egg-chive filling, press it down with your hand, and add more filling so it fills the cup tightly (very important). Add the filling onto the center of the rough disk. Fold the dough over it to create a half moon. Gently use your hand to press the filling to even it out.
- Seal the edges of the dough together by gently pressing the dough and pressing out as much of the air bubbles as you can.
- Crimp the edges by folding the excess dough together along the edge using your hand, one finger width at a time, until it forms a pattern. Cut off any extra dough at the end and discard it. If you don’t know how to crimp the edges, you can simply press the dough together so it won’t break apart during cooking.
Cook
- Heat 1 to 2 tablespoons of oil in a large nonstick frying pan over medium heat until hot. Pan fry the Chinese chive pockets until the bottom turns golden brown, 2 minutes or so. Turn to the other side and fry until golden brown. If the pan starts to smoke, turn to medium-low heat. If your chive pockets are thick, you can also stand them upright in the pan to fry the edge.
- Once done, transfer the chive pockets to a big plate. Serve hot with Chinkiang vinegar (highly recommended) or dumpling sauce. You can add soy sauce to the vinegar if you think the pockets are not salty enough.
Storage and reheating
- To store the chive pockets, place in a ziplock bag, using parchment paper to separate the pockets. Squeeze out as much air as possible, and seal the bag. Freeze them for up to 2 months. To reheat frozen pockets, you don’t need to thaw them. Cook them in the pan just like if you were making fresh ones, except that you’ll need to cover the pan and add a splash of water while heating. Once heated through, open the lid and cook a bit longer to crisp up the surface.
Nutrition
Serving: 1pocket, Calories: 153kcal, Carbohydrates: 17.1g, Protein: 4.9g, Fat: 7.3g, Saturated Fat: 1.5g, Cholesterol: 62mg, Sodium: 431mg, Potassium: 101mg, Fiber: 1g, Sugar: 0.7g, Calcium: 30mg, Iron: 2mg