Thanks, I’m sending it over now.
Check your inbox for the saved recipe. When you make it, I’d love for you to leave a rating and let me know how it turned out; I always enjoy hearing from you directly!
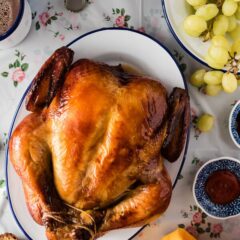
The Best Cantonese Roast Chicken (广式烧鸡)
This Cantonese roast chicken tastes even better than one at a good restaurant. The skin is truly crispy and the meat so moist and tender. Want to to cook a perfect Asian style chicken in the oven? Look no further!
Ingredients
- 1 (4 to 5 pound / 2 kg) whole chicken
Marinade
- 4 big cloves garlic , sliced
- 1 thumb ginger , sliced
- 1/2 cup soy sauce
- 1/4 cup oyster sauce
- 2 tablespoons Japanese sake (or Shaoxing win, or dry sherry)
- 2 tablespoons sugar
- 1/2 teaspoon salt
- 1/8 teaspoon freshly grounded black pepper
Instructions
- Rinse chicken with tap water and pat dry with a paper towel.
- Combine all the ingredients in a bowl and mix well.
- Transfer the chicken to a gallon-sized Ziplock bag, legs up. Add half the marinade into the cavity of the chicken. Pour the rest of the marinade onto the chicken skin. Seal the bag halfway across. Try to squeeze out as much air as possible. Seal the bag. Rub chicken through the bag to make sure the marinade and herbs are evenly dispersed.
- Place chicken in fridge for 24 to 48 hours (*footnote). Flip once during marinating.
- On the day of cooking, place a cooling/roasting rack over a baking sheet.
- Transfer the chicken from the bag to a large plate. Discard marinating liquid and all the herbs. Make sure the cavity of the chicken isn’t holding any liquid. Place the chicken onto the roasting rack, breast side up.
- Place the baking sheet near an AC vent or in front of a fan. Let the bird air dry completely. It will take at least 4 hours if you don’t use a fan. To speed up the process, I sometimes use a hair dryer to dry the chicken. You can also place the chicken in the fridge to dry, but it takes longer.
- The surface of the chicken must be completely dry in order to yield crispy skin after baking. When the chicken is ready to bake, the surface won’t be shiny, with almost a leathery feel when touched.
- Preheat oven to 400 degrees F (200 C).
- Line the baking sheet with aluminum foil to catch the chicken grease. Place the roasting rack on top. Spray a thin layer of oil onto the roasting rack. (*see footnote 2)
- Tie chicken legs together with kitchen twine. Spray a thin layer of oil onto another sheet of aluminum foil. Cut foil into small squares and wrap around the end of the chicken legs and wings tips. (*see footnote 3)
- Bake on the lowest rack in the oven for 30 minutes. Rotate chicken (don’t flip). Bake for another 30 minutes. Rotate again. Continue baking until the thermometer reads 165 F (74C) when probing into the thickest part of the leg. It takes me 1 hour and 30 minutes in total to roast a chicken from Costco (about 5 pounds).
- During the final hour of baking, check on the chicken every 10 to 20 minutes. When you notice that any part of the chicken is already browned, cover that part with aluminum foil to prevent it from burning. If you think this is too much trouble, you can simply cover the whole chicken with a large piece of foil when most parts are nicely browned.
- When the chicken is cooked through, let cool for 15 minutes before slicing.
- Serve chicken by itself as a main. Or you can serve it with sriracha, plum sauce, or soy sauce.
- To reheat leftover chicken, my favorite way is to cook it with a bit of oil on the stove top. The chicken will get nicely charred and heat up in a few minutes without drying out (which happens if you reheat it in the oven).
Notes
- I highly recommend you marinate the chicken for at least a day and a half (start marinating in the evening on day 1, take out to dry around noon on day 3, cook in the late afternoon on day 3). The seasoning will be fully absorbed by the chicken and the whole bird will be much more flavorful.
- I forgot to spray oil a few times but the chicken still came off the roasting rack without any problem. Do this if you can remember, just in case.
- The aluminium foil prevents the thin parts of the chicken from burning. By spraying oil onto the foil, the chicken skin won’t be torn off when removing the foil after baking.