Chinese Coconut Buns (Cocktail Buns)
These Chinese coconut buns use an easy milk bread dough to create an extra light and fluffy texture and are filled with a rich buttery coconut filling that is just like the ones made by Chinese bakeries. They are a perfect weekend project to spice up your afternoon tea. These coconut buns are freezer-friendly, too, so you can make them ahead and serve them later. {Vegetarian}
Servings: 12 to 16 buns
Ingredients
Dough
- 260 ml (1 cup + 1 tablespoon) milk , heated to 110°F / 43°C
- 1 1/2 teaspoons (6 g) active dry yeast
- 400 g (2 3/4 cups) bread flour
- 50 g (1/4 cup) sugar
- 1 g (1/4 teaspoon) salt
- 40 g (3 tablespoons) butter , melted
- 1 large egg
Filling
- 40 g (2/3 cup) unsweetened shredded coconut
- 85 g (6 tablespoons) butter , melted
- 30 g (1/4 cup) dry milk powder
- 50 g (1/4 cup) sugar
- 20 g (2 tablespoons) all-purpose flour
- 1 g (1/4 teaspoon) salt
Topping
- 21 g (1 1/2 tablespoons) unsalted butter , melt
- 18 g (2 tablespoons) all-purpose flour
- 10 g (1 tablespoon) confectioner’s sugar
Egg wash
- 1 large egg
- 1 tablespoon heavy cream (or milk)
- Toasted sesame seeds for garnish (Optional)
Instructions
To make the dough
- Combine the warm milk, a pinch of sugar (from the sugar you plan to use in the dough), and dry yeast in a small bowl. Set aside for 5 minutes for the yeast to activate. When it’s ready, the yeast should be bubbly.
- Add the flour, sugar, and salt to the bowl of a stand mixer and create a well in the center. Pour the activated yeast, melted butter, and egg to the well. Attach the dough hook. Mix on low until a shaggy dough begins to form. During mixing, stop the mixer and scrape the flour from the wall of the bowl if needed.
- Turn the speed to medium (setting 4) and knead for 15 to 20 minutes, until smooth and elastic. Observe the dough during the process. If the dough is too wet and cannot be gathered by the dough hook, sprinkle some flour, 1 teaspoon at a time, until the dough comes together. If it’s too dry, you can add a bit more milk. This is a wet dough. And it’s normal to have a small amount of dough stick to the bottom of the mixing bowl the whole time.
- Spray or grease a large bowl with a thin layer of oil (or butter).
- Once the dough is ready, gather it into a ball and place in the oiled bowl. Cover with plastic wrap. Rest until doubled, about an hour or so (It can take anywhere from 45 to 90 minutes depending on heat and humidity).
To make the filling
- Add all the filling ingredients into a medium-size bowl. Mix with a spatula until crumbly. You should be able to lift and shape the filling using your hands. If it’s too crumbly and dry to form, add a bit of melted butter. Set aside. (*Footnote 1)
Roll out the dough & 2nd rise
- Punch the fully risen dough down to deflate it. Transfer it to a clean working surface and knead briefly, until it returns to its original size.
- Cut the dough into 12 or 16 even pieces (*Footnote 2). You can use a scale to weigh each piece of dough so the buns will come out perfectly evenly sized. For 12 buns, it’s 65 g per piece or 49 g per piece if making 16 buns. Immediately cover all the dough with plastic wrap to prevent it from drying out.
- One piece at a time, pull and pinch the dough together at the top until the dough is rounded. Flip the piece so that the pinched part of the dough faces down on the working surface. Place your palm and fingers over the ball forming a domed cage. Roll the dough in small circular motions while applying light pressure to the dough. Set aside and cover again. Once all the dough is formed, let rest for 10 minutes before assembling.
Assemble the buns
- Line a 9” x 13” baking dish (*Footnote 3) with parchment paper.
- Flatten a piece of dough. Roll with a rolling pin into a 3”x5” (7cm x 12cm) oval shape, with thinner sides and a thick center. Scoop 1 heaping tablespoon of filling (if making 12 buns, use 1 scant tablespoon if making 16 buns). Place it in the middle of the dough (*Footnote 4). Bring up all the edges of the dough to gather in the center, around the filling. Pinch all the dough together to seal the bun, forming an oval-shaped bun. Place on a parchment-lined baking tray and cover with plastic, repeat with the remaining buns.
- Once all the buns are formed, let rest for another 30 to 40 minutes. While the buns rise, preheat the oven to 350°F (176°C) and prepare the topping.
Prepare the topping
- Combine the topping ingredients in a small bowl. Mix until it forms a smooth paste. Transfer it to a small ziplock bag and press it towards one corner and squeeze out as much air as possible. Seal the bag, and cut 1/4” (6mm) of the tip off.
Prepare the egg wash
- Make the egg wash just before baking by combining the egg and heavy cream in a small bowl. Stir to mix well.
Bake the buns
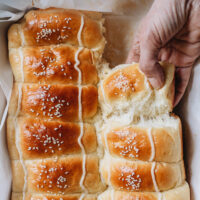
- Once the buns have finished their second rise, brush gently with the egg wash. Pipe two strips across the short ends of the buns. Sprinkle with the sesame seeds if using. Bake for 20 minutes, or until golden brown. Transfer the dish to a wire rack to cool.
- Serve the buns warm or at room temperature.
Store and reheat
- Once the buns have cooled off completely, place them in a ziplock bag or airtight container. Store in the refrigerator for up to 3 days, or in the freezer for up to 3 months.
- To reheat the buns, you can either microwave them or bake them in a 300°F (148°C) oven until warmed throughout, 5 minutes for refrigerated buns or 10 to 15 minutes for frozen ones.
Notes
- If your room is very cold, the filling can become very firm and difficult to shape. In such cases, I usually place it in a warm spot such as on my radiator. It will loosen up the butter so it’s easier to work with as you shape the buns.
- I recommend making 12 buns if using a baking dish. I made 16 when I shot the images and found the buns got squeezed together too much. If using a baking sheet, either 12 or 16 works. I personally prefer to make a batch of 16 buns for a smaller serving size.
- You can use a regular baking sheet as well. The buns will come out more separated, with only a small part attached together.
- The filling should be crumbly and stiff, and you should be able to wrap it easily. If you’re looking for the perfect shape, you can form the filling into a log before wrapping.
Nutrition
Serving: 1serving, Calories: 203kcal, Carbohydrates: 28.4g, Protein: 4.5g, Fat: 8.1g, Saturated Fat: 5.1g, Cholesterol: 30mg, Sodium: 91mg, Potassium: 53mg, Fiber: 0.9g, Sugar: 8.1g, Calcium: 49mg, Iron: 2mg