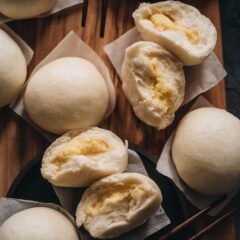
Chinese Steamed Custard Buns (nai wong bao, 奶黄包)
Steamed custard buns are a dim sum classic, but I found them to be a perfect dish for holiday gatherings and parties as well. Made with a yeast dough and steamed, the buns have a super soft and spongy texture with a smooth surface. The custard filling is creamy, fragrant, and sweet. It has a melt-in-your-mouth texture when warm.
Ingredients
Dough
- 125 g (1/2 cup) water , warm
- 7 g (1 packet / 2 teaspoons) active dry yeast
- 60 g (4 tablespoons) sugar
- 250 g (1 2/3 cup) cake flour (or low gluten flour)
- 7 g (2 teaspoons) baking powder
- 7 g (1 1/2 teaspoons) shortening
Filling
- 20 grams (3 tablespoons) cornstarch
- 3 grams (1 teaspoon) all-purpose flour
- 56 grams (1/4 cup) granulated sugar , seperated
- 3 large Pete and Gerry’s Organic Eggs egg yolks
- 240 grams (1 cup) whole milk
- 15 grams (1 tablespoon) butter
- 1/4 teaspoon vanilla extract
Instructions
Prepare the dough
- Add the water into a small bowl and warm to approximately 100-110°F (38°C), about 30 seconds in the microwave. The water should be warm, just a bit above body temperature. Add the sugar and active dry yeast. Let sit for 5 minutes so the yeast will activate.
- While the yeast activates, add the cake flour and baking powder into your mixer bowl.
- Once the yeast is activated, you should see bubbles on the surface of the mixture. Pour it into the mixer bowl. Mix with a spatula a few times, until the liquid is just absorbed by the dry ingredients.
- Install the dough hook on your mixer. Start at low speed, then gradually increase to speed setting to 6 out of 10. Knead for 10 minutes, until the dough is very smooth. Stop the mixer in the middle and scrape the dough from the sides of the bowl.
- Add the shortening. Knead on level 6 for another 5 minutes. The dough should be soft, smooth, and easily lift from the bowl without sticking to your hands.
- Lightly grease a large bowl with butter or oil spray. Transfer the dough into the bowl. Cover the bowl with plastic wrap and let it rest in a warm part of your room, until the size triples, about 2 hours.
Prepare the custard
- Prepare the custard while the dough is resting. Mix the cornstarch, all-purpose flour, and half of the sugar together in a small bowl.
- Place the egg yolks in a large bowl. Stir a few times to mix the yolks.
- Add the milk and the remaining half of the sugar into a small saucepan. Heat over medium heat. Stir occasionally to dissolve the sugar completely. Cook until it reaches about 120 °F/ 49 °C (no more than 150 °F / 65 °C). You might see a few bubbles here and there. If the milk starts foaming, it’s too hot.
- While the milk starts to get warm, add the dry ingredients (from step 1 of the custard) into the bowl with the egg yolks. Whisk until it forms an even paste. Do not add the dry ingredients too early, because the sugar will change the texture of the eggs.
- Add the warm milk into the egg yolk mixture, about 1/4 cup at a time. Whisk constantly until the milk is fully incorporated into the paste. Continue to add more milk, a 1/4 cup at a time and continuously stirring, until it forms a thin, smooth mixture and all the milk is added.
- Return the mixture back to the pot (the one you used to heat the milk). Heat over medium low heat and stir constantly, until the mixture thickens, 5 minutes or so. Keep cooking and stirring, until you can draw a line on the bottom of the pot using a spatula. (Note, the custard will start to thicken suddenly, like a switch was flipped. So you should keep a close eye on it.)
- Remove the pot from the stove immediately. Add the butter and vanilla extract. Stir to mix well.
- Line a large, deep plate with plastic wrap. Place a large mesh strainer on top.
- Pour the custard into the lined plate through the strainer to smooth out the texture. Use a spatula to press the custard through the strainer if any lumps remain.
- Cover the custard with plastic wrap. Press the wrap against the custard, so it won’t form a skin once it’s chilled.
- Chill the custard in the fridge until it’s cooled, 2 hours or so. Or in the freezer for 30 mins.
Assemble
- Cut some parchment paper into 3” (7 cm) squares to hold the buns. You’ll need 16 squares.
- Punch the air out of the dough. Transfer it onto a lightly oiled working surface. Knead a few times to make the dough into a round ball. Divide the dough into 16 even pieces by cutting it into 2 even strips, then further cutting each strip into 4 small pieces. Each piece of dough should weigh 27 grams. Use your hands to roll and shape the dough pieces into dough balls.
- Wrap the buns one at a time.
- Flatten the dough ball using your palm. Use a rolling pin to roll a dough ball into a round disc that is thick in the middle and thin on the edges, about 2.5 to 3” (6 to 7 cm) in diameter. Carefully remove it from the surface and place it onto your palm.
- Place about a heaping tablespoon of custard onto the center of the wrapper. Press the custard into the dough to release any air bubbles within the custard. Use your other hand to gather the wrapper onto the top of the custard filling. The dough sheet will start to form pleats and retain its round shape.
- Once done, place the custard bun onto one of the cut parchment squares, pleated-side-down, then place it on a plate. Loosely cover it with plastic wrap to prevent them from drying out. Repeat the process to wrap the rest of the buns.
- Set a stopwatch (or timer) after wrapping the first bun, to keep track of the resting time. You need to rest the buns for 20 to 30 minutes before steaming.
Steaming
- Depending on the size of your steamer, you might need to steam the buns in batches. What I usually do is prepare the steamer after wrapping half of the buns, so some of them are ready to be cooked as you work on the rest.
- To prepare the steamer, add about 3” (7 cm) of water to the pot and heat over medium-high heat until the water starts to boil. Place the rested buns onto the steamer rack, leaving at least 2” (5 cm) in between, because the buns will expand a lot as they cook.
- Cover and let steam for 10 minutes. Once done, remove the steamer rack and place it onto a trivet. Uncover the steamer rack carefully. Let the steam out and then transfer the buns onto a serving plate. Let the buns cool for 5 minutes before eating.
- Cook the rest of the buns using the same method.
Serve and store
- The custard buns taste best when they are still warm, but you can serve them at room temperature, as well.
- Once the buns have cooled completely, place them in a sealed container at room temperature, if serving the same day.
- You can store the buns for 2 to 3 days in the fridge. To serve, heat up the buns until warm using the microwave.
Nutrition
Serving: 1serving, Calories: 121kcal, Carbohydrates: 21.5g, Protein: 2.8g, Fat: 2.7g, Saturated Fat: 1.2g, Cholesterol: 43mg, Sodium: 14mg, Potassium: 95mg, Fiber: 0.5g, Sugar: 8.1g, Calcium: 43mg, Iron: 1mg