Thanks, I’m sending it over now.
Check your inbox for the saved recipe. When you make it, I’d love for you to leave a rating and let me know how it turned out; I always enjoy hearing from you directly!
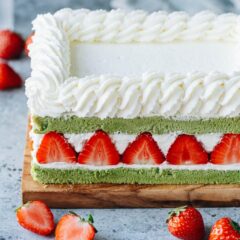
Matcha Cake
A matcha cake recipe that creates feathery light and moist cake, with an earthy matcha flavor balanced with strawberries and whipped cream that are not too sweet. The cake stores well, can be prepared ahead, and holds up well during transportation, making it perfect for your next holiday gathering. {Vegetarian}
Ingredients
Cake
- 80 g (1/3 cup) whole milk
- 50 g (3 1/2 tablespoons) unsalted butter
- 1 teaspoon vanilla
- 1/2 teaspoon sea salt
- 70 g (1/2 cup + 1 teaspoon) cake flour
- 5 g (2 teaspoon) matcha powder
- 4 large egg yolks
- 4 large egg whites
- 1/4 teaspoon cream of tartar (or 1/2 teaspoon white vinegar)
- 85 g (6 tablespoons) caster sugar (or regular sugar)
Strawberries
- 12 oz to 1 lb (340 g to 450 g) strawberries
Whipped Cream Frosting
- 4 tablespoons cream cheese
- 4 tablespoons confectioners sugar
- 473 g (1 pint) heavy whipping cream
Instructions
Prepare the cake
- Cut a piece of parchment paper to fit the bottom of a quarter sheet pan (13”x9”) and line the pan with it.
- Preheat the oven to 325°F (160°C).
- Combine the milk and butter in a medium-sized heatproof bowl. Microwave until melted. Add the vanilla and sea salt. Stir to mix well.
- Sift the cake flour and matcha powder into the mixture. Mix gently with a spatula until smooth.
- Add the egg yolks. Mix again until evenly combined.
- Add the egg whites and the cream of tartar into the clean mixing bowl of a stand mixer, or a clean bowl using a hand mixer. Beat at speed 4 until the egg whites are frothy. Slowly add the sugar while continuing to beat, until glossy and medium peaks form.
- Scoop 1/4 of the beaten whites out and add it to the yolk mixture, Fold using a spatula until smooth. Pour the mixture back into the egg whites. Continue to fold everything together until just smooth. Don’t overmix but also avoid leaving large pieces of egg white.
- Pour the batter into the lined sheet pan. Drop the pan from 5” (12 cm) onto the table twice to release any extra large bubbles.
- Bake 325°F (160°C) for 15 to 20 minutes. Test the doneness by gently pressing the cake, and it should slowly bounce back.
- Release the sides of the cake from the sheet pan using a sharp paring knife. Place a cooling rack over the cake. Wearing a pair of oven mitts or using kitchen towels, pat the baking sheet with a swift motion to flip the cake onto the cooling rack. Let it cool completely before cutting and decorating.
- Once the cake has cooled, place it back in the sheet pan by placing the pan upside down to cover the cake, then flipping it over. Use a sharp paring knife to divide the cake into 2 even pieces across the long side. Then slice off about 1/4” (0.5 cm) from the four sides to form a straight-cut cake.
- With a large enough cutting board (or a flat plate, or a cake stand), place it over the sheet pan. Flip it in a swift motion again to transfer the cake onto it. Set aside until you’re ready to decorate the cake.
Prepare the strawberries
- While the cake cools, select 8 to 10 medium-sized strawberries that are similar in size. Cut off the ends with the stems, then slice into halves (this is for the outside edges of the cake).
- For the rest of the strawberries, remove the stem then slice into three even pieces (this is for the inside of the cake).
Prepare the cream
- Add the cream cheese and the confectioners sugar into the clean mixing bowl of a stand mixer, or a bowl and use a hand mixer. Mix with a spatula until the sugar is mixed in.
- Add the heavy cream into the mixing bowl. Whip at medium speed until firm peaks begin to form, then stop immediately.
Decorate and assemble the cake
- Working on the bottom cake layer: Add a large dollop of the whipped cream onto the cake. Spread the cream with an offset spatula into a thin even layer across the top until the cream just comes to the edge.
- Creating the strawberry wall: Arrange the halved strawberries, stem-side down and cut side facing out, over the edge of the cake. Align the cut side of the strawberries as straight as the edge of the cake. There should be no gaps between the strawberries.
- Once the strawberry walls are created, fill the center with the strawberry slices.
- Put another large dollop of cream on top of the strawberries. Spread evenly and fill all the gaps both on top and on the sides of the cake.
- Gently place the top layer of the cake on top and line it up with the bottom layer.
- Add another dollop of cream onto the cake and spread again. Smooth out the sides of the cake.
- Fill the rest of the cream into a piping bag or ziplock bag with the corner cut off for decorating the top and/or sides if desired.
- You can serve the cake now or store it in the fridge for 2 to 3 days. To serve, slice the cake using a serrated knife or a sharp paring knife.
Storage
- Use a cake stand with a cover if you have it. Or choose a container (a tall baking dish works as well) that can fit the cake. Place the cake on the lid that comes with the container, then carefully lower the container so it covers the cake. Store it in the fridge for 2 to 3 days. The cream will stabilize once refrigerated and the cake will become easier to cut and transfer.
Notes
- Special tools (affiliate links): Quarter Sheet Pan (13”x9”) | Quarter Sheet Pan Liner | Electric Mixer (Stand or Handheld) | Offset Spatula | Piping Bag | Rectangular Cake Carrier (for storage and transportation)
Nutrition
Serving: 1serving, Calories: 346kcal, Carbohydrates: 24.7g, Protein: 8.8g, Fat: 24.1g, Saturated Fat: 13.4g, Cholesterol: 249mg, Sodium: 176mg, Potassium: 669mg, Fiber: 0.6g, Sugar: 15.4g, Calcium: 69mg, Iron: 2mg