Thanks, I’m sending it over now.
Check your inbox for the saved recipe. When you make it, I’d love for you to leave a rating and let me know how it turned out; I always enjoy hearing from you directly!
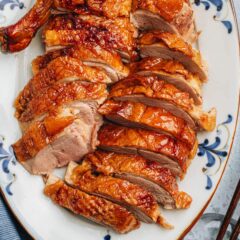
Chinese Roast Duck (烤鸭)
A foolproof Chinese roast duck recipe that does not require many special ingredients and still gets a great result with golden crispy duck skin and juicy flavorful meat. Very detailed pictures and a video are included to showcase how to make a restaurant-style roast duck in your own kitchen. {Gluten-Free Adaptable}
Ingredients
- 1 whole duck ,preferably Pekin duck, 3.5-4.5 lbs (1.6-2 kg) (*Footnote 1)
Dry Seasonings
- 1 teaspoon sea salt
- 1 teaspoon five spice powder
- 1 teaspoon sugar
Wet Seasonings
- 4 cubes red fermented tofu
- 2 tablespoons Shaoxing wine
- 1 tablespoon hoisin sauce
- 1 teaspoon oyster sauce
Whole Seasonings
- 1 star anise
- 1 green onion , cut into 4” (6 cm) long pieces
- 1 ” ginger , cut into large slices
Blanching
- 8 cups water
- 1/2 cup Shaoxing wine
- 1/2 cup honey (or brown sugar syrup, or maltose) (*Footnote 2)
- 1/2 cup Chinese red vinegar (or cider vinegar, malt vinegar)
Serving options
- Plum sauce
- Ginger scallion sauce
Special equipment
- 2 skewers (metal or wooden)
- Kitchen twine
- Pump with a fine tip , electric or hand pump (*Footnote 3)
Instructions
- To prepare the duck: First remove any giblets and neck pieces from the cavity, and tear off the excess fat found inside the bird. Next, remove the wings by cutting through the joints, but keep the drumettes on the bird. Remove any remaining pieces of feather with kitchen tweezers.
- Have the skewers ready within reach. Cut off two pieces of 2’ (60 cm)-long kitchen twine, and place them within reach.
- Seal the front of the duck: Threading a skewer through both layers of skin. Seal the top by tying twine under the skewer. The top must be sealed before adding the marinade.
- Add the marinade: Combine the wet seasonings in a small bowl and mash the fermented tofu to mix well. Add the dry seasonings into the duck cavity, using your hands to rub the cavity a few times. Add all of the seasonings, ensuring they are snug within the cavity. Carefully pour the wet seasonings into the cavity, making sure that they do not leak out of the duck.
- Seal the tail of the duck: To close the duck’s cavity, carefully thread a skewer through both layers of the skin, and tie twine under the skewer to seal the bird. It is best to hold the duck at an angle, so the wet seasonings do not escape the cavity.
- Pump the air under the duck skin: After the duck has been closed, place the duck breast side up. Insert an air pump with a fine tip where the leg meets the breast of the duck. Begin pumping air into the bird, and ensure that the skin is separated from the meat as much as possible. Switch to the opposite side to guarantee all the skin has lifted up from the meat. Then insert the tip from the top of the breast pointing to the leg direction, and pump again to lift the breast skin. Do the same with the opposite side. (*Footnote 4)
- To blanch the duck: Prepare a tray that can fit into your fridge. Line it with a wire rack. Add all the blanching ingredients into a big wok, dutch oven or a large pot. Bring all the blanching ingredients to a boil over medium-high heat. Turn to medium heat. Carefully lower the duck into the seasoned water. Ladle hot water and pour over the duck until the skin becomes tight and smooth, about 30 seconds.(*Footnote 5) Use a spider strainer to lift the duck and transfer it to the lined tray. If the duck is too heavy, you can also use a spatula to lift the tail end, then use your hands to lift the leg bones (they won’t be too hot).
- Rest overnight: Once the duck has cooled off slightly, transfer it into the fridge. Allow to marinate and air dry in your fridge for at least 24 hours before roasting. (*Footnote 7)
- To roast the duck: Preheat your oven to 450°F (232°C). (*Footnote 8) If your oven has convection, roast at 425°F (218°C) with convection instead. This helps the duck cook more evenly. Wipe the duck skin with a paper towel, to remove any oil on the surface.
- Roast at high temperature: Transfer the duck to the oven. Roast at 450°F (232°C) for a total of 20 minutes. After 10 minutes, rotate the duck around (180 degrees, don’t flip it), and cook for 10 minutes more.
- Roast at a lower temperature: Lower the temperature to 350°F (176°C) or 325°F (163°C) convection, and rotate the duck again. Roast for another 30 minutes in total if using a 3.5-4 lb (1.6-1.8 kg) duck. Rotate after 15 minutes. If your duck is bigger, add 10 to 15 minutes of cooking time for a 4-5.5 lb (2-2.5 kg) duck, or add 20 to 25 minutes for a 6-6.5 lb (2.7-2.9kg) duck. Rotate every 15 minutes to ensure even cooking. (*Footnote 9)
- Test the doneness: The duck should have developed a nice golden brown color. Make an incision with a paring knife poking through the thickest part of the breast meat, then press the skin. If the juice runs clear, it is cooked. (*Footnote 10) If the juice is red, keep cooking for another 10 to 15 minutes.
- Rest the duck: Once the duck is cooked, transfer the duck to your kitchen counter. Let rest for at least 40 minutes.
- Drain the duck: Once the duck has cooled enough to handle, prepare a big bowl. Untie the tail end and remove the skewer. Use a sharp knife to cut through the skin and remove the part where you sealed the duck, exposing the cavity. Very carefully lift the duck over the bowl to drain the liquid from the cavity, then remove any solid aromatics. The inside of the duck will be very hot and you should handle it very carefully. Then remove the twine and skewer from the neck area.
- Carve the duck: Carve the duck by cutting through the part where the leg meets the breast. Find the joint of the thigh bone and cut through it to remove the duck leg. Then find the joint of the drumstick and the thigh, cut through it. Then cut down the center of the breast to remove both breasts.
- Reheat the duck (Optional): If you’re not serving the duck immediately, or you accidentally get the duck skin wet when draining and carving the duck, I highly recommend this step. Heat your oven to 450°F (232°C). Place all the carved duck pieces onto a baking sheet lined with a wire rack, skin side up. Heat in the oven for 5 to 10 minutes, until the skin is crispy again. Slice the breast into 1/2” (6 mm) thick pieces, and place them on a platter with the legs and thighs.
- How to serve: Serve hot or warm with plum sauce or ginger scallion sauce.
Notes
- Do your best to source a Pekin duck, as these birds are smaller and ideal for roasting. If you can only find a regular duck, which is usually a Peking/Mallard hybrid, that will work as well.
- Traditionally maltose is used for roast duck. Maltose can be substituted with honey or a rich brown sugar syrup. To make brown sugar syrup, add 2/3 cup dark brown sugar and 1/3 cup water into a small pot. Heat over medium heat until simmering. Stir to fully dissolve the sugar.
- A bicycle pump with a sanitized tip gets the job done well. But if possible, an electric pump will be more efficient. If using an electric pump, make sure to lower the pressure first so it does not add so much pressure that it tears the skin.
- To get truly crispy skin, 100% of the skin must puff up above the meat. Insert the air pump tip into multiple locations to fully lift the skin up.
- Blanching the duck does not take much time, you are only trying to render some fat and make the skin supple, not cook the meat.
- Chinese red vinegar is traditionally used. The red vinegar can be substituted with malt or apple cider vinegar.
- Air drying is essential to crispy skin. Most Chinese restaurants air dry their ducks for a few days before cooking. Blanching helps to eliminate bacteria, so you can safely age the duck.
- Having a reliable oven temperature is essential to getting a good end result. It is highly recommended to use an oven thermometer to guarantee that the duck is cooking correctly.
- If your duck is heavier than 4 lbs (1.8 kg) you may need to cook it for longer than 60 minutes total, while if it is closer to 3 lbs (1.4kg) it will need only 50 minutes total. Any additional cooking should be done at 350°F (176°C)
- To determine whether the duck is ready, judge by whether its juice runs clear, and if its color is a deep brown. The duck meat should be very moist now and the part attached to the bone still a bit pink. As you rest the duck, the residual heat will keep cooking the inside a bit more.
- To make the dish gluten-free: Use dry sherry to replace Shaoxing wine. Make sure to use a gluten-free oyster sauce.
Nutrition
Serving: 1serving, Calories: 555kcal, Carbohydrates: 7.4g, Protein: 61.1g, Fat: 29.5g, Saturated Fat: 10.8g, Cholesterol: 230mg, Sodium: 437mg, Potassium: 670mg, Fiber: 0.5g, Sugar: 4.5g, Calcium: 36mg, Iron: 7mg