Pressure Cooker Curry Beef Stew (An Instant Pot Recipe)
The easiest and quickest pressure cooker curry beef stew recipe that yields the best results.
Ingredients
Bottom layer
- 1 can (14.5 oz / 411g) diced tomatoes
- 2 tablespoons Shaoxing wine (or dry sherry)
- 2 tablespoons light soy sauce (or soy sauce)
- 1 tablespoon ginger , minced
- 3 cloves garlic , minced
- 1 bay leaf
- 2 dried chili peppers
Middle layer
- 1/2 medium-sized yellow onion , sliced
- 1 lbs (450 g) beef chuck roast , cut into 1” (2 cm) cubes (*Footnote 1)
- 2 tablespoons tomato paste
Top layer
- 3 tablespoons curry powder (I used Madras curry powder)
- 1/4 teaspoon ground black pepper
- 1 tablespoon sugar
- 1 1/2 teaspoon fine sea salt
Serving
- Chopped cilantro or green onion for garnish
- 1 cup frozen green peas or chopped green beans (Optional)
Instructions
- Add all the ingredients listed under “Bottom layer” above into the Instant Pot. Stir to mix well.
- Spread the onion into a single layer on top of the Bottom layer. Add the beef chunks on top of the onion without overlapping. Smear tomato paste onto the beef as evenly as possible.
- Sprinkle all the “top layer” ingredients onto the beef as evenly as possible.
- Seal the Instant Pot. Set on Manual at high pressure for 30 minutes. Use natural release when done. (*Footnote 1)
- Taste the beef and adjust seasoning by adding more salt if needed. Remove the bay leaves and the chili peppers and discard them. Stir everything to mix well. You can store the beef curry in an airtight container in the fridge for 3 to 4 days, or serve directly. (*Footnote 3)
- (Optional) To add veggies to your curry, simply microwave some frozen green peas or green beans in microwave and add them into the curry. You can also turn on the saute function of your Instant Pot, add the veggies, and cook until they are done.
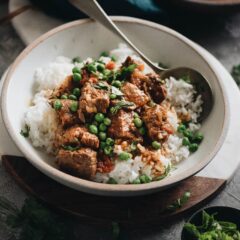
- Serve hot over steamed rice.
Notes
To make the dish gluten free, replace the soy sauce with tamari and use dry sherry instead of Shaoxing wine.
- Do not cut off and discard the fatty bits from the beef. Fat keeps the meat juicy while cooking and will melt into the sauce to create that velvety texture.
- Do not use quick release because it might cause splatter. The natural release process will also continue to cook the meat.
- The dish tastes wonderful when it’s fresh, but it tastes even better the day after, once the spices incorporate further into the sauce. It’d be a great idea to cook it on the weekend and use it as meal prep for the following week.
Nutrition
Serving: 4g, Calories: 481kcal, Carbohydrates: 14.9g, Protein: 32.4g, Fat: 32.6g, Saturated Fat: 12.7g, Cholesterol: 117mg, Sodium: 774mg, Potassium: 722mg, Fiber: 3.7g, Sugar: 7.6g, Calcium: 50mg, Iron: 5.8mg